While we are no longer making active post of Cricut projects on this blog as of 8/1/2013, we invite you to use it for continued die cut inspiration as we will leave the blog up for viewing. Happy Cricuting !

Showing posts with label Create a Critter 2. Show all posts

Monday, March 25, 2013

See through Easter Egg card


Hellow this is Terri from www.scrappinwiththebug.blogspot.com wishing you a very HAPPY SPRING. I know wehre I live it's ANYTHING but Spring here. It's cold, damp and possibility of snow.

So with that being said I figured I'd make a cute fun little spring/ Easter card. A friend of mine was making/selling those fun panaramic sugar eggs so this is where my inspiration came from.  On the inside of the egg she put a cute little egg and bunny w/ some grass. I thought I'd just make a fun bunny.

The Bunny is cut at 3" from Create a Critter 2 - I just love that cartridge it's just so fun. 
The Egg card was from Art Philosophy cut at 5" using the card function
The window opening also from Art Philosophy - I hid the inner egg line and then cut the vellum out so it would fit over the opening.
The grass is made from Easter 2010 cartridge - cut at 1.8"

I added a little tag - made from Emma with www.creativetimeforme.com 's mini tag die and mini tag sentiments.
I added a small flower brad.

I hope you enjoy it and

Happy Scrappin'


Designed by: Terri Szymanski
Cartridges used: Arts Philosophy, Create a Critter 2
Papers: We R Memory Keepers and bazzill pink, brown
Other Materials: My Creative Time's mini tag/ and die, brad.

Monday, February 25, 2013

BUZZZZZ Flower/Heart Wreath full of LOVE


Hi again this is Terri from http://www.scrappinwiththebug.blogspot.com/. I know,  I know Valentines is already over but I made this a couple of days ago for Valentines and it was just too fun not to share with you.

I used Arts philosophy cartridges and cut out different colors of flowers. I wanted purple, pink and dark purple. I cut the flowers at 2.5", on Font Heart 3 Shift function.
Depending on how full you want it to look and/or what the starting size is of your base you will need about 150-200 flowers. This specific project took 190.
I started with a Styrofoam core - in the shape of a heart. I painted it a soft pink so that way in case any areas were not filled in 100% it wasn't white.
 I then added the flowers. I added about 10 of the light purple, then did the same of the pink, dark and light again. Then I would add to the other side that way the "lines" were kept pretty straight. I used Scotch Quick dry adhesive to add the flowers. I worked allot in sections on this. I will admit this is a simple project but takes a few hours to make.

So since I like to share my tricks here are a few.
I have learned a few tricks for rolling the flowers  - so here goes maybe this will help you a little. Tip #1 - Use a  quilling tool to get them started
#2 - After you have rolled about 2 turns put a small dot of glue on the flower - I use Scotch Quick dry glue - then continue rolling the rest. This will keep the "bud" portion of the flower and not unroll allot.
#3 - When you get to the end put a little glue on the tail area - and then put the rolled flowers on the glue and let them unroll. Then hold and press.
#4 - DO NOT try to glue your flowers to the base until the GLUE HAS DRIED completely - especially if using a thin weight paper.
#5 When putting them on the base/wreath form - get them as close as you can together (makes it look full).

I used for the paper a simple paper pack from Michael's - it was just simple pinks, and purples. All of these papers were in the pack. The paper is 8 1/2 x11 and you can get 12 flowers off the one piece of paper.

While I loved the look of it with just the flowers I wanted to go a step further. I wanted a little "banner" so I used My Creative Time's heart die and cut them out in the bright pink - then I cut out  3/4" letters w/ shadow from Kate's ABC to form the word LOVE.

The adorable little bee's were cut at 2" from Create a Critter 2 cartridge again in the coordinating colors from the paper.
I then over lapped the hearts to each other and the bee a little - and just glued to the roses.
A little stickles to give the bee a cute little shimmer/glitter.
 
Here is the back - I only did 4 rows because I want this to lay flat against the door. I may/may not add ribbon - it will depend on what door I hang it on since it's not water proof I don't think I'll put on the front door.
 
Hope you enjoy and
 
Happy Scrappin'
 
 
Cricut Info & Supplies Used:
Designer :  Terri Szymanski
Cricut Machine: Cricut Expression
Cricut Images: Arts Philosophy <FONT> Shift Heart 3, Create a Critter 2 Bee cut at 2",  Kates ABC 3/4" letters.
Other Supplies Used: My Creative Time for me heart die, Stickles, Recollection paper pack, heart Styrofoam piece

Wednesday, February 6, 2013

Valentine Treats Layout

Hello!  Michele here from www.michelegreen.com.  I'm happy to be posting today!  I tend to scrapbook about a year behind so today's layout is of the preparations for last year's Valentine's Day.  My daughter really wanted to create homemade valentines so we opted to make "sour cream containers" filled with candy.  (Personally, I have no idea why these are called sour cream containers.  I have never seen sour cream like this.  I HAVE however seen juice popsicles like this.  In fact, we were always served those as a treat with our hot lunch when I was in elementary school.  Sour cream...) Anyway... :)

The layout:

I had one little hiccup in this process. I can't find the printed photos!  So here's one that will be printed and put into one of those two big open white spaces:
(Yes, that's me there on the left.)

Here is the layout I have created.  This one was pretty simple to do.  It started because I had a ton of leftover strips from making the containers.  What a perfect way to remember them by including those strips in the layout! I arranged them any old way across a plain white piece of cardstock.


From there, I added my Cricut cuts which were all from the Phrase keys of the Create A Critter 2 cart.
Valentine - 3.5"
Treat - 2.5" (The s is off another phrase so the font matched)
Hearts are all from the owl cut - ranging between 3" and 11"


Here is a close up of the journaling for you:

It was a really fun evening spent with my daughter and niece getting their valentine's ready.  Happy Valentine's Day to all of you reading this!


Saturday, February 2, 2013

Hey ya'll this is Trinity from trinityscraftingcreation.blogspot.com and today I have a valentines project that I had found on pintrest and wanted to remake it for a friend of mine for valentines day.
This was easier then I though it would be to bring it all together. I bought a 4 pack of those Starbucks coffee drinks that you can get at the grocery store and then got my hubby all wired up cause he had to drink all of them because I don't like cold coffee lol. I took some white spray paint and painted the carrier and the lids to the bottles and then when it all dried I used some of my valentines paper  from K&Company that I found at Michaels and cut 4 squares out at 3.5x5 and then cut 4 more smaller squares out at 3x4.5 but used the wavy blade on my trimmer to give it different affect. Then I took some plan pink cardstock and used my loop punch from Martha Stewart and made a boarder that I put around the box. I had to do 2 different pieces for that. I then cut out 2 hearts from CAC 2 from page 30 that were the accessory to the kola bear and those were cut at 2.5" and pop dotted those where the paper had meet each other so you couldn't see it. I also took some pink and red ribbon that I had and tied it up at the handle. Then I took some of her fav. candy and filled the bottles full and you would be amazed on just how much candy those little bottles hold...good thing I had bought the big bags lol. I appolize for the color...my lighting wasn't to good when I took these pictures, they are alot brighter colors in person.

Thank you so much for stoping by and looking. Hope you have a great weekend!

Sunday, December 30, 2012

Let It Glow

Hi There,

This is Yvonne from Ink-spirations. Hope everyone had a wonderful Christmas. My daughter came home so everything was great. Today I'll get to skype with my son and his family while they open Christmas presents! Isn't technology wonderful.

My project I'm sharing is actually decorating the tree with my son and family in 2011. I had visited early in November so I could be part of the decorating so they purchased an artificial tree.
It was my Grandsons first Christmas that he could really help with the decorating. It was so much fun.


The pattern paper was from a Christmas pack by The Paper Studio called Holiday Wonder. Remaining cardstock Bazzill. I had lots of picture as so created an illusion of how we used to hand our Christmas cards - on a string usually hung against a wall. Now fewer people actually send cards.
Lots of glitter and bling used on the pages - after all it is Christmas!

Wishing everyone all the best for 2013!
Yvonne
Designer - Yvonne Balmer
Project - Scrapbooking
Cricut Machine - Imagine & Expression & CCR
Cartridges
Elegant Edges (scalloped square) 9.35" & 9.00"
Art Philosophy - Let It Glow - 1"
Art Philosophy - Snowflake - 3.50"
Art Philosophy - Snowflake Border - 9" length
Art Philosophy - Presents - 1.75"
Create A Critter2 - Tree - 4.25"
Celebrate With A Flourish - Lights - 1.75"

Friday, November 30, 2012

Wibbly Wobbly!

Hi There Crafters!

Yvonne here from Ink-spirations. Glad to be back with another project. With December just around the corner I'm working hard on getting all my Christmas cards done.

The little penquin is on an action wobbler. Just too cute!  I started with CCR cause it is so easy to make sure your sizes are going to be correct for your card base size.

 
Printed all paper with the Imagine using Christmas Wish. The sentiment and penquin are from Create A Critter 2.  Some puffy paint added to his hat and some pink chalk to rosy up those cheeks. I like using chalk cause if I make a mistake I can just eraser it and try again.

Card Base - 5 1/2" square
Pattern base - 5 1/4" square
Circle base - 4.375"
Circle pattern - 4.25"
Border base - 1 3/8" x 5.25"
Border pattern - 1.25" x 5.25"
Santa Penquin - 3"
Words - 1.25"

Designed by Yvonne Balmer
Machines Used: Imagine, CCR
Cartridges: Create A Critter 2, Christmas Wish
Other items - glitter, puffy paint, dew drops, chalk, xyron (to make the front of the letters sticky for the glitter)
Thanks for stopping by!
 
Yvonne

Sunday, November 25, 2012

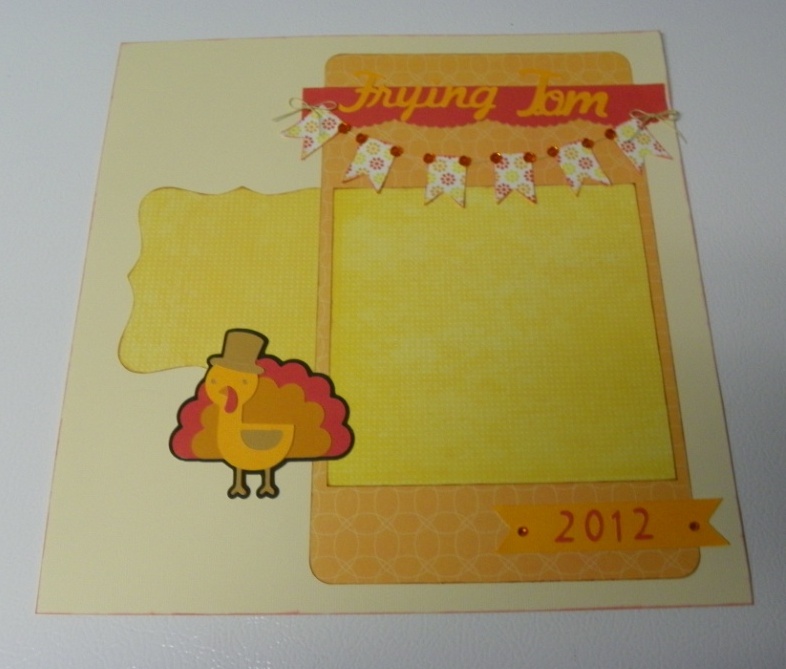
Frying Tom Thanksgiving layout

Layout before adding journaling and photos

Turkey - 3" Create a Critter 2


 Hi this is Terri from http://scrappinwiththebug.blogspot.com/ this month for my project I am sharing a layout I made reflective of this past Thanksgiving. Hoping everyone had a GREAT Thanksgiving. I know I did.
The past few years the tradition has been to get a Turkey and fry him. This year was no different. My family all crammed into my brother's apartment for Turkey Day. My husband was in charge of frying the bird. I will say - for those who have never had a fried turkey it is so super yummy. We use an electric fryer and it works wonderfully.
I must admit in the past 8 years of frying the turkey I have never taken photos. So this year I knew instantly that I wanted to make a series of photos showing what steps go into making the this wonderful bird.

I used the paper from DCWV -- Citrus stack and also Fall harvest stack (for the solid paper).

Cartridges used:
Create a Critter 2 - Turkey cut at 3"
Arts Philosophy - Square 4 cut at 4"
Arts Philosophy - Banner  1" each
Billionaire - Welded the words Frying Tom cut at 1"
Billionaire - 2012 - cut .80"

I used a Martha Stewart punch for the accent red and also used a square punch to cut  date tag at the bottom.

The orange rhinestones are from Queen & Co.
Hemp Twine - from Michael's


Designed By:  Terri S.

Cricut Machine Used: Expression, gypsy

Cricut Cartridges Used:  Arts Philosophy, Billionaire, Create a Critter 2,

Other Supplies Used: DCWV paper Citrus and Fall Harvest paper stacks, ATG adhesive, Queen & Co - rhinestones, hemp twine

Thursday, October 18, 2012

Nuts About You

Greetings fellow Cricut FANatics! This is Michele from Scrap-n-Dance.blogspot.com! I have created a fall themed two page layout for you!

I have a few friends that have asked me to create kits for them, and this is one that I finished up not too long ago. I really like how this one turned out. Let me tell you how I created it!

I used my Gypsy to do this, so if you want to copy it exactly, you'll need a Gypsy or Design Studio, mainly because the tree is sized so big that it's trunk is off the mat, and only the Gypsy or Design Studio can cut something sized bigger than the mat.

I loved the title, but I worried that the words might get lost on the busy background paper, and there was no shadow option for it. But, you don't always have to use a shadow of the shape, all you need is something to set it off... and I thought two acorns welded together as a background for the title was perfect. In fact, I liked it more because it was different from the usual phrase shadow.

If you like, before you put all the pieces together, ink the edges of them. "Cutesy" pages like this can seem more "grown up" after inking the edges of everything with dark brown ink. I found this out when one friend, who'd seen these pages in their initial stages before ink, and then saw it later when it was completely done... She didn't want a kit at first, it was too cutesy for her. But the inking changed her mind completely.

The ribbon is seam binding that I had dyed using Distress Stain in Fired Brick color. I laid down a strip of tacky tape adhesive, then as I laid down the ribbon, I pinched pleats in it. This gives the layout texture and dimension, more than even pop dots can! 

Tree:  Create A Critter 2 @ 13.85 inches (with the lower trunk hanging off the mat)
Squirrel:  Create A Critter @ 4 inches (I hid the mouth on my Gypsy, as I don't care for those weird smiles sometimes)
Title:  Just Because Cards @ 13.50 inches
Leaves:  Doodlecharms @ 2 inches
Acorn title background: Create A Critter @ 6.53 inches, TWO welded together
Small Acorns:  Create A Critter @ 2.25 inches

Cricut Info & Supplies used:
Designed by Michele Donner-Ramsey
Cricut Machines used:  Gypsy, Expression
Cricut Cartridges used:  Create A Critter 2, Create A Critter, Just Because Cards, Doodlecharms
Other Supplies:  Bazzill Cardstock, DCWV Autumn Melody Stack, Seam Binding ribbon, Ranger Distress Fired Brick Stain, Ranger Distress Ink Walnut Stain, adhesives

Thursday, September 6, 2012

It's been a circus around here...

Hello!  This is Michele from MicheleGreen.com.  (I'm GreenGirl on the Cricut message board.)  I'm so happy to be here today! In going with the theme for September of "End of Summer", I have a card to share with you today. AND... it features what is supposed to be announced as part of today's Hello Thursday cart of Create a Critter 2! 
 
The end of summer for me is met with the beginning of school.  I am a teacher and one of my best friends is too.  We work in separate buildings so there was no time to see her before students returned.  I did want to take the time to wish her a great start to the school year so I made her this card: 


 I love the sitting lion on this version of Create a Critter! Let's look at some of the steps in how this card was made. 

First, I cut out all of the lions and their stools.  (I ended up not using the stools because it was just too much.)  I cut:
2 lions and stools @ 1.25"
2 lions and stools @ 2"
1 lion and it's stool @ 3"

I also inked the lions for some added cuteness.  I use orange around the mane and yellow on the body.  I decided not to cut the pink parts for the nose and ears.  Instead you will see later that I used Stickles to fill in those areas. 


Next I needed to create a circus ring for the lions to sit in.  I did this by using the Martha Stewart circle cutter (and um... believe the package when it says the blade is sharp - ouch!).  I cut a 4.25" circle and inked it in black and brown ink to make it mottled.  I then took my ATG and put adhesive around the edge so that I could circle the twine around it and have it stick without using wet glue. That's what I am trying to show in this picture. 


I came up with a cute saying for the card and printed it on card stock.  I wanted to save my card stock so I used painter's tape to hold my piece to the plain white printer paper.  I love this trick! 


The saying looked too plain to me just plain white so I added a red piece to carry the theme to the inside of the card.  This picture also shows the variety of pop dots I used to allow the lions to be straight on the front of the card, rather than just glue them all to each other. 


Look at that cute little guy!  He is so adorable! 


I hope you have enjoyed my post today and I would love to hear what you think!  Don't forget to create a back to school item for yesterday's Cricut Crafty Challenge too! 

Cricut Info and Supplies Used:
Designed by:  Michele Green
Cricut Cartridges Used: Create a Critter 2
Cricut Machine Used: Expression, Cuttlebug
Other Supplies Used: Card stock, Martha Stewart circle cutter, twine, pop dots, googly eyes, Stickles, ink, brads, Stars embossing folder, 

DON'T FORGET TO LEAVE A COMMENT TO BE ENTERED TO WIN OUR WEEKLY DRAWING IN SEPTEMBER.