While we are no longer making active post of Cricut projects on this blog as of 8/1/2013, we invite you to use it for continued die cut inspiration as we will leave the blog up for viewing. Happy Cricuting !

Showing posts with label Doodle Charms. Show all posts

Thursday, October 18, 2012

Nuts About You

Greetings fellow Cricut FANatics! This is Michele from Scrap-n-Dance.blogspot.com! I have created a fall themed two page layout for you!

I have a few friends that have asked me to create kits for them, and this is one that I finished up not too long ago. I really like how this one turned out. Let me tell you how I created it!

I used my Gypsy to do this, so if you want to copy it exactly, you'll need a Gypsy or Design Studio, mainly because the tree is sized so big that it's trunk is off the mat, and only the Gypsy or Design Studio can cut something sized bigger than the mat.

I loved the title, but I worried that the words might get lost on the busy background paper, and there was no shadow option for it. But, you don't always have to use a shadow of the shape, all you need is something to set it off... and I thought two acorns welded together as a background for the title was perfect. In fact, I liked it more because it was different from the usual phrase shadow.

If you like, before you put all the pieces together, ink the edges of them. "Cutesy" pages like this can seem more "grown up" after inking the edges of everything with dark brown ink. I found this out when one friend, who'd seen these pages in their initial stages before ink, and then saw it later when it was completely done... She didn't want a kit at first, it was too cutesy for her. But the inking changed her mind completely.

The ribbon is seam binding that I had dyed using Distress Stain in Fired Brick color. I laid down a strip of tacky tape adhesive, then as I laid down the ribbon, I pinched pleats in it. This gives the layout texture and dimension, more than even pop dots can! 

Tree:  Create A Critter 2 @ 13.85 inches (with the lower trunk hanging off the mat)
Squirrel:  Create A Critter @ 4 inches (I hid the mouth on my Gypsy, as I don't care for those weird smiles sometimes)
Title:  Just Because Cards @ 13.50 inches
Leaves:  Doodlecharms @ 2 inches
Acorn title background: Create A Critter @ 6.53 inches, TWO welded together
Small Acorns:  Create A Critter @ 2.25 inches

Cricut Info & Supplies used:
Designed by Michele Donner-Ramsey
Cricut Machines used:  Gypsy, Expression
Cricut Cartridges used:  Create A Critter 2, Create A Critter, Just Because Cards, Doodlecharms
Other Supplies:  Bazzill Cardstock, DCWV Autumn Melody Stack, Seam Binding ribbon, Ranger Distress Fired Brick Stain, Ranger Distress Ink Walnut Stain, adhesives

Wednesday, October 3, 2012

Two Cards: Enjoying Autumn & "Scare" Globe

Hi!  This is Lori from The Singing Shell blog with an autumnal card and a Halloween card for you.

I had no idea what to make for this month's post but then I got inspired to make two cards.  Here is the first:

ENJOYING AUTUMN


I love autumn for all its beautiful colors and for the cool breezes it brings.  I wanted to make something whimsical and carefree so I chose the barefooted girl riding a bike from the  Something to Celebrate cartridge.  She is on page 37.  With her hair flying behind her, she looks happy - doesn't she?  (Even though she has no facial features!  I am reading body language :)   She was cut at 3 1/2 inches. .  I also used Distress Ink Pads for the hardware on the bike.

  I used Distress Markers to outline the edges of the dress
and then added glitter to make her stand out.   

The tree [tree3] is from the Heritage cartridge and is cut at 4 1/2 inches.  I inked that up with lots of different Distress Ink Pads because I couldn't find the right paper.  I gently tapped the colors randomly onto the die cut.

Colors used: Evergreen Bough, Festive Berries,
Antique Linen, Wild Honey.  

The leaves [leaf] are from the Doodlecharms cartridge - an oldie but a goodie.  I cut those at a 1/2 and 3/4 inches.  I was nervous because I never cut anything that small on purpose.  But it worked like a charm.  I inked those up with the same Distress Pads, too.  That way they would match my tree.


Now for the background.  I used washi tape to create a kind of road across the background.  I used the Musical Flourish folder for the background and then inked the embossed parts lightly.  I only embossed the part above the washi tape to create a distinction between earth and sky.  I rounded the corners with We R Memory Keepers corner chompers.

I purposely made the tree bigger than I needed so
I had to trim it.  It took me a day to find
the courage!


The final product :)


So that's it - an auutmnal card for any occasion.


"SCARE" GLOBE

This is a snow globe with a twist.  And I know - it is not really a “scare” globe.  This little guy is too cute to scare anybody:)  I picked "scare"for strictly for its Halloween appeal. 


The snow globe aka “scare” globe is from Joy of the Season and is cut at 5.25 inches.  I added a little blue on the left side of the globe to give it a little dimension.  I used the Tumbled Glass Distress marker and then just went over it with a wet detail brush to lighten it up and spread it out a bit.  The spider web is from Chic & Scary and cut it at 3 inches.  I used only the edges and then cut off the top.


Mister Bear from Teddy Bear Parade is cut at 3 inches.  I didn’t use the trick or treat bag because it would have made the little scene too busy.  I ran the Spiced Marmalade Distress Marker over the edges of the orange part of the markers.  I used the Forest Moss Distress Marker for the green.  For the ears, I used a Rose Red Copic Marker.  For the muzzle I also used a Copic Marker – Chamois.
 
TIP: You can make your own custom color ribbon.
 The ribbon is actually plain seam binding that I colored with
 Spiced Marmalade and Forest Moss Distress Markers.
 I added some water to soften the colors. 

Although I really loved creating Mister Bear, I loved making the spiders more!  I added glitter - Glow-in-the-Dark Glitter.  First, I cut the spiders from Doodlecharms at a ½ inch.  Then, I made their eyes with Glossy Accents.  That way when I added the glow-in-the-dark glitter and turned off the lights, you would be able to see the eyes, too.

Spiders Before.
 
Spiders After
 
I hope this inspires you to make your own "scare" globes.  They might even be scarier than mine!

Thank you very much for all your compliments last time.  It made me feel great for days!

Enjoying Autumn Card
Cricut Info & Supplies Used:
Designed by: Lori Sjogren
Cricut Machine used: Create
Cricut Cartridges used: Something to Celebrate, Heritage, Doodlecharms
Other supplies: Bazzil, solid cardstock; Webster's Pages, pattern cardstock; Musical Flourish embossing folder, Cuttlebug; Ranger, Distress Markers and Distress Ink Pads; Denami Designs, Sparklets Lemon Sorbet glitter; Close to My Heart, Vanilla Cream ink pad; We R Memory Keepers, corner chomper.

 "Scare" Globe Card
Cricut Info & Supplies Used:
Designed by: Lori Sjogren
Cricut Machine used: Create
Cricut Cartridges used:  Teddy Bear Parade, Chic n Scary, Joy of the Season, Doodlecharms
Other supplies: Bazzil & Recollections, solid cardstock; Die Cuts With a View, pattern cardstock; Ranger, Distress Markers & Glossy Accents; Martha Stewart Crafts, Glow-in-the-Dark glitter;

Friday, September 14, 2012

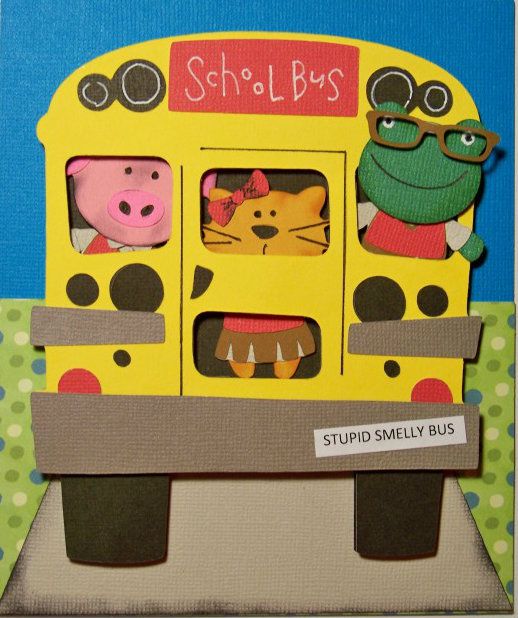
Back-to-School Card -- Stupid Smelly Bus

Hello!  It's Nadia from my blog, With Glittering Eyes, and I have a fun back-to-school project to share!  Later this month, I will be out-of-town for a few school days so I thought colorful cards for my daughter would be fun ways to remind her that I am thinking of her even though I will be far away!  I am sharing one here today!

For my card, I used animals that I morphed together with Teddy Bear Parade to create new and different critters that wear the little school uniforms!  You can see my initial post on that by clicking here to see a whole menagerie of characters!  Some of the critters from that post were used on this card.  

Stupid Smelly Bus card...


Here's a little background bit:
There are no buses at my daughter's school but we always get behind at least one heading to another school on our morning commute! In Kindergarten and First Grade, my daughter used to enjoy reading Junie B. Jones stories.  Once she read the Stupid Smelly Bus, we started referring to all school buses that way, in honor of Junie!  My daughter is always intrigued by what goes on in a school bus... always making up scenarios as we pass them or follow them.

For this card, I used three critters from a previous post on my blog, adding school uniforms.  I stuffed 'em in my favorite bus cut and added a little scenery to plant the bus on the road! 


Crafty Details for Stupid Smelly Bus:
  • This card finishes at 5" wide by 6" tall and is created by simply scoring a 6" x 10" rectangle of card stock in the middle.
  • Pig - body cut at 2" on the Expression from Teddy Bear Parade; head cut at 2" from County Fair. (Head was manually separated from the body).  School uniform cut from Teddy Bear Parade at 2".
  • Cat -  body cut at 2" on the Expression from Teddy Bear Parade; head cut at 1" from Doodlecharms.  School uniform cut from Teddy Bear Parade at 2".  
  • Frog -  body cut at 2" on the Expression from Teddy Bear Parade; head cut at 1-1/2" (real dial size) from New Arrival.  School uniform and glasses cut from Teddy Bear Parade at 2".  His glasses are popped up 1/8".

  • School bus - cut at 5" on the Expression from Locker Talk (page 34).  Rear bumper was popped up 1/8".  Two black bases were cut and 1/8" pop dots were used between the two bases to create a little space for the critters to exist in.  I adhered one black base to the the yellow bus, removing the windows.  (After the critters were placed, I connected the two bases with the pop dots.)   The bumper sticker was trimmer-cut after printing with Microsoft font.

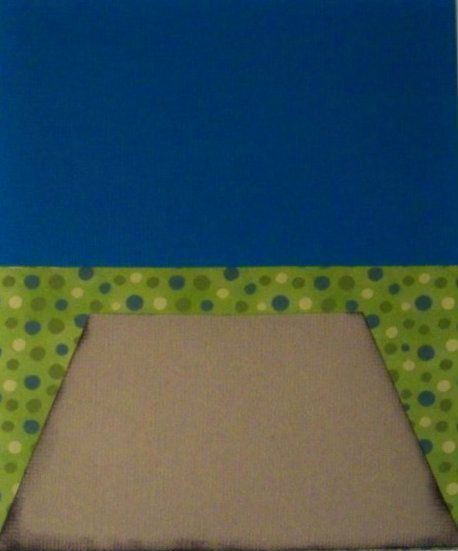
  • Blue base - trimmer-cut at 5" x 6"
  • Green mat - trimmer-cut at 5" x 3"
  • Gray mat - trimmer-cut at 2-1/2" high with top cut at 2-7/8" and bottom cut at 5"


If you enjoyed this card, check out my new project on my blog.  It is a whole classroom vignette in a shadowbox, called Ms. Elephant's Third Grade!  There are lots of fun details, pictures, tips, and lots of new morphed animals!  Additionally, later in the month on my blog, I will be posting the whole set of back-to-school kids cards like the one I have shared here.  Hope to see you over there! 


Here's a sneak peek of Ms. Elephant's Third Grade:


Cricut Info & Supplies Used:
Designed By: Nadia Herbst-McConnell
Cricut Machines Used: Expression
Project Type: card
Project Theme: Kids
Cricut Cartridges Used: Teddy Bear Parade, Locker Talk, County Fair, Doodlecharms, New Arrival
Suppies Used: Card stock from my scrap bin, ATG tape, Scotch Scrapbookers glue, 1/8" foam squares (pop dots), white and black gel pens, black ink and sponge applicator
DON'T FORGET TO LEAVE A COMMENT TO BE ENTERED TO WIN OUR WEEKLY DRAWING IN SEPTEMBER.

Wednesday, September 12, 2012

Sugar and Spice Shadowbox

Hi! This is Maria from Stamp, Cut, Create!. I'm so happy to be part of this wonderful new adventure! My family was blessed at the end of this summer with a beautiful new grand daughter and my project today is a shadowbox that I made for her nursery.
 I used the Word Collage cartridge for the subway art Sugar and Spice poem and printed it with the Imagine at 9".  All the printed papers for the background were printed with the Imagine Art Berries and Cream cartridge. The colors matched the baby's crib set perfectly. The other elements, the ladybug, dragonfly and flowers, were also inspired by the bedding.


The ladybug is from Walk in My Garden and was cut at 2 1/2" with black and red glitter card stock. The Dragonfly is from Doodle Charms, cut at 1 1/2" with green and pink glitter card stock. The flowers are from Mother's Day Bouquet. I used the same flower, cut in different sizes for the layers. The largest flower is        2 1/4" and 2" and the smaller is 2" and 1 3/4". The light pink portion of the larger flower was embossed with the Cuttlebug Swiss Dots folder. The Gypsy was used to lay everything out and to cut from. The buttons in the flower centers are from Stampin Up and I tied a piece of twine through the holes before gluing them to the centers with Glossy Accents. I have found that it works really well for adhering heavier or bulky pieces to the paper. The pearl flourishes are from Want2Scrap and I love the extra feminine touch they add to the piece!
All  the elements were adhered with Scotch foam tape. I used double and triple layers of the foam tape on some of them to give them more dimension. The picture was placed in a shadowbox frame that I purchased at Michael's.
I hope you enjoyed my entry for today's Cricut Fanatics Blog. Happy crafting and thanks for stopping by!


Cricut Info & Supplies Used:
Designed By:  Maria
Cricut Machine Used:  Imagine, Expression, Gypsy, Cuttlebug
Cricut Cartridges Used: Imagine Berries and Cream, Word Collage, Mother's Day Bouquet, Walk In My Garden, Doodle Charms
Other Supplies Used:    Scotch Foam Tape, Glossy Accents, Adhesive Pearl Flourishes, buttons, Twine, cardstock, Shadow box frame.