While we are no longer making active post of Cricut projects on this blog as of 8/1/2013, we invite you to use it for continued die cut inspiration as we will leave the blog up for viewing. Happy Cricuting !

Showing posts with label Mini Album. Show all posts

Wednesday, July 31, 2013

Farewell Cricut FANatics and a final Project Tutorial


By Debbie O'Neal of www.scrapmequickdesigns.com
 
Well Cricut FANatics, today is the last posting day on the blog. Sniff, Sniff. I know how you must be feeling as my heart is heavy today too.
 
It has been my privilege to host this blog for you and I want to thank everyone for visiting us here to get your Cricut inspiration.  I also ask you to join me in sending a big thank you out to my other two administrators Rebecca and Amy for assisting me with hosting challenges and blog admin advice. You ladies were a joy to work beside.  
 
And a really really really BIG THANK YOU  to all the Cricut FANatics Design Team members, past and present who have so inspired us with their Cricut creations.  The variety of projects we have had posted is truly astounding and goes to show how the Cricut products really push our creativity in new directions. I encourage you to follow the individual designers on their blogs to keep the inspiration coming to you.
 
As mentioned before, I will NOT be deleting the Cricut FANatics blog.  Please continue to use the blog as a reference. The database of project posts is searchable and you can use the labels list to quickly find projects for inspiration.  The blog will stay up as long as Blogger allows it to do so.
 
As far as myself, I will still be crafting and continue to post all kinds of die cut projects including Cricut on my website at www.scrapmequickdesigns.com and welcome you to follow me there for inspiration.  When you stop by, please leave a comment to say hello !  I also have a die cut focused  Facebook Group "Crafty Cut Ups" and I invite all of you to join us there for more crafting fun too !


FINAL CRICUT FANATIC BLOG PROJECT - MAKING A CRICUT MINI ALBUM TUTORIAL 
 
I wanted to leave you all with one last Cricut Project Tutorial to inspire you.  One of my all time favorite cartridges is the Close to My Heart "Artiste" cartridge.  There are so many amazing things you can do with this cartridge.  I LOVE all the fun mini albums and decided to make one for my final Cricut FANatics project. It was hard picking but I finally decided to use the mini album on page 59 in the image book/page 37 in assembly instructions.  It is recommended you make your mini album no less than 3.8" tall/wide. I decided to make it an even 4" to fit my photos a bit better.

 
1. First thing you want to do when making a mini album with your die cut machine, you want to pick a good quality double sided patterned paper to add some pizzaz to your album.  I love the heavy quality of the paper in the amazing Teresa Collins Collections and decided to use the Everyday Moments Collection I had been hoarding :)


 2. Take a few minutes to decide what order you want to use the patterned paper. Don't forget there is a front and backside so be sure and check to make sure the patterns look nice on both sides together.


3. It's important to give some thought to which paper you are going to use of the front and back cover of the mini album.  Give a little thought to the way you may want to decorate the front cover to give you some idea of what might look best with what you have in mind.

Here I selected the dark blue pattern to be the front and back cover for my book. The bird paper is the B side of the same paper so that becomes the inside of the front and back cover.  (and yes, I realized After I cut the paper that I should have made sure to turn the paper on my mat so the inside design was horizontal but it still looks fine to me ).

 
4.  Cut the inside pages according to the diagram in the Cricut manual. I cut all the pages at 4", same size I cut the cover. As you can see, the pages automatically cut out at the right size without adjusting each page manually to get the graduated sizes of the mini album pages.  Cool, right?

 
5. Layer the inside pages in the recommended order according to the assembly directions on page 37 within the back and front covers.  Add book binding rings to hold it together. 


6. Now for the fun part...DECORATING THE MINI ALBUM ! One of the great things about using a collection pack is that they generally come with embellishments of some kind that make decorating your mini album super easy !  For this mini book I used the stickers and die cut pieces that were in the collection and a few little embellishment gems from my stash.  And my trusty Tim Holtz Tiny Attacher, ATG and some foam pop dots.

 
7. Start out decorating by selecting which of the embellishments you want to use for the front cover. Nothing is worse than using all your matching embellishments on the inside and running out for the cover...yes, I am speaking from experience :)
 
Here I layered some stickers on the binding edge and across the bottom of the cover.  Next I decided to use the circle flower cardstock piece on the rounded flap of the album cover as part of the closure  feature. To do that, I adhered it to the rounded flap so that it hangs off the edge as shown towards the center of the front cover.  Next, I added the label sticker in the center of the front cover, then layered on top with a foam pop dot the Every Day Moments cardstock piece, placing it so that the Circle Flower piece would tuck under it just slightly to hold the mini album cover together when closed. To finish the cover off I added a rose shaped pearl cachabon to the flower center, a bit of yellow/white twine a the bottom edge and tied some crinkled seam binding ribbon to the top binder ring.
   
 
8. Decorate the inside pages using the selected embellishments of your choice. Think about photos you may want to use, add some places for journaling spots along the way and embellish to your hearts content to get the look you want in your mini album.
 
Here are some pictures of the inside of my album to show off ideas of how to decorate the inside of this particular Cricut mini album. I added the tabs to top of some pages with my tiny attacher stapler, layered stickers and journal spots on others for variety.  I like to add in journaling cards mixed in with some of the pages to add more interest to the overall book.


I have photos picked out to put in here to make myself a little reminder book to stop and enjoy the Every Day Moments of my own life.  Unfortunately I didn't have time to add them to the mini album before doing this post. But rest assured, this one will be used.  I hope this tutorial inspires you to create your own mini album using some of the amazing shapes found on the Cricut cartridges.
 
Well, I think I have dragged my feet long enough about ending this last post. Time to say Farewell Cricut FANatics and thank you for the fond memories we have made here at Cricut FANatics Blog !
 
Hugs to you all,  happy die cutting !  Debbie O'Neal


Monday, February 4, 2013

Cricut Crafty Challenge #5- Be Mine Valentine

Hi Everybody,
It's Becka here today from Creations with Becka. Today I am bringing you all another Cricut Crafty challenge. This month the challenge is to make something special for you Valentine.
I made this Itty Bitty Mini Album for mine.


I used Tags, Boxes and More and Sophiscated cartridges for this project. I have a video posted on my blog.

Challenge Guidelines:
  • Ok you have until February 26th to enter the challenge, you must use at least 3 cricut cuts. You can made anything you would like.
  • Please link you projects below.
  • I will post the winner on the 27th. The winner will win something very cool- still working out the details and will be announced soon


Saturday, November 3, 2012

A Quick Project


I made this album cover for dd1's basketball photos. (I just knew she would want to play basketball -- oops I forgot to ask her.  She's throwing the shot-put instead.)   The cover is 8 1/2 by 11 landscape I used 3 Birds on Parade for the icons and Ashlyn's Alphabet for the lettering.  The basketball player is cut at 5.5 inches.  The letters are cut at 2 inches and welded together.  I used random papers from my stash with a emphasis on red and blue, her school colors. 


Tuesday, October 16, 2012

Folded Halloween Mini

Hello everyone!  Doreen here from Polkadotpaperprincess.blogspot.com.  Hope you are having a spooktacular October! 


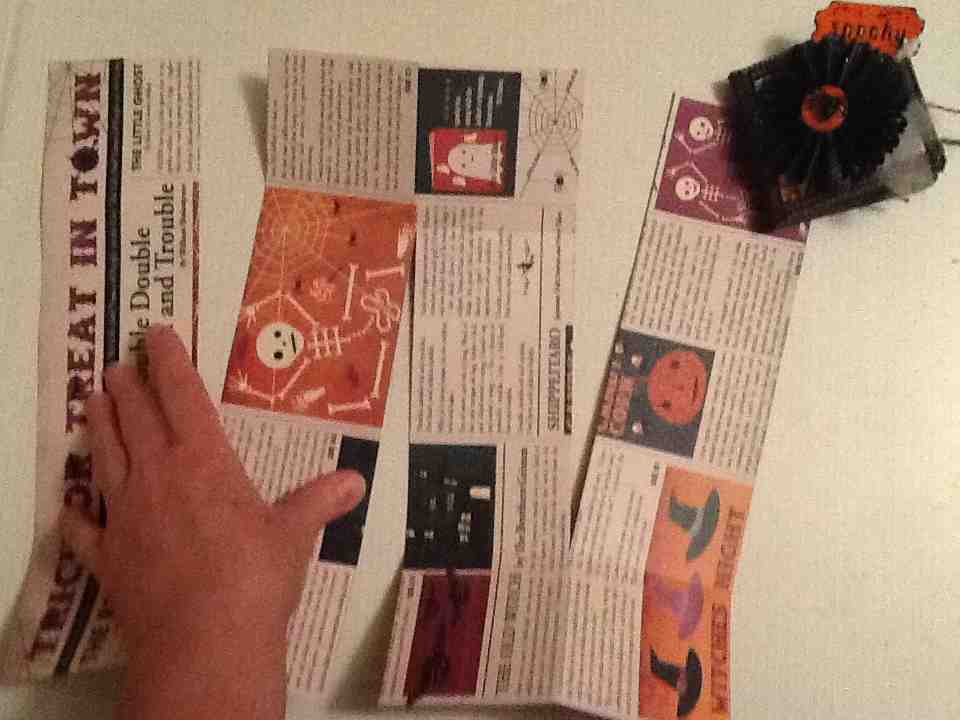
I have made a Halloween mini for you from one folded piece of 12x12 paper!  
Here is the front of the book. 

The tag is made from Chic & Scary and the Rosette is made from Ribbons and Rosettes. 

Here are the inside pages.  The side without the embellishments were left plain to allow placement for pictures.   I intentionally made it look rough to add the the "spookiness".


 There is lots of glitter and washi tape applied to the album.  I also love the ribbon flowers!!!
The image on this page would have been upside down.  So to avoid that look, I  painted it with white paint, then orange. The circle is a large rub-on to which I added a black ribbon flower.  I also added a matt to the opposite page.  The black "spot" is the flower.  I couldn't get it to photo better.  It looks a little spooky! See the cute little kitty bling in the corner!


This back page has a chipboard sticker added to it.  

Here are the tags for the inside.  They are made from Wrap it Up!  The kitty on the fence is a stamp I added to the tag.  I think it's a Technique Tuesday stamp.


Here's how the album was made:

If I have not made the directions clear enough, let me know.  I can easily do a short video or answer questions! 

Score at 3, 6 and 9 inches from the top to the bottom of the 12x12 piece of paper.

Rotate paper 90 degrees and score again at 3, 6 & 9 inches.

 Now cut at the 3" score line starting at the top and going all the way down to the last score mark.  (3" from the bottom - horizontal line.)   Do the same at the 9" score line. 

 Flip the paper in the opposite direction (180degrees) and cut on the 6" score line  from the top down to the 3" horizontal score line.  You will note the paper is sideways.  This is because the design I want to use is the "A" side which has a directional look.  That is to say a "top" and a "bottom".  If it doesn't matter to you which way the design faces, it doesn't matter what way you put the paper.  If you want part of the paper to face upwards (like mine does) you must turn the paper so the design starts sideways!
You will end up with something that looks like a "W" or "M" depending on which way you look.

 Fan fold the paper.  You will then need to either tape, sew, bind or glue the edges.  You will end up with pockets if you like.  I alternated them so I had one pocket on the top followed by a side pocket.  This can be achieved by where you put your adhesive.  You can have no pockets if you choose, just tape all of the edges!
 Practice folding the paper to see which direction you want your favorite image to show up.  If you don't have any directional images (like card stock) it's even faster!
Enjoy!

Designed by:  Doreen
Machines used:  Expression & Gypsy
Project type:  Mini Album
Cartridges used:   Chic & Scary, Wrap it Up, Ribbons & Rosettes
Supplies:  Ribbon flowers, washi tape, glue, glitter, ATG tape, rub-ons, twine, 7Gypsies tape, tulle, bling, scissors or cutting board

Monday, October 1, 2012

Fall Mini Album


Happy Fall Ya'll !   This is Debbie O'Neal aka ScrapHappyDeb of Debs Electic Thoughts Blog. Our Cricut FANatics October theme is  FALL  (Halloween, Fall, Thanksgiving projects of any type).  Our designers, of course, are free to share any type of project in October but I wanted to show you a FALL project.

I just love the colors of fall...warm reds, orange, browns, tans, etc.  Plus Fall items always seem to have a lot of texture too don't they?  So my project is a Fall Mini Album album I made recently for a swap I was in on the Circle MB.  I tried hard to incorporate the feeling and texture of fall in to it.

I used the new Mini Books Cricut Cartridge to create the mini album base. If you haven't bought this cartridge yet, I am issuing an enabling alert !  LOL   You will want to own this cartridge after seeing how easy it is to make one of the mini albums included.
I selected the Mini Book Accordian Album on page 13 of the handbook. The assembly directions are on page 27 of the handbook.
 
I wanted my book to be 6" wide so I cut it at 6".  But that meant that the length was longer than
a regular 12X12 mat so I used the 12X24 mat and a white poster board cut in half so I could make the cover as long as was needed.  
The cover was then folded at the scoring marks to create a 6 X 6 square.  Notice there
is a little tab where the open end of the cover is tucked.
Next I cut the three pieces at 6" that form the inside of the album again using the larger mat and poster board.  Once the three pieces were cut, you adhere them to create the accordian fold shown above.
Next I adhered one end of the accordian fold inside the cover. Then repeated with the other end on the opposite side of the inside cover.  This forms the base of your mini album.  It creates 8 pages for your book.
 
Now on the the fun part...decorating the mini album !
I used the patterned paper and journaling cards from the new Simple Stories Harvest Lane line.  Yummy colors and patterns in this fall line were perfect for my Fall album.  I covered the square album pages by cutting the patterned papers and solid colored cardstock into 5 3/4" X 5 3/4" squares and inked the edges and adhered to each page of the album.  For the outside cover of the album
I  hand cut the patterned paper for the curved piece of the album cover.  Where that little flap was cut, I used my exacto knife to make the slice in the patterned paper so it could still be used.  I put some jute twine in a button and then used a glue dot to adhere it to the little flap.
 As I mentioned above, I cut the squares of patterened paper and cardstock and adhered to each page to form the base.  I used some Washi Tape to adhere some of the cute paper embellishments and journaling cards to the inside of the album pages.
You can see here where I made sure an added the Washi Tape on both sides of the journaling card so that it now flips over in the book like a page.  I even added some Washi Tape as a bit of embellishment on the cardstock page.
I repeated the process of alternating cardstock pages and patterned paper through out the album and the journaling cards and Washi tape.
It was fun alternating the patterns and colors.
On the last page I made a pocket out of cardstock cut from page 16 and embellished it with some Washi Tape.  Instead of the tag for the pocket, I used one of the SS Harvest Lane Bingo cards and added a button with jute twine to it for the free space on the card.
 
To finish off the cover there is a band that goes around the mini album.  I used a gold foil paper and the Autumn Type Cuttlebug folder to emboss it.  Layered some felt flowers I cut out with my Cuttlebug and used a button with jute for the center of the flowers.  I tied some just to the other end of the band to fnish it off. 
 
Since this project was for a swap, I also included the matching set of embellishment stickers and alphas and a baggie of embellishments so the receiver could add the final touches to the mini album to match the photos they put in it. 
 
I can hardly wait to make more mini albums using this cartridge !!!  Happy Fall Ya'll
 
Cricut Info and Supplies Used: 
Designed By: Debbie O'Neal aka ScrapHappyDeb
Cricut Machines Used: Expression and Cuttlebug
Cricut Cartridges Used: Mini Books
Other Supplies Used: Autumn Type Embossing Folder, Simple Stories Harvest Lane Paper and journaling cards, felt, gold foil cardstock, buttons, jute twine, ink, washi tape