While we are no longer making active post of Cricut projects on this blog as of 8/1/2013, we invite you to use it for continued die cut inspiration as we will leave the blog up for viewing. Happy Cricuting !

Showing posts with label Something to Celebrate. Show all posts

Thursday, March 14, 2013

A Birthday on Saint Patrick's Day!

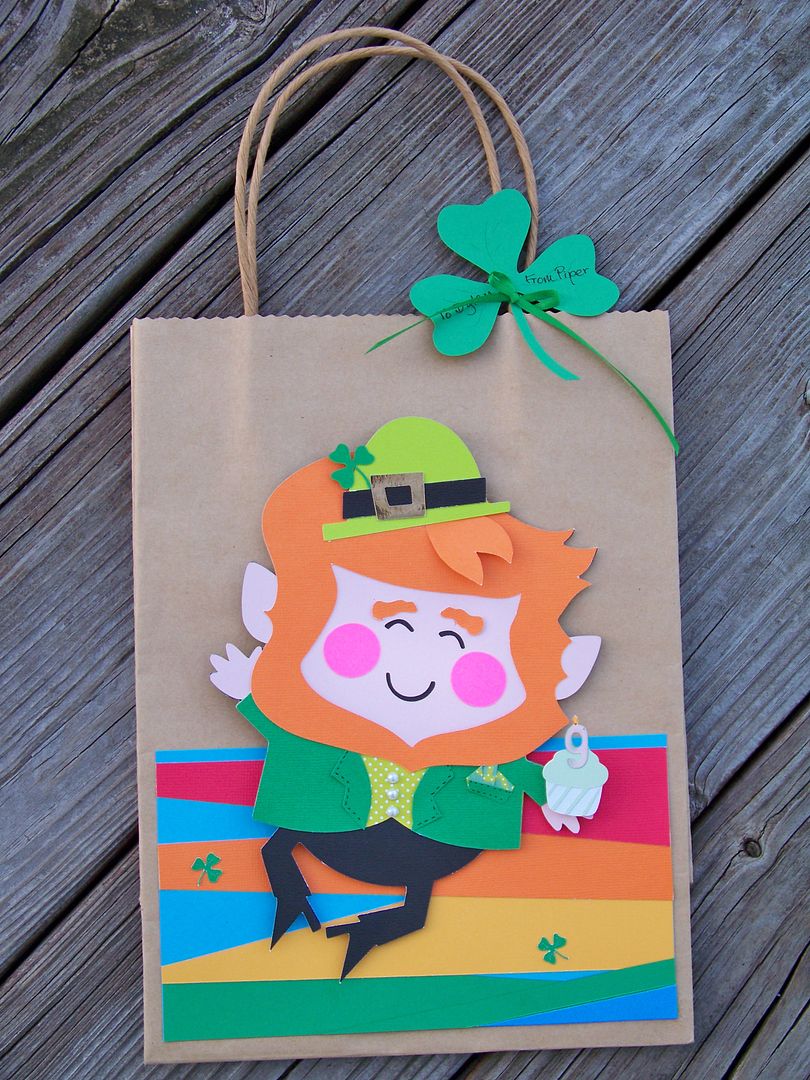
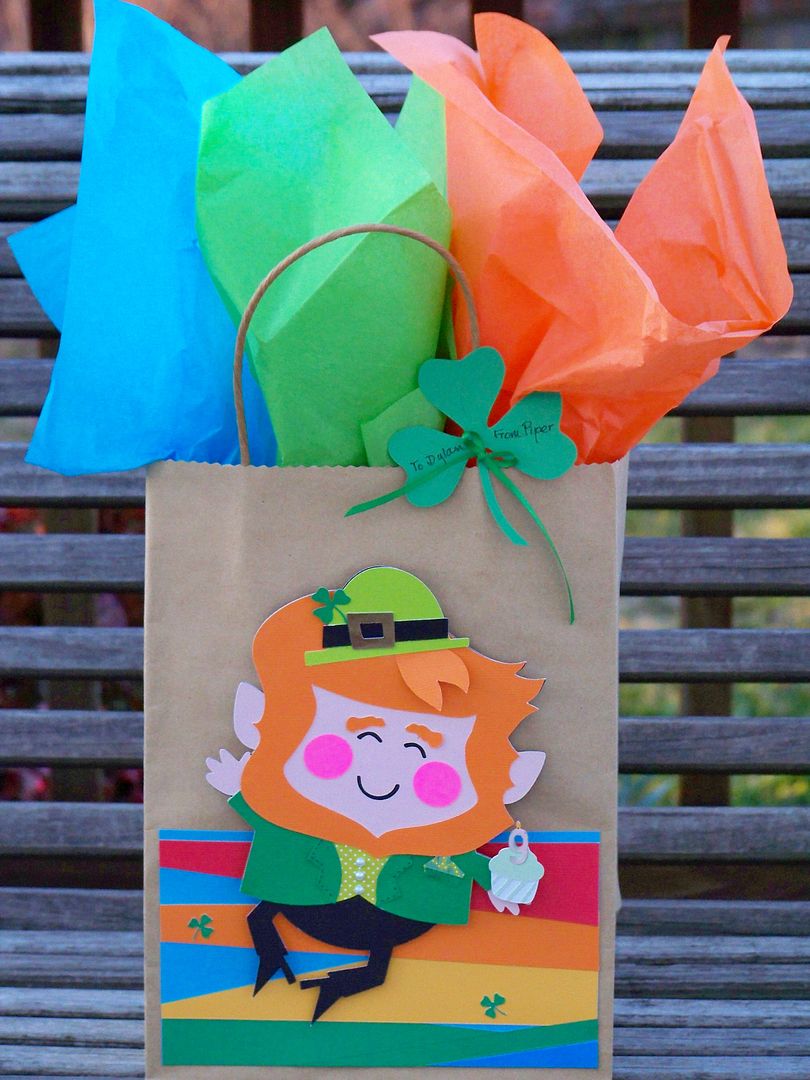
This is Nadia from my blog, With Glittering Eyes.  (If you have visited me before, please note that I have a new blog address:  www.withglitteringeyes.blogspot.com.)  Today I have a project to share that I made for one of my daughter's little BFFs.  Her birthday is on St. Patty's Day so I came up with a little gift bag for her with a birthday leprechaun.
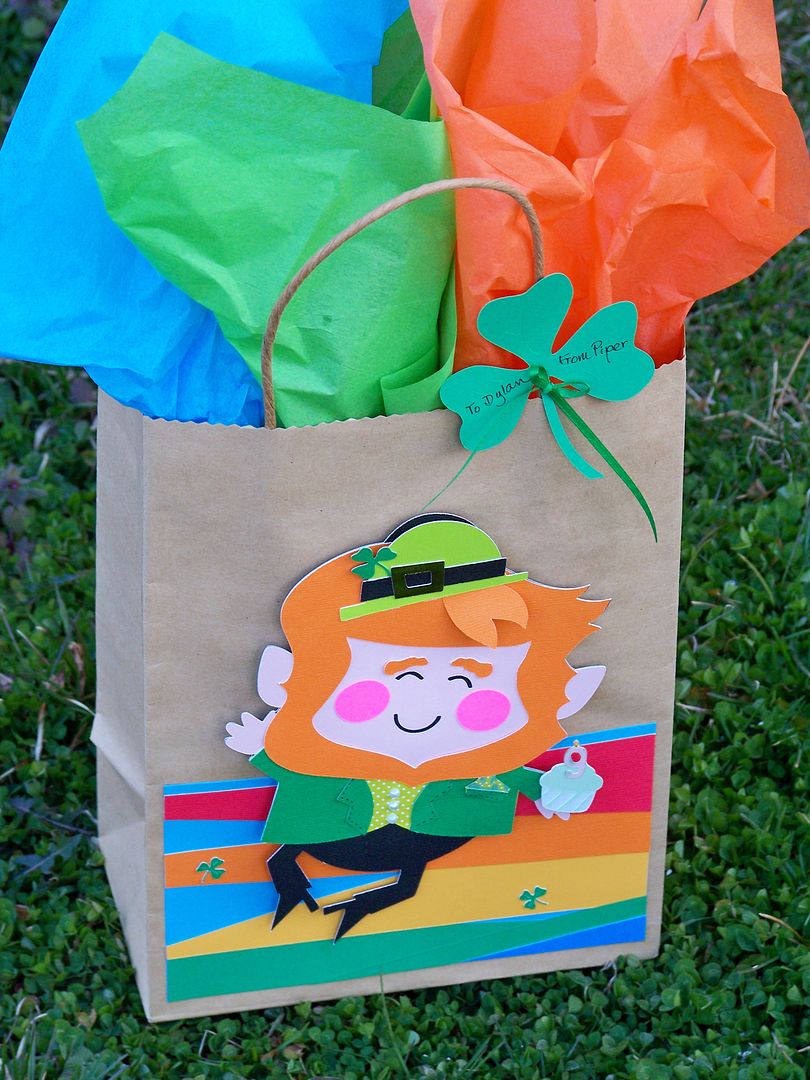

I keep on-hand 7-1/2" x 10-1/2" kraft paper gift bags-- that was my base.  (That is the measurement minus the handles.)  I cut the jumping leprechaun from Simply Charmed (page 32) at 7".


The thing with a big cut is that you kind of have to add extra details and pop up some elements to keep the die cut from flattening out.  For this little guy, I hand-cut an extra lock of hair.  I glued it flush on the 'scalp end' and popped it up with 1/8" pop dots on the 'curl end'.  I also popped up his little hat and added a shamrock to the hat band cut from A Child's Year (page 31), cut at 3/4".  I added a vest layer to his outfit but cutting two jackets and cutting one away so that I could layer them and see the second layer, like a vest.  I added adhesive pearls for vest buttons.  I hand-cut lapels for the top layer, the jacket, and added a breast pocket and pocket square.  
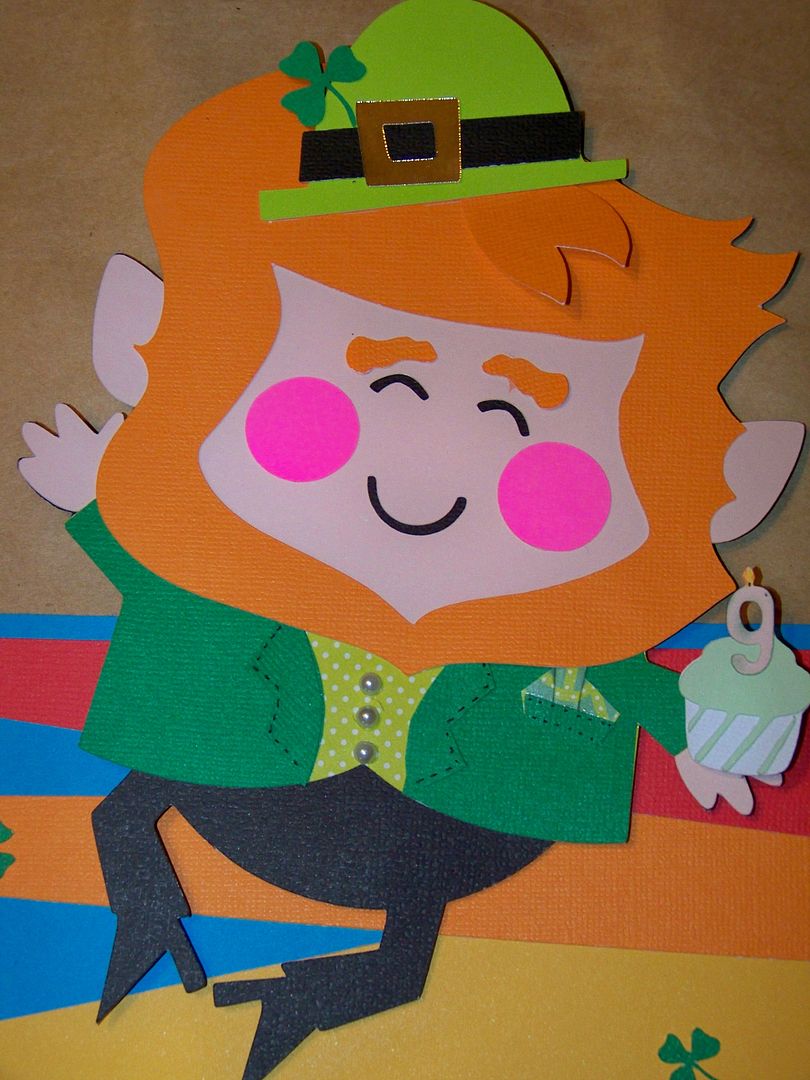

To make him a 'birthday' leprechaun, I cut a little cupcake from Something to Celebrate (page 22) at 1".  I only cut the first two layers since it was so tiny.  I cut a "9" candle from the same cart (page 30) at 3/4".  I hand-colored (with pencils) the flame and wick.

To give him a "place" to exist, I trimmer-cut rainbow-colored solids and layered them to create a ground and horizon line.  I placed a couple of tiny shamrocks, cut from A Child's Year at 1/2".


Lastly, for a tag, I cut a last shamrock, also from A Child's Year, at 3-1/4", and tied it on with 1/8" ribbon.

Lately, I have taken a little inventory of my Cricut cartridges and, as you have also probably figured out, there are many repeating icons among them!  I used to 'need' all the cartridges and came pretty close to getting them all before last autumn.  The good thing about this economy, hopefully there is a silver lining, is that many of us have gotten a chance to re-prioritize and to be more creative!  So... if you don't have the cartridges listed above, you can find shamrocks on the following cartridges that you may have:

  • Create-A-Critter 2
  • Designer's Calendar
  • Elmo and Friends Holiday
  • Give A Hoot
  • Imagine More Cards
  • Celebrate with a Flourish
  • Paper Doll Dress Up
  • Phrases 
  • Spring Fever
  • Holiday Cards
You can find leprechauns on the following cartridges that you may have:
  • CCR Exclusive:  St. Patrick's Day
  • Teddy Bear Parade
  • Paper Doll Dress Up
A cupcake image can be found on dozens of cartridges.  This is just a sampling:
  • A Child's Year
  • American Alphabet
  • Best Images of 2006 and 2009
  • Birthday Bash
  • Create-A-Critter 1 and 2
  • Storks Delivery
  • Divine Wedding
  • Doodlecharms
  • Elmo's Party
  • Every Day Paper Dolls
  • Hello Kitty Greetings... and the list goes on and on!!!!
Numbers can be found on any cartridge with font of course.

Thank you for checking my post today!  I hope you will visit my blog in the future.  You can always find my blog on Facebook at facebook.com/WithGlitteringEyesBlog and on Pinterest at pinterest.com/nadiahm/withglitteringeyes-blogspot-com-my-crafts/.  

Cricut Info & Supplies Used:
Designed By: Nadia Herbst-McConnell
Cricut Machines Used: Expression
Project Type: Gifts
Project Theme: Birthday, St. Patrick's Day
Cricut Cartridges Used:  Simply Charmed, A Child's Year, Something to Celebrate
Suppies Used: Paper, Quick Dry Glue, pop dots, adhesive pearls, microfine pen, ribbon

Saturday, October 13, 2012

An October Birthday Card

Sis Patterson from Paper, Craft & Scissors with an October birthday card to share today.  I made this card for one of the loveliest people you'll ever meet and today is her 40th birthday.


I used a mix of patterned papers and Cricut cartridges to make this card.  The little squirrel, cut at 1" tall, is from Noah's ABCs.  If you don't have this cartridge, you should buy it for the truly beautifully styled animals.  The chicken, squirrel, and cow are wonderful.

The wheelbarrow is from Walk in My Garden (1.5" tall).  The rolled flowers are from Artiste (2.25" tall and 1.5" tall).  The 40th birthday candle is from Something to Celebrate (1.5" tall).  The circle cuts, scalloped circle, and pumpkins are from Cricut Essentials.  I cut several layers and adhered them together to add dimension and strength.  The wheelbarrow was cut twice in the woodgrain paper and once in solid gray.  I trimmed the wheel from the solid gray cut and adhered it on top of the layered wheelbarrows.  I used my Copic E59 walnut to add a "stem" to the pumpkins.  The patterned paper circle is adhered to the Bazzill layer with foam tape.

The ribbon is from Paper Trey Ink in Smokey Shadow and the sentiment is stamped in the same color.  The papers are from Basic Grey, My Mind's Eye, Kaisercraft, and Bazzill.  I used Paper Trey Ink as the base for this card and applied the patterned papers on the front, back, and inside of the card base. Before adhering the patterned paper, I scored the Paper Trey Ink cardstock with a quarter inch wide center fold to allow for some inner depth.  I used Sparkle and Sprinkle glitter in Snow Angel for the candle.  The completed card measures 5.25" square.  


And here is the inside of the card:


The cupcake is from Inky Antics and uses brown and apricot honeycomb paper.  I made a cupcake stand with a circle punch.  There is an identical squirrel to the one on the front perched on top of the cupcake holding a little birthday candle from a Martha Stewart punch.  The inner sentiment area measures 2" by 3.25".  I framed it in the Bazzill card stock and attached it with foam tape.  The sentiment is from Hero Arts.

Check your mailbox today for delivery and Happy Birthday, Sherry!

Cricut Info & Supplies Used:
Designed By: Sis Patterson
Cricut Machine Used: Expression
Cricut Cartridges Used: Artiste, Something to Celebrate, Noah's ABCs, Walk in My Garden, Cricut Essentials
Other Supplies Used: Paper Trey Ink, Ribbon and cardstock, Bazzill cardstock, patterned paper from Basic Grey, Kaisercraft and My Mind's Eye Tangerine paper, Inky Antics cupcake stamp and honey comb paper, Martha Stewart Birthday Candle Punch, Sparkle and Sprinkle glitter in Snow Angel, Hero Arts sentiment stamp on interior, Waltzing Mouse stamp on card front

Wednesday, October 3, 2012

Two Cards: Enjoying Autumn & "Scare" Globe

Hi!  This is Lori from The Singing Shell blog with an autumnal card and a Halloween card for you.

I had no idea what to make for this month's post but then I got inspired to make two cards.  Here is the first:

ENJOYING AUTUMN


I love autumn for all its beautiful colors and for the cool breezes it brings.  I wanted to make something whimsical and carefree so I chose the barefooted girl riding a bike from the  Something to Celebrate cartridge.  She is on page 37.  With her hair flying behind her, she looks happy - doesn't she?  (Even though she has no facial features!  I am reading body language :)   She was cut at 3 1/2 inches. .  I also used Distress Ink Pads for the hardware on the bike.

  I used Distress Markers to outline the edges of the dress
and then added glitter to make her stand out.   

The tree [tree3] is from the Heritage cartridge and is cut at 4 1/2 inches.  I inked that up with lots of different Distress Ink Pads because I couldn't find the right paper.  I gently tapped the colors randomly onto the die cut.

Colors used: Evergreen Bough, Festive Berries,
Antique Linen, Wild Honey.  

The leaves [leaf] are from the Doodlecharms cartridge - an oldie but a goodie.  I cut those at a 1/2 and 3/4 inches.  I was nervous because I never cut anything that small on purpose.  But it worked like a charm.  I inked those up with the same Distress Pads, too.  That way they would match my tree.


Now for the background.  I used washi tape to create a kind of road across the background.  I used the Musical Flourish folder for the background and then inked the embossed parts lightly.  I only embossed the part above the washi tape to create a distinction between earth and sky.  I rounded the corners with We R Memory Keepers corner chompers.

I purposely made the tree bigger than I needed so
I had to trim it.  It took me a day to find
the courage!


The final product :)


So that's it - an auutmnal card for any occasion.


"SCARE" GLOBE

This is a snow globe with a twist.  And I know - it is not really a “scare” globe.  This little guy is too cute to scare anybody:)  I picked "scare"for strictly for its Halloween appeal. 


The snow globe aka “scare” globe is from Joy of the Season and is cut at 5.25 inches.  I added a little blue on the left side of the globe to give it a little dimension.  I used the Tumbled Glass Distress marker and then just went over it with a wet detail brush to lighten it up and spread it out a bit.  The spider web is from Chic & Scary and cut it at 3 inches.  I used only the edges and then cut off the top.


Mister Bear from Teddy Bear Parade is cut at 3 inches.  I didn’t use the trick or treat bag because it would have made the little scene too busy.  I ran the Spiced Marmalade Distress Marker over the edges of the orange part of the markers.  I used the Forest Moss Distress Marker for the green.  For the ears, I used a Rose Red Copic Marker.  For the muzzle I also used a Copic Marker – Chamois.
 
TIP: You can make your own custom color ribbon.
 The ribbon is actually plain seam binding that I colored with
 Spiced Marmalade and Forest Moss Distress Markers.
 I added some water to soften the colors. 

Although I really loved creating Mister Bear, I loved making the spiders more!  I added glitter - Glow-in-the-Dark Glitter.  First, I cut the spiders from Doodlecharms at a ½ inch.  Then, I made their eyes with Glossy Accents.  That way when I added the glow-in-the-dark glitter and turned off the lights, you would be able to see the eyes, too.

Spiders Before.
 
Spiders After
 
I hope this inspires you to make your own "scare" globes.  They might even be scarier than mine!

Thank you very much for all your compliments last time.  It made me feel great for days!

Enjoying Autumn Card
Cricut Info & Supplies Used:
Designed by: Lori Sjogren
Cricut Machine used: Create
Cricut Cartridges used: Something to Celebrate, Heritage, Doodlecharms
Other supplies: Bazzil, solid cardstock; Webster's Pages, pattern cardstock; Musical Flourish embossing folder, Cuttlebug; Ranger, Distress Markers and Distress Ink Pads; Denami Designs, Sparklets Lemon Sorbet glitter; Close to My Heart, Vanilla Cream ink pad; We R Memory Keepers, corner chomper.

 "Scare" Globe Card
Cricut Info & Supplies Used:
Designed by: Lori Sjogren
Cricut Machine used: Create
Cricut Cartridges used:  Teddy Bear Parade, Chic n Scary, Joy of the Season, Doodlecharms
Other supplies: Bazzil & Recollections, solid cardstock; Die Cuts With a View, pattern cardstock; Ranger, Distress Markers & Glossy Accents; Martha Stewart Crafts, Glow-in-the-Dark glitter;

Monday, September 17, 2012

Cute Baby Shower Decor


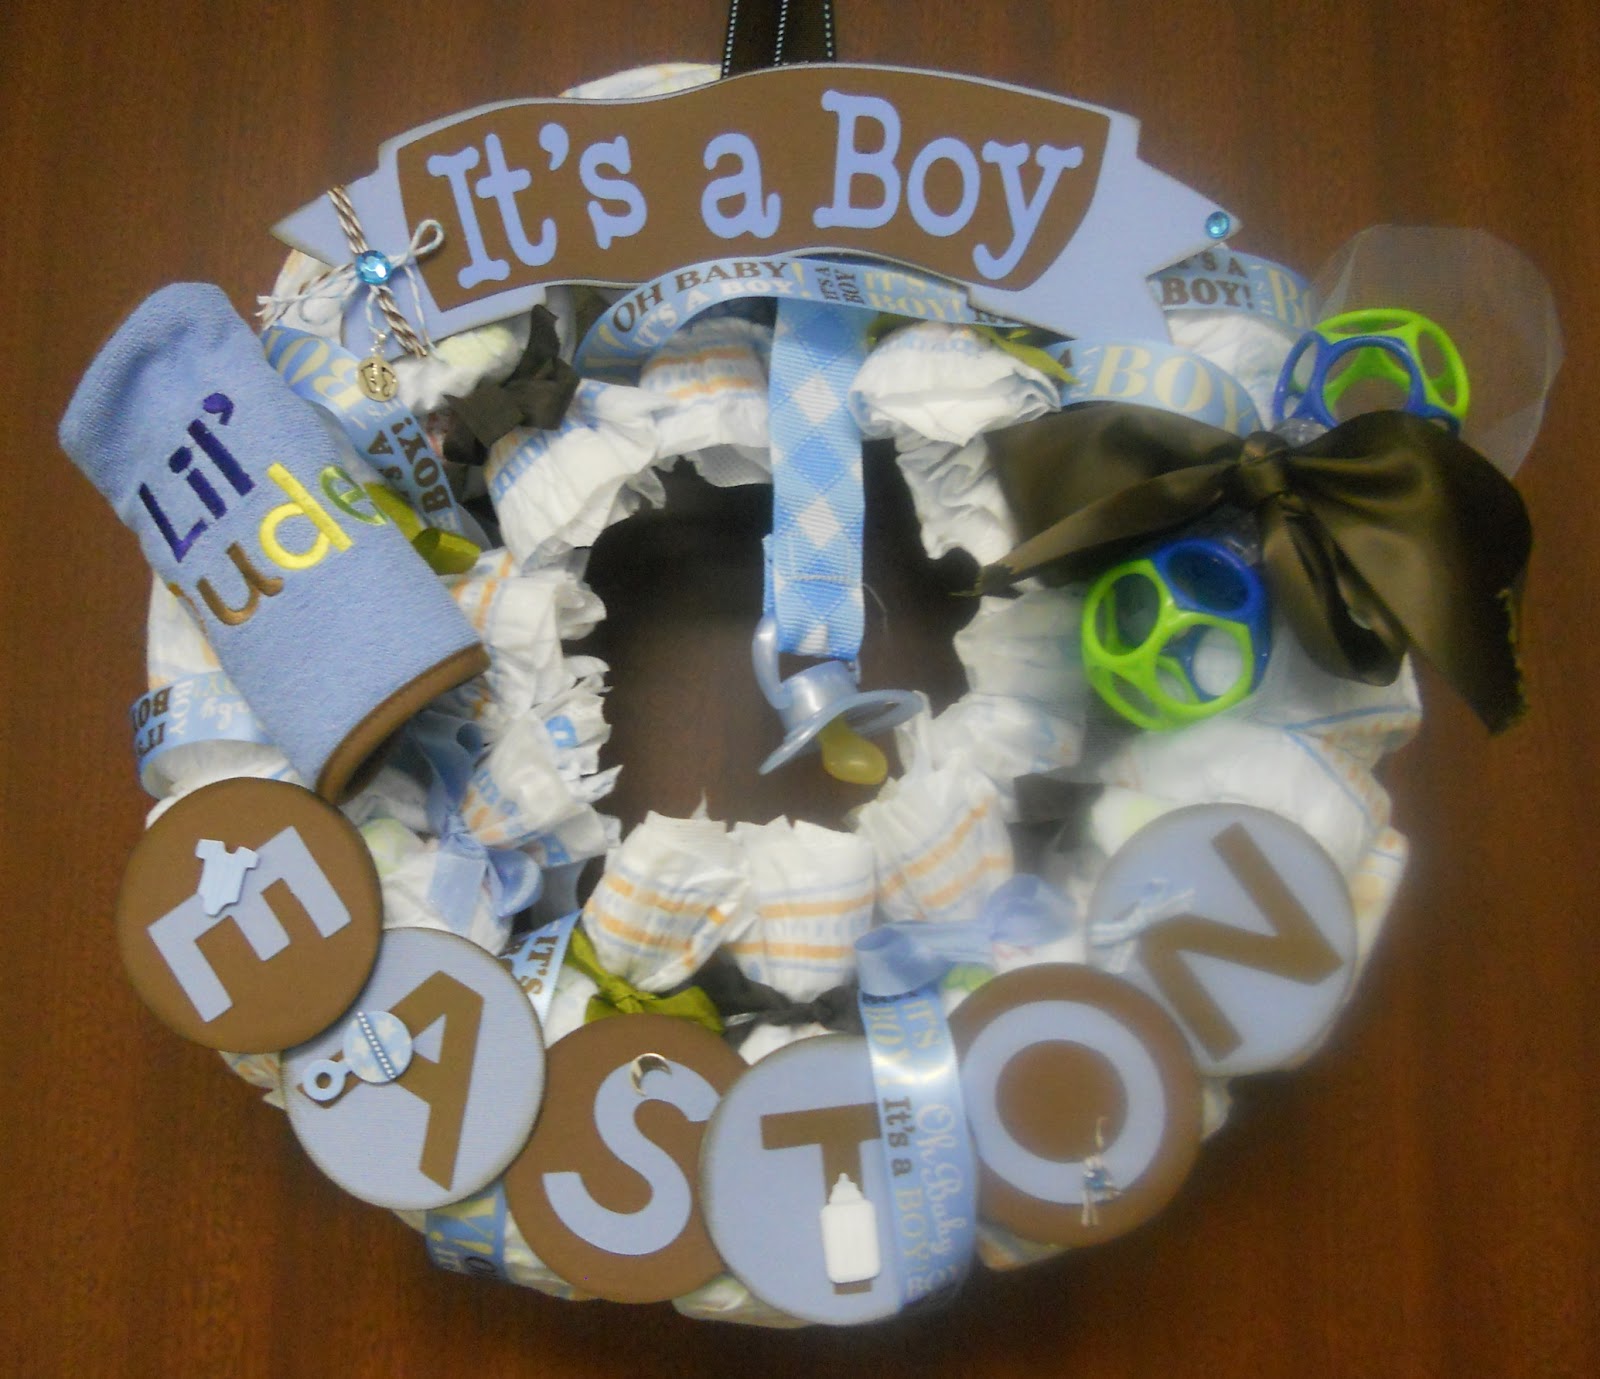
Hi, this is Demita, mom2sidsquid on the CMB. Today I'm sharing a banner and diaper wreath made for a co-worker's baby shower.

The Wreath is 9" and was purchased at Hobby Lobby. It's covered with size 2 pampers. I cut the banner and layer from Something to Celebrate at 3.5" in CCR. It's a boy is cut at 2" from Cricut Alphabet Font 1 out of vinyl. Wrapped with twine and added gems to each end. I used beacon 3-1 adhesive to adhere it to the diapers.


Easton (funny she's the 2nd co-worker to name her son Easton) was made using 3" circles from Cricut Craftroom Basics and the letters were cut from the Cricut Craftroom Basics at 2". The elements added to the name were taken from an OLD baby boy scrapbooking kit I had.
 
The Banner was made using Pretty Pennants at 6". I used the Stork (Banner 4).
 
 
I flipped the bottom banner. The Letter Banners were also cut at 6" (scalloped Banner and top). Each Rosette was made from six 4.25" rosettes (Ribbon & Rosettes Cartridge). I glued them with Beacon 3n1 adhesive to 4" circles. The letters were cut at 3.5" from Birthday Bash. I used Baby Steps at 2.5" relative size for the remaining diecuts. Crinkle Ribbon was used to hide the jump rings that connected the banners together.
 
Here are some close ups of each banner piece


Cricut Info and Supplies Used:
Designed by:  Demita Dozier
Cricut Machines Used: Expression
Cricut Cartridges Used: Something to Celebrate, Cricut Alphabet Font, Cricut Craftroom Basics, Pretty Pennants, Ribbons & Rosettes
Other Supplies Used: 9" wreath, cardstock, patterened paper, ribbons, pampers, twine, gems