While we are no longer making active post of Cricut projects on this blog as of 8/1/2013, we invite you to use it for continued die cut inspiration as we will leave the blog up for viewing. Happy Cricuting !

Showing posts with label Layout. Show all posts

Tuesday, July 30, 2013

My Last Post for Cricut Fanatics ~ A Heritage Layout

Hello everyone! It’s Angie from Angie’s Paper Passion and I’m so sad that our beloved Cricut Fanatics Blog will be closing after tomorrow, so this is my last post as a Design Team member. I have been very happy and honored to have had the chance to share my projects here along with these other very, very talented designers. I’d like to thank Debbie O’Neal for starting this blog and all of her hard work to keep it going. And this leads me to my layout today. This layout is completely scrap lifted! I first saw this LO when I first met Debbie – at Provo Craft Demo Training back in the Spring of 2010! I had always wanted to recreate it and felt this was just the right time. (Debbie, can you believe that this blog is a year old? And that we’ve known each other for over three years?!?! Boy does time fly!)

So here is my Heritage layout:

HeritageLO_AGC (4)

Since I’m a new Grandmother, I felt it was important to document my Grandson’s ancestry on both sides of his family. I had researched my family history many years ago but now I needed to find out more about my Daughter-in-law’s family. So after she gave me the names of my Grandson’s great-grand parents I created this layout for him. I am going to frame it for his bedroom wall.

I used the same cartridge, Heritage, and the same paper from DCWV. The one thing that I did change was the tree image but it still came from the Heritage cart. I typed up all of the family names in Word and placed them in the frames under the cameos and they contain my Grandson’s parent’s, all four Grandparent’s and all eight great-grand parent’s names. I know that he’ll really appreciate this when he’s older!

I hope that you will still follow me at my blog Angie’s Paper Passion where I will continue to post all of my crafting & Cricut projects and where I hope to continue to inspire others in their crafting pursuits!

Thanks again to all of you for visiting and to Debbie for bringing us all together!

Cricut Info and Other Supplies Used:

Designed by:  Angela Cromwell

Cricut Machine Used: Expression and Cricut Craft Room

Cricut Cartridge Used:  Heritage

Other Supplies Used: DCWV patterned paper, American Crafts cardstock, foam dots

Happy Crafting!

Angela

Wednesday, July 10, 2013

Swim Party 12x12 LO

Hi Everyone!  It's RockinRenee from IcameIsawIcreated.  Today I am sharing with you a layout created using my Imagine and the cartridge The Good Old Days.


Cricut Info and Other Supplies Used:

Designed by:  Renee Cooper
Cricut Machine Used: Imagine
Cricut Cartridges Used:  The Good Old Days & When I Was a Kid
Other Supplies Used:
Misc ribbon from my stash
Snap! life bingo card
Smash pinwheel
Gold metal star brad
White thread
I know that everyone is trying to beat the heat.  Hopefully, this layout will help to cool you down!  It's been great sharing with you on the Cricut Fanatics blog.   Thank you for all the scrappy love.  I would love to still share with you at IcameIsawIcreated.blogspot.com.   Come on by.  Until then, happy swimming...and scrapping,
Renee

Monday, July 8, 2013

Gotta Wear Shades

Hello everyone!  This is Erika from http://EKittyScraps.blogspot.com  I can't believe it is July already.  I am very sad to hear the news that this is the last month for the blog.  I would wake up in the morning and read the blog daily.  I will truly miss this.  I will try to post another project or two before the month is over.  Here is my LO for the month.  This is another LO for my Stepson that got married last Summer.  This is Pre-wedding fun with the Best Man, Maid of Honor and Groom. 
All of the pictures have black backgrounds with either brown or cream colored frames.  Gotta Wear Shades was cut at 3/4 inches using the Shadow feature on the Platin SchoolBook Cartridge.  I could not cut that small without using the Shadow feature.  Too much tearing of the letters on the mat.  The shades were cut at 3/4" and 1/2" (square shades) using Paper Dolls Teen Scene on page 56 and (girly shades) Forever Young cartridge from page 47.  The lens's were cut a 1/4 inch smaller to fit the frames better.   

The banner was cut from the Artiste cartridge on page 66 on kraft paper.  I then used my Festive Berries Distress Stain to color the banner.  Only took a minute or two to dry.  I used pop dots on the banner and all of the shades on the LO to add height.

I added song lyrics about sunglasses to both layouts for fun.


I backed the song lyrics with black paper.

I inked "Gotta Wear Shades" with Vintage Photo Distress Ink to help stand out. 


You now can see the pop dotted sunglasses fron this angle.


I hope you like my LO and Thanks for stopping by. 

Materials Used:
Cricut Expression Machine
Cricut Cartridges: Artiste, Forever Young, Paper Dolls Teen Scene and Platin SchoolBook
Silver and Gray Paper from The Formal Stack by DCWX
Kraft paper
Festive Berris Distress Stain
Vintage Photo Distress Ink
Pop Dots, glue 


Saturday, July 6, 2013

Girly guns

Hi all, Michele here from www.michelegreen.com! Today I have a layout to share with you that is simple but effective. In this layout, my daughter is shooting her shotgun for the first time in preparation for her first turkey hunt.


I wanted it to be girly but still "manly" with the hunting aspect so I choose a pink gingham and kraft scheme. Some faux stitching around the edges of the kraft and letters ties it all together.

The title "Shoot!" is cut from Birthday Bash at 2".  The rifle is from the Cricut Lite cart Yee-haw at 3". (This is one of those cuts that you think would be a lot bigger in size but because Cricut measures in height and not width, it is deceiving.)

I hope you all have enjoyed this simple layout and please continue to visit this month, as it will be out last active month here on the blog.

Designed by: Michele Green
Cricut Cartridges Used: Birthday Bash, Yee-haw
Cricut Machines Used: Cricut Expression
Project type: Layout
Other Materials: Paper - Cardstock, Sharpie pen

Tuesday, July 2, 2013

The First Few Years layout

Hello Fanatic friends. Cindy here from Scrap-obsessed.blogspot. I recently purchased the new Cricut cartridge called The First Few Years. I am loving the layout ideas and how simple it is to get everything cut out because the booklet tells you exactly what size to cut each piece. I started at the beginning with the first layout.


My son and daughter in law just announced they are going to have another baby girl. She is due in October, so I thought it would be nice to have some layouts ready for her arrival. All of the cuts are from the First Few Years cartridge except for the butterflies. I made those using a couple of punches from Stampin' Up. All of the purple and gray papers are from Stampin' Up. I also used Wisteria Wonder ink to sponge the edges of each piece.

Cut sizes:
Photo mat 9.75"
Banner on top 2.25"
Title 1"
Baby Carriage 3"
Circle under carriage 2"
Tags on the left side were both cut at 2.25"

I hope you like my project today and will stop by my blog for future layouts from this cartridge.

Saturday, June 1, 2013

Die Cut Tip Tutorial - Themed Layout Design

Hello Cricut FANatics. Its Debbie O'Neal of Scrap Me Quick Designs.  Happy June 1st to you all !  Hard to believe the summer is here already, isn't it? Our lives are currently filled with end of school activities, graduation parties, weddings, summer vacation planning, summer camp trips, etc.  I think it is one of the busiest times of the year, don't you?

Speaking of summer camps, last year I helped volunteer at my granddaughter's Girl Scout Day Camp. It had a western theme with lots of great western activities, crafts and games.  Of course, I took a ton of pictures and wanted to scrapbook them but wasn't sure how to go about capturing the fun of the photos with the theme of the event.  That lead me to think about Layout Design and using my Cricut so I wanted to share some tips I used to create this page for our Die Cut Tip Tutorial - Themed Layout Design.

 
Die Cut Tip Tutorial -  Themed Layout Design
 
Step 1: Find Die Cut Images on your cartridges that fit your event theme and support your photos.
           
My Example:  I used the Old West Cartridge and selected images that worked with my design idea of game playing and western.
 
Step 2: Determine how many photos you want to use on your page and possible placement.
Begin by selecting your focal point photo and creating a photo mat to emphasize the importance of the photo.
 
My Example: I had this one great photo of my granddaughter all decked out in her western garb (don't you love that fake mustache???) so that was my focal point photo.  I made my own Wanted Poster as the photo mat to continue to emphasize the theme.
 
Step 3: Determine a title (and subtitle if wanted )for your layout and cut out the letters and images
 
My Example: I thought about how she looked like a real "desperado" and came up with the "Armed & Dangerous title and "ready to play" subtitle to again play up the game playing aspect.
 
Step 4: Create some embellishments for your page with your die cuts and size them to fit the areas on your layout where you will place them.
 
My Example: The sign on the Old West cartridge seemed like the perfect subtitle spot and then I created the cards and card box to play up the game playing theme.  I needed one more embellishment to balance out my page and decided to use the cactus to emphasize the western theme. 
 
Tip: Make sure and enhance your die cut images using ink and markers, etc. to add more dimension to your images.  And don't forget that pop dots really help add that wow factor to your die cut placement on your layouts too !
 
Hope this Themed Layout Design Tip gives you some insight on how to take your die cut images and create your own themed layouts.
 
Cricut Info & Supplies Used:
 
Design by: Debbie O'Neal
Cricut Used:  Expression
Cricut Cartridges: Old West
Other Supplies Used: Cardstock, patterned paper, distress ink, marker pens, pop dots


Monday, March 4, 2013

A Quick Little Beach Layout


I created this quick layout in anticipation of a trip to the beach during Spring Break. I used Splish Splash for the  words and castle.  they are cut a 2.5 inches.  I used Ashlyn's Alphabet for the title.  SIMP (Sand In My Pants).  The journaling will discuss the battle we always have when we go to the beach -- sand sticking to our bodies.  The papers are from my stash.  The title is green on top of blue.


Wednesday, February 27, 2013

Man's Best Friend Layout

Hi Cricut FANatics!  This is Rita with Rita's Paper Obsession.  February is the month to celebrate love and I wanted to remember the love of our pets with a layout.


Dogs are great examples of how to live life to it's fullest.  We can learn many life lessons from our four legged friends:
  • When loved ones come home, always run to greet them.
  • Never pass up the opportunity to go for a joyride.
  • Allow the experience of fresh air and the wind in your face to be pure Ecstasy.
  • Take naps.
  • Stretch before rising.
  • Run, romp, and play daily.
  • Thrive on attention and let people touch you.
  • Avoid biting when a simple growl will do.
  • On warm days, stop to lie on your back on the grass.
  • On hot days, drink lots of water and lie under a shady tree.
  • When you’re happy, dance around and wag your entire body.
  • Delight in the simple joy of a long walk.
  • Be loyal.
  • Never pretend to be something you’re not.
  • If what you want lies buried, dig until you find it.
  • When someone is having a bad day, be silent, sit close by, and nuzzle them gently.
Using Paper Pups, I cut the following:  from black cardstock 3" Paw using circle feature and 4" Sundog; from white cardstock 2 5/8" Collar and Buckle; 1 3/4" "Best Friend"; 4" Sundog using the blackout feature.

I applied black and brown ink using a stiple brush to the photo mats, dog image and title.  Stickles were used to create a glittering collar and a clear gem was added to the dog cut.


I ran the dog collar through my Xyron sticker maker and applied red glitter.  On the title I applied red glitter to the heart.  For the buckle I used a Versamark ink pad to adhere silver embossing powder.


I used a paw stamp and Versamark ink to create a background of little paw prints.  Unfortunately I ran out of time to locate a picture to put on my layout so I stamped the mat with a few bones until I can get my picture printed.

Thank you for stopping by and may you run, romp and play daily.

Designed by:  Rita Poteat
Cartridges:  Paper Pups
Cricut Machines:  Expression
Other materials:  Black and brown ink, stiple brush, red glitter, Versamark ink, silver embossing powder, embossing heat gun, paw and bone stamps from a set I purchased a Michaels.

Wednesday, February 6, 2013

Valentine Treats Layout

Hello!  Michele here from www.michelegreen.com.  I'm happy to be posting today!  I tend to scrapbook about a year behind so today's layout is of the preparations for last year's Valentine's Day.  My daughter really wanted to create homemade valentines so we opted to make "sour cream containers" filled with candy.  (Personally, I have no idea why these are called sour cream containers.  I have never seen sour cream like this.  I HAVE however seen juice popsicles like this.  In fact, we were always served those as a treat with our hot lunch when I was in elementary school.  Sour cream...) Anyway... :)

The layout:

I had one little hiccup in this process. I can't find the printed photos!  So here's one that will be printed and put into one of those two big open white spaces:
(Yes, that's me there on the left.)

Here is the layout I have created.  This one was pretty simple to do.  It started because I had a ton of leftover strips from making the containers.  What a perfect way to remember them by including those strips in the layout! I arranged them any old way across a plain white piece of cardstock.


From there, I added my Cricut cuts which were all from the Phrase keys of the Create A Critter 2 cart.
Valentine - 3.5"
Treat - 2.5" (The s is off another phrase so the font matched)
Hearts are all from the owl cut - ranging between 3" and 11"


Here is a close up of the journaling for you:

It was a really fun evening spent with my daughter and niece getting their valentine's ready.  Happy Valentine's Day to all of you reading this!


Sunday, January 27, 2013

Family Layout

Hello everyone, this is Rita with Rita's Paper Obsession.  It is hard to believe January is almost over.  Like everyone else, I set some goals for 2013, one of which was doing at least one layout a week.  So today, I have a layout to share with you as well as a couple online resources I go to when I'm looking for sketch ideas or Cricut images.

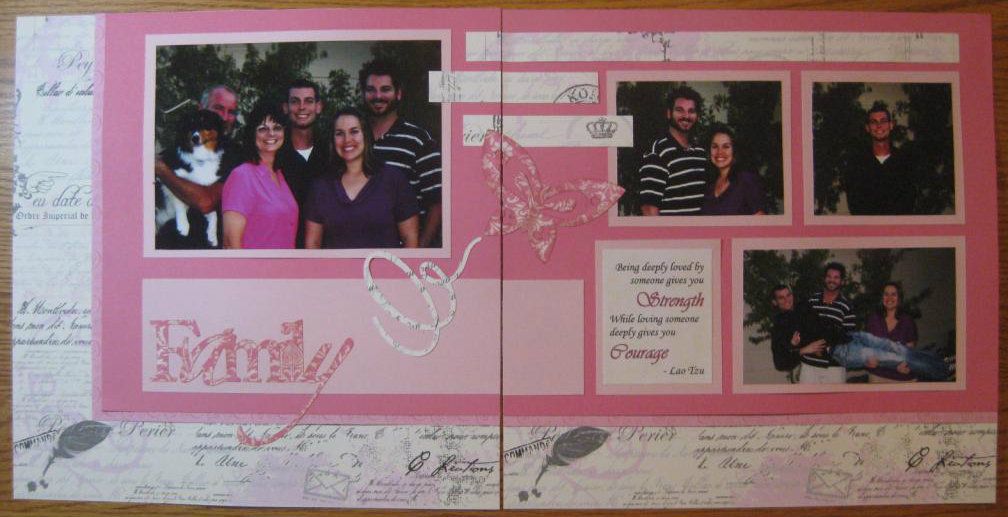
I had some family snapshots I wanted to scrap but wasn't coming up with any great ideas as to how I wanted my layout to look.  For inspiration I went to pagemaps.com.  This site as all kinds of sketches.  I selected a sketch from August 2006.


And here is my completed layout:


I used Echo Park "Love Letters" and Paper Pizazz "Soft Tints Pink Swirls".  The solid pink is from Close to My Heart.

It takes me a while to choose the cuts for my layouts.  Part of the problem is I have a lot of cartridges and don't know which carts have the image I'm looking for.  To solve my problem I go to mycutsearch.com.  This site is awesome and simple to use.  You simply enter what you are looking for and the site shows you all the handbook pages with the searched image.

The Echo Park paper was double sided so I used the reverse side for my cuts.  The butterfly is from Pink Journey and "Family" is from Sophisticated.  Both were cut at 3".  "Family" was part of a longer phrase so I used Design Studio to hide the other words and make the cut.

I started my layout at a crop and I didn't bring my inks but I had my Inkadinkado blending chalks.  I used brown chalk along the edges of my cuts. 

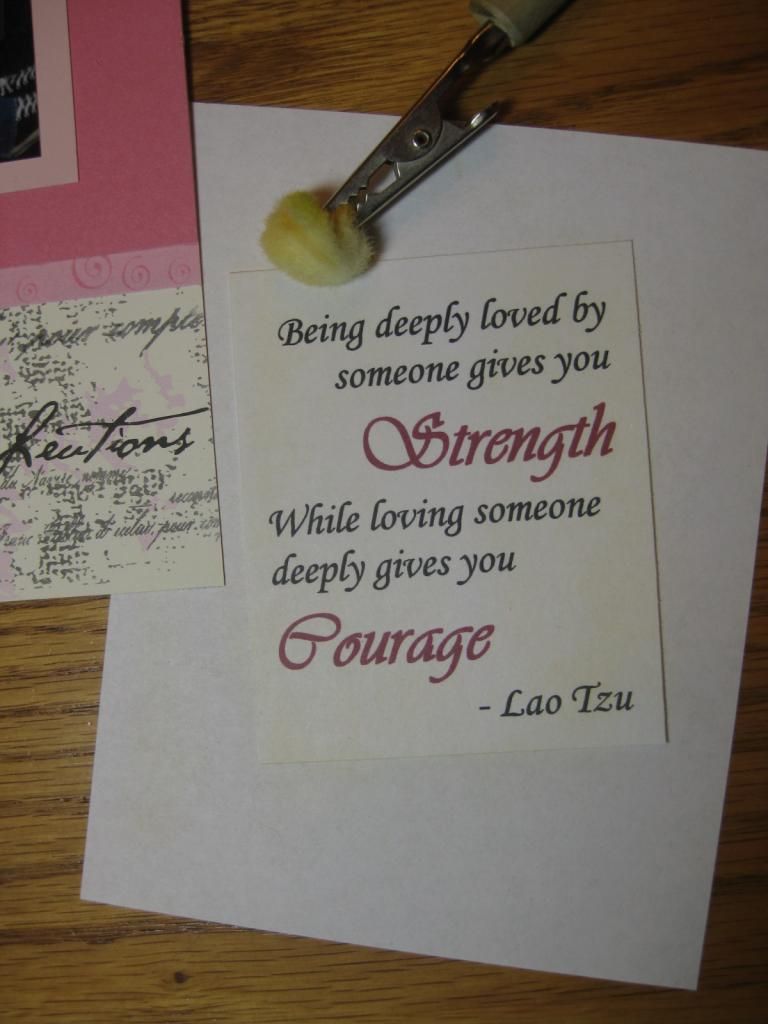
The quote was computer generated but I only had white paper.  I didn't like the starkness of the white so I yellowed the paper with a mustard colored chalk.


Looking for sketch inspiration go to pagemaps.com
Looking for a Cricut image go to mycutsearch.com

Thank you for stopping by and allowing me to share with you today.


Designed by:  Rita Poteat
Cartridges:  Pink Journey, Sophisticated
Cricut Machines:  Expression, Design Studio
Other Materials Used:  Echo Park "Love Letters", Paper Pizazz "Soft Tints Pink Swirls", Close to My Heart pink cardstock, Inkadinkado blending chalks


Friday, January 18, 2013

We Are Together

Hello fellow Cricut Fans!  This is Michele, from Scrap-n-Dance.blogspot.com! (Dancingarden on the MB)  I am so honored to be  your designer today, and I have a layout for you that could be used for family gatherings. 
We just came from a couple months of doing things with our families. Not all of it may have been holiday related! I design these kits for a few friends of mine and they like these more general pages sometimes.  :)  As a bonus, everything in this layout was from my stash!

I really like the "bird on a wire" imagery I found in the printed papers. I wanted a border along the bottom that mimics the print. I did a search on my Gypsy and didn't find anything like that on any cartridge I had. So, I created my own!  I am providing a link to the gypsy file below, please feel free to use it on your own pages! If you post it on your blog, let me know, I'd love to see it. :)

The images I chose are a little whimsical but kind of formal. I wanted a bird image but I also chose the chair because when we visit some of my family, we spend a lot of time sitting and watching the birds through their patio doors. The images evoke those wonderful memories of past gathers for me.

Adhesive-backed pearls add accents to the cuts.
I design on my Gypsy and sometimes I don't pay much attention to sizes. I will list the sizes here but if you don't have a Gypsy, you can always round the size to the nearest quarter inch.

The bird and birdcage are from Sophie, and were cut at 5.38"
The label behind is cut from Elegant Edges at 4.7"
"Together" is from Sophisticated and cut at 2.75"
"we are" is also cut from the Sophisticated font, cut at 1"
The chair is from Sophisticated and cut at 5.69"
The birds on a wire were welded from several cartidges: a stretched dash from Plantin and birds from Heritage, Everyday Pop-up Cards and Picturesque.


Cricut Info and supplies used:
Designed by Michele Donner-Ramsey

Cricut machines used:  Expression, Gypsy
Cartridges used: Sophie, Elegant Edges, Sophisticated, Plantin, Heritage, Everyday Pop-Up Cards, Picturesque
Other Supplies: Bazzill Cardstock, We R Memory Keepers Antique Chic printed cardstock, adhesive flat-back pearls, Distress Ink Black Soot, adhesives

Tuesday, December 18, 2012

oh Happy day

Hello there! This is Michele from Scrap -n- Dance!  Let's take a little break from the holidays for just a moment! I have to admit that I am getting a little overwhelmed by it all, so I'm going to post a layout idea I had that has nothing to do with Christmas! (officially that is... who knows what pictures may end up on the layout eventually! lol)

I love looking at quilts, and wish I had the patience for quilting myself. I've also seen a few scrapbookers use quilts as an inspiration for their pages. That that is where I too decided to look for inspiration!

The bottom half of this layout is made with quite a few "squares" pieced together to look like a quilt. I cut half of them from a blue patterned printed paper and the other half of them from an off-white pattered paper. The "squares" are not true squares at all. The edges curve slightly inward. The shape is button 14 on CTMH Art Philosophy. The edges are inked to give them more depth. Behind these squares is red cardstock, to give the shapes a contrasting background.

The flowers come from Flower Shoppe; the words "oh" welded from Songbird, "Happy" from Cake Basics, and "day" from Graphically Speaking. Oh and the blue scallop border is also from Art Philosophy! I just cut two at an inch so that the two would equal 12".

I will say, getting the "squares" lined up like this was painstaking work at first. Repositionable adhesive tape really helped! But I think the result was worth it. I won't be able to cover the all that "quilting" with pictures, that's for sure!

Cricut Info and other supplies used:
Designed by Michele Donner-Ramsey

Cricut machines:  Expression and Gypsy
Cartridges used:  Cake Basics, Art Philosophy, Songbird, Graphically Speaking, Flower Shoppe
Supplies: Off-white and red colored cardstock, Printed cardstock, buttons, ink, adhesive

Sunday, November 25, 2012

Frying Tom Thanksgiving layout

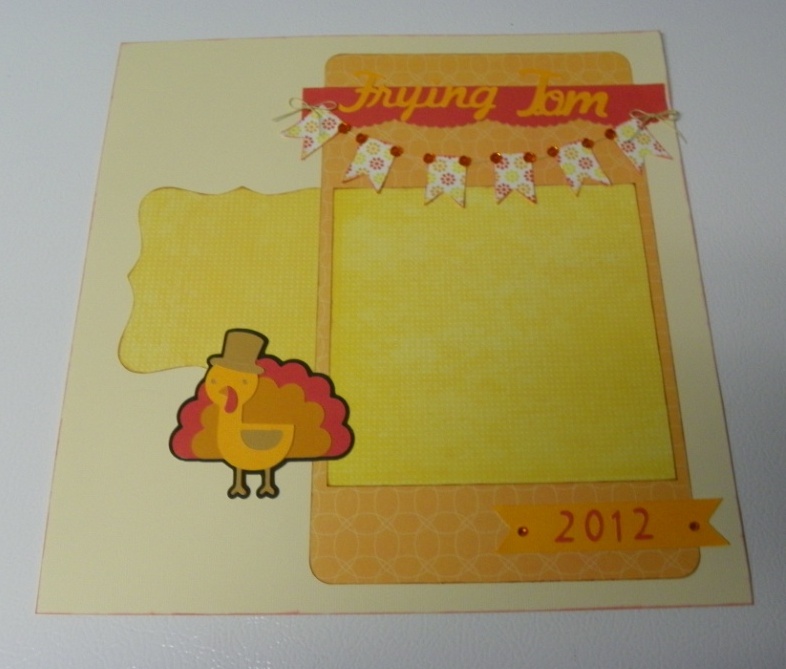
Layout before adding journaling and photos

Turkey - 3" Create a Critter 2


 Hi this is Terri from http://scrappinwiththebug.blogspot.com/ this month for my project I am sharing a layout I made reflective of this past Thanksgiving. Hoping everyone had a GREAT Thanksgiving. I know I did.
The past few years the tradition has been to get a Turkey and fry him. This year was no different. My family all crammed into my brother's apartment for Turkey Day. My husband was in charge of frying the bird. I will say - for those who have never had a fried turkey it is so super yummy. We use an electric fryer and it works wonderfully.
I must admit in the past 8 years of frying the turkey I have never taken photos. So this year I knew instantly that I wanted to make a series of photos showing what steps go into making the this wonderful bird.

I used the paper from DCWV -- Citrus stack and also Fall harvest stack (for the solid paper).

Cartridges used:
Create a Critter 2 - Turkey cut at 3"
Arts Philosophy - Square 4 cut at 4"
Arts Philosophy - Banner  1" each
Billionaire - Welded the words Frying Tom cut at 1"
Billionaire - 2012 - cut .80"

I used a Martha Stewart punch for the accent red and also used a square punch to cut  date tag at the bottom.

The orange rhinestones are from Queen & Co.
Hemp Twine - from Michael's


Designed By:  Terri S.

Cricut Machine Used: Expression, gypsy

Cricut Cartridges Used:  Arts Philosophy, Billionaire, Create a Critter 2,

Other Supplies Used: DCWV paper Citrus and Fall Harvest paper stacks, ATG adhesive, Queen & Co - rhinestones, hemp twine

Saturday, October 27, 2012

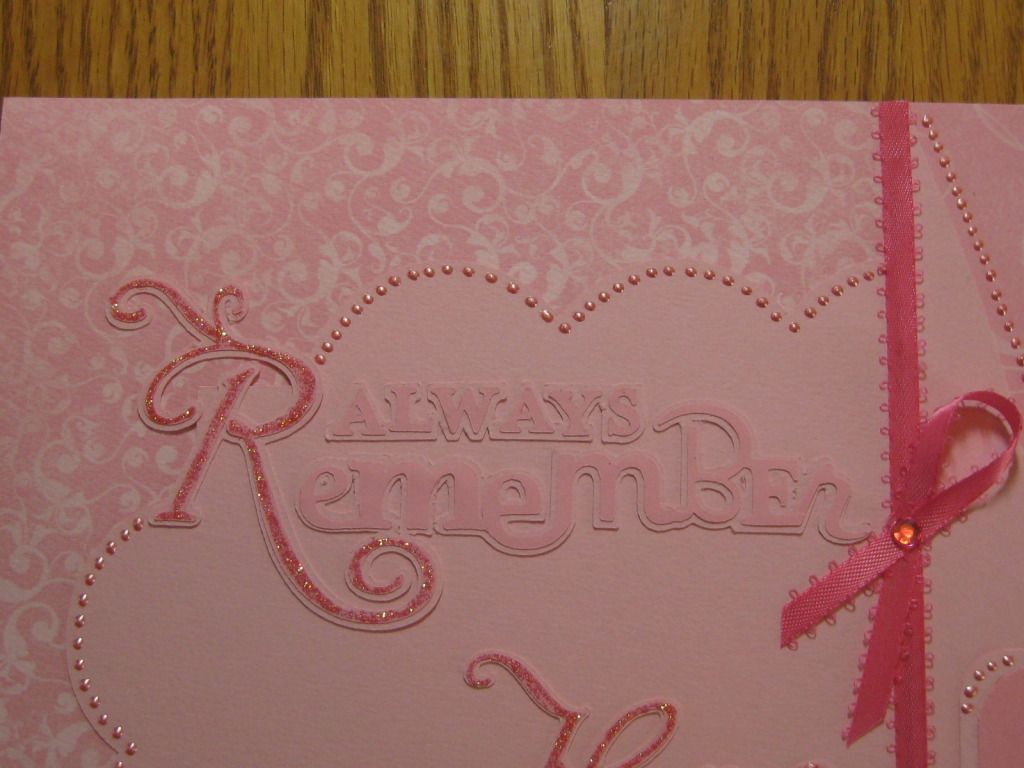
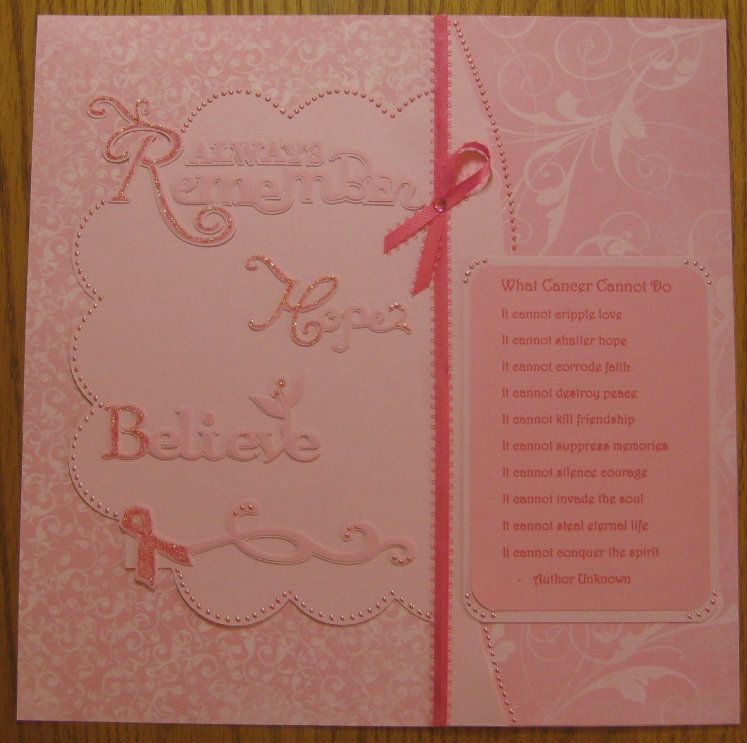
Breast Cancer Awareness Layout

Hi everyone, this is Rita from Rita's Paper Obsession.  As you know, October is Breast Cancer Awareness month.  It is also the one year anniversary of my breast cancer diagnosis.  I can't let the month go by without doing my part to promote awareness.

When talking about awareness, the emphasis is on reminding ladies to get their mammograms and the importance of self exams.  Yes, these things are important, but I want you to be aware that a lump in the breast may not be the first sign.  Five lesser known signs of breast cancer are:  1. Itchy, sore, reddened breasts; 2. Upper back pain; 3. Nipple changes; 4. Change in shape or size; 5. Pain, swelling or lump in armpit.  It was a couple of the lesser signs I chose to ignore.

So, my public service announcement - Get those mammograms, do self exams and watch for the lesser known signs.  You know your body, DO NOT ignore it.

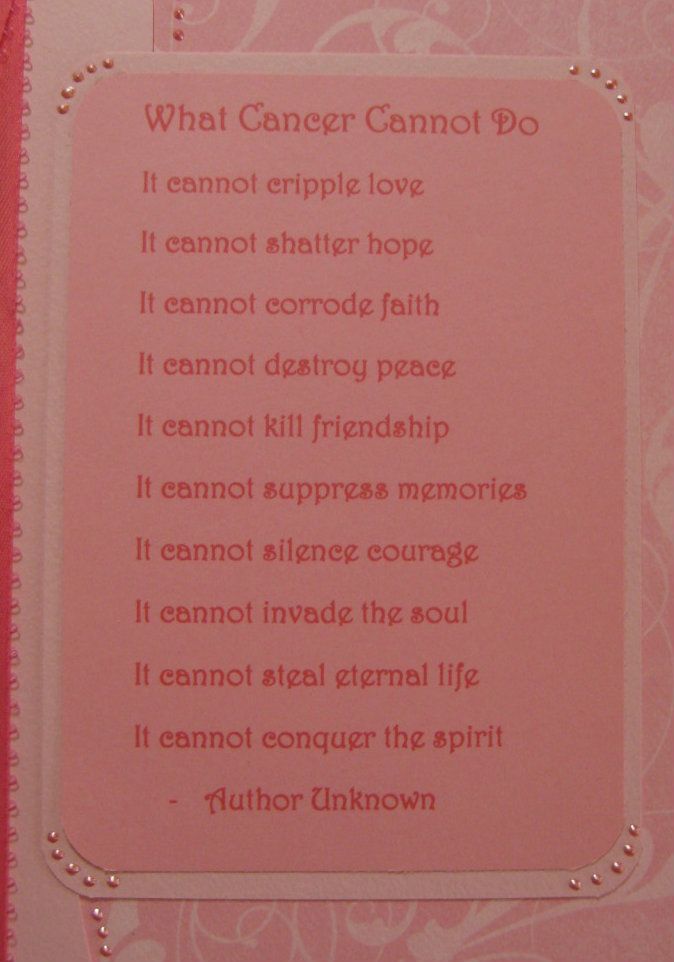
I am slowly scrapping my journey.  One of the things I wanted to remember was a poem I saw daily while I was going through radiation.  It was on a plaque hung on the waiting room wall and was a great reminder what cancer could not take from me.


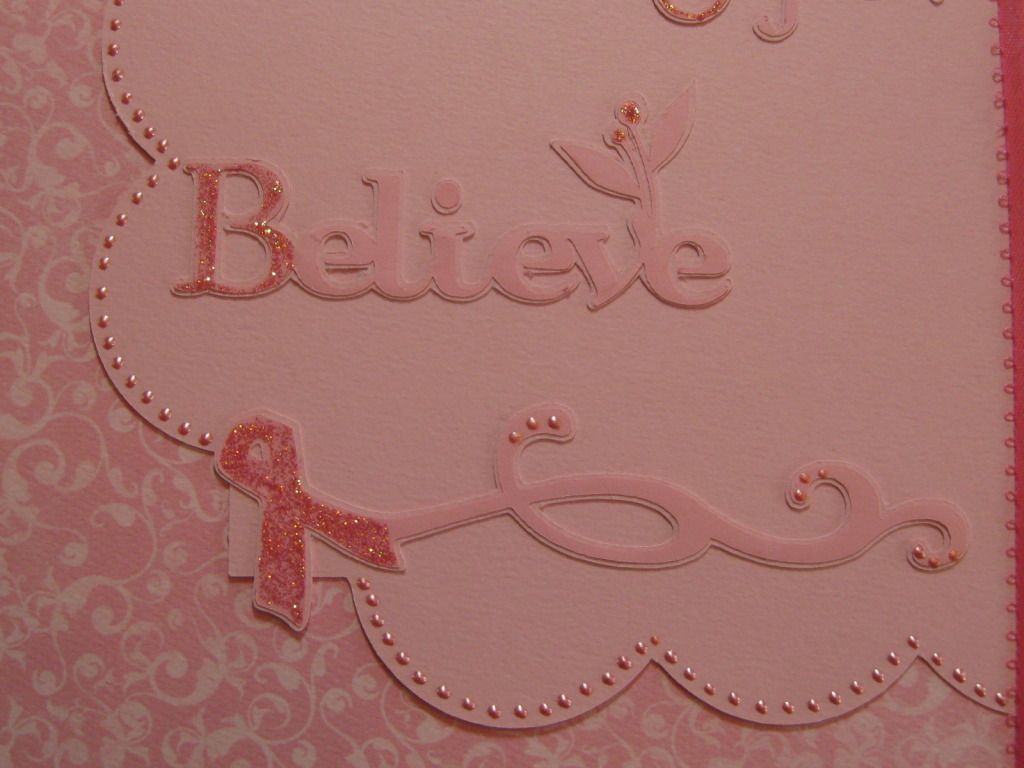
The scalloped cut is from the Elegant Edges cartridge.  I used the base image and cut the Ivy (button 2) at 9 inches.

The phrases and ribbon cuts are from the Pink Journey cartridge.  "Always Remember" was cut at 2 1/2 inches.  "Hope", "Believe" and the ribbon flourish were cut at 1 1/2 inches.

I hand cut the curved edge of the solid on the poem side.


I highlighted the first letter of each phrase and the ribbon with Stickles.  I used Liquid Pearls to accent the scalloped cut, along the curved paper edge, on the corners of the poem mat and on some of the flourishes.  Ribbon was added to soften the contrast between the two sides of the layout.

Thank you for allowing me to share with you today.

Cricut Info & Other Supplies:

Designed By- Rita Poteat

Cricut Machines Used- Expression

Cricut Cartridges Used- Elegant Edges, Pink Journey

Other Supplies Used- BoBunny's Back to Backs "Passion Fruit Flourish", solid pink cardstock from my stash, ribbon, pink gem, Liquid Pearls - Petal Pink, Stickles - Fruit Punch

Saturday, October 6, 2012

Fall Soccer layout

Hello!  This is Michele from www.MicheleGreen.com.  I'm happy to be back again this month!  When I think of October's theme fall, the first thing that comes to mind is jumping in the leaves!  But... I don't have any pictures of that.  I must be too busy in the leaves myself - ha!  Another fall thing in our house is soccer.  So that is what I bring to you today - a fall soccer scrapbook layout.


My older DD really likes to play soccer.  She plays in the rec league in our town.  When asked what she liked best about last season, she said, "I guess everything.  And I really liked my team."  So I guess that was a pretty good year!

So how did I make this?  Well, the soccer green pattern paper was in my stash.  The soccer girl is cut from the All Sports cartridge.  She was cut at fit to page, which ended up being just over 8".  A little tidbit about this girl - she does not fit exactly on her base layer.  I had to do a little trimming so that she didn't have grass growing off her arms and legs.  Or... in soccer you do get a lot of grass stains, maybe they meant it that way?!


The title was cut from Varsity Letter, the Lite cart.  Fall was cut at 1.5" and Soccer at 2".  I used the Narrow feature key because I think those letters are so much easier to glue together than the normal font.  I'm not sure the name of them but I used the Scotch dimensionals that you see in the picture to pop up the word fall. I love these when I want something to stick up but not too much.  They are made of a soft foam and are easy to squish down.


Here's just a fun pic of the layout in progress as I thought things out and decided where things were going to go.


Here is a closer view of the left hand final page for you:


The journal box there is from the phrase key of the soccer girl I used from All Sports.  It was cut at 2.5" in purple and 2.25" in white.

And of the right side final page:


And lastly, I have one fun picture for you.  Do you ever wonder what someone's desk looks like in the middle of a project?  Here was mine in the middle of this layout.  Do you see all that nice corner desk work space?  Yeah, me neither!  All that space and somehow it all gets instantly covered up and I end up working in a 6x6" area.  Sheesh!  :)


I hope you all have a wonderful weekend!!

CRICUT INFO & SUPPLIES USED: 
Designed by: Michele Green
Cricut Machine Used: Expression
Cricut Cartridges Used: All Sports, Varsity Letter
Other Supplies Used: Green soccer paper; white, black, green, and purple cardstock, black ribbon, Scotch Pop Ups

Wednesday, September 26, 2012

Savory Memories

Hello, this is Liz of lizziesworldofcrafting.blogspot.com.  Today I have a layout to show you.

Twice a year I attend a weekend retreat with a group of friends at a beautiful Inn in Vermont.  The name of the retreat is called Savory Memories...the food is so delicious which is the Savory Part of the name.  (Grr--I apologize in advance for the pictures my camera is acting up).


The window is cut from Spring Cottage at 4" (I added the strips of paper behind the window so there would be "curtains." 

The word Savory is cut from the From My Kitchen cartridge at 3" and the word Memories is cut is from Phrases cut at 3".  I used the Shadow feature on both words.  The butterfly is cut at 2" from cake basics (I think this is my favorite butterfly!)


 I wanted to add a bit of extra around the matted picture so I cut the fence from Spring Cottage at 4" and then cut it in half with scissors and surrounded the matted picture of the girls.

I hope you have enjoyed my project.  Have a sparkling day!

 Cricut Info & Supplies Used:
Designed By: Liz Vellali
Cartridge(s) used:  Spring Cottage, Cake Basics, From My Kitchen and Phrases
Cricut Machine(s) used:  Expression
Project Type:  Layout
Project Theme:  Vacation

DON'T FORGET TO LEAVE A COMMENT TO BE ENTERED TO WIN OUR WEEKLY DRAWING IN SEPTEMBER.