Showing posts with label Paper Doll Dress Up. Show all posts
Thursday, April 25, 2013
Graduation Banner
Hello again it's Terri from http://www.scrappinwiththebug.blogspot.com/ bringing you a fun graduation banner.
A few weeks ago a friend asked me if I would make a banner for her daughter who is graduation from high school. The colors are royal blue and silver. She just gave me a size wanted and the name and told me I had free rain for the rest.
I went with the traditional Congratulations and her name then I added some additional banners w/ the fun graduate, diploma, class of and a few little stars.
Banners were cut at 5" w/ the shadow feature from Birthday Bash
The letters were all cut from Something to Remember at 3" - 3.2" I used my gypsy to size them accordingly.
I also did the shadow function with those.
The girl was from Paper dolls - and I used the "hide" feature so I could stamp some PKS faces on them. She was cut at 3.5"
The Class of 2013- I did again with the gypsy and sized the letters at 1.6 and welded them together.
The diploma was cut at 1.5" from Wrap it up. (You know those cartridges you forget about when buy them having awesome fun features).
I since she only wanted Royal Blue and silver I pop dotted the letters up so they would really stand out on the banner.
The paper is Cord'inations - royal blue and some light weight silver paper from bazzill.
Machine used: Gypsy, and Expression
Cartridges: Birthday Bash, Paper dolls, Something to Remember, Wrap it up
Thanks for stopping by today hope you have a GREAT DAY
Terri
Monday, April 8, 2013
Bunny Cards and Tags
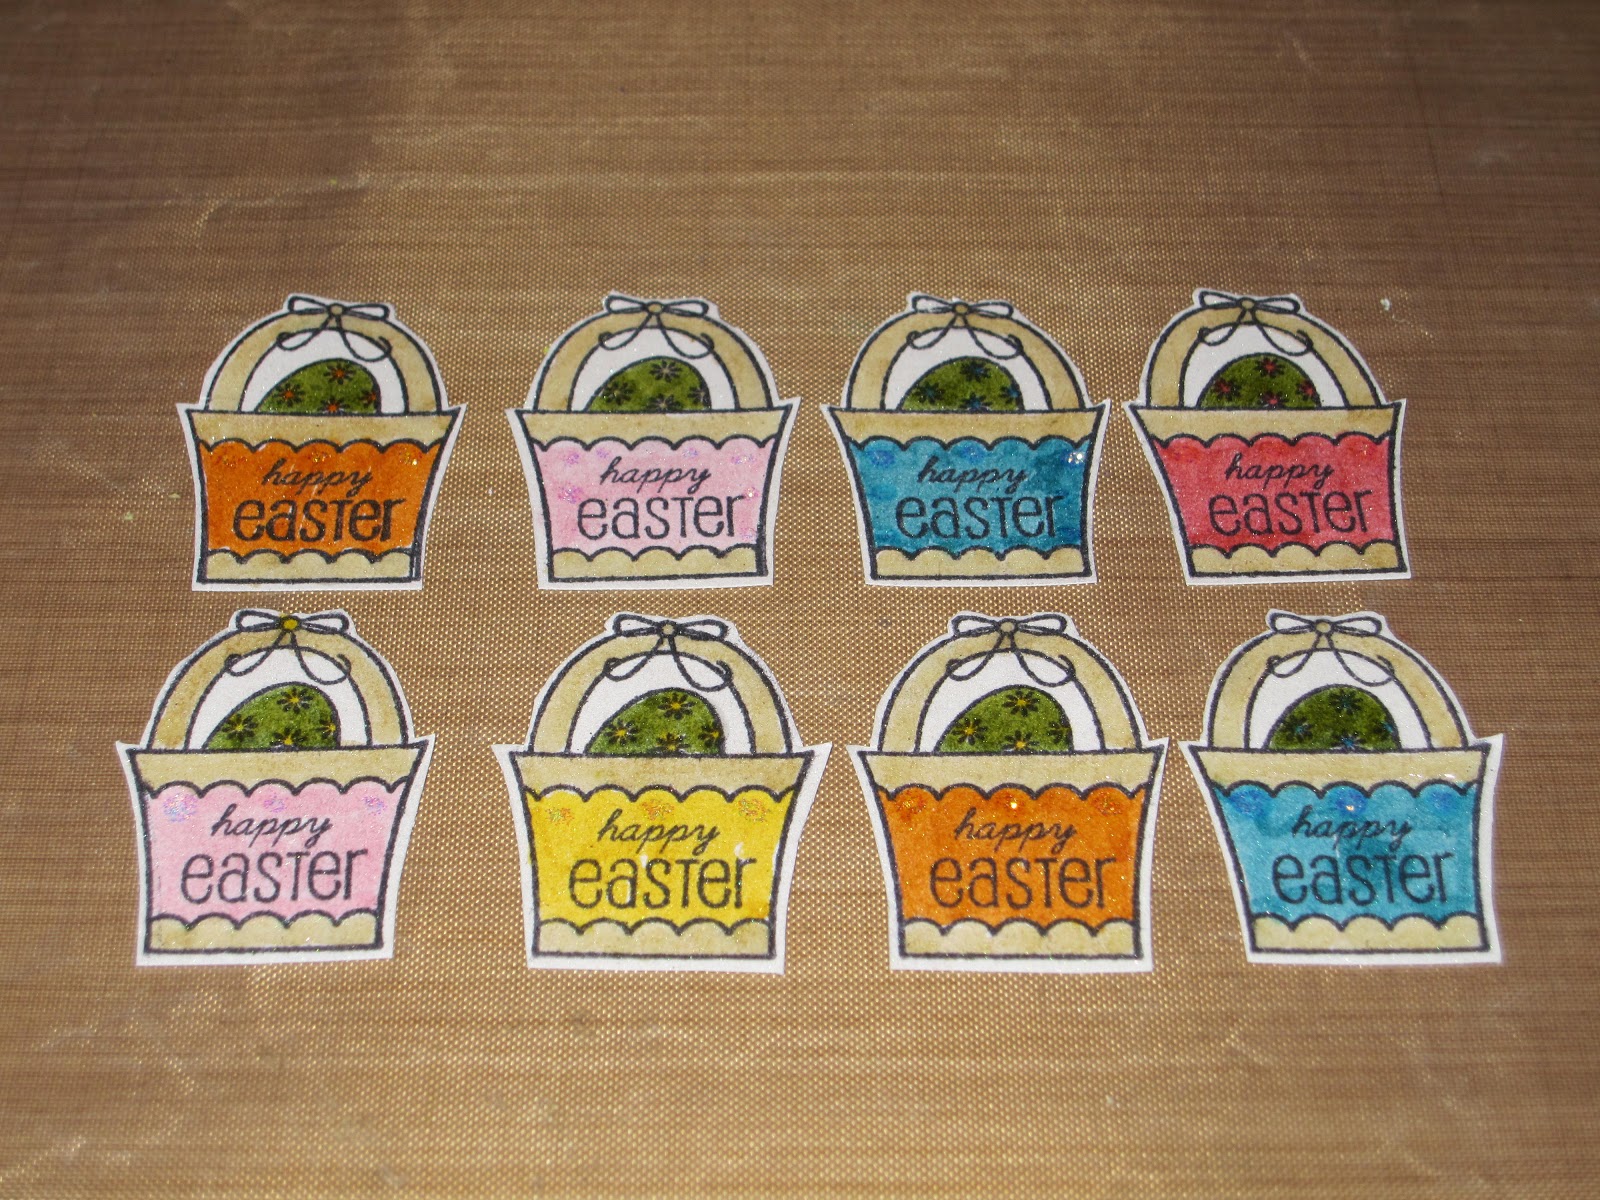
Hi Everyone. This is Erika from http://ekittyscraps.blogspot.com/. I am so happy to be here today and share my projects with you. First up is the bunny card-Peter Cottontail and his Easter Basket.
I used the easter basket stamp from Studio G (a $1 stamp-love them) and also fussy cut and colored with Distress Ink Pens.I added glossy accents and stickles to the easter basket since they looked kind of flat or dull compared to the embossed glittery rabbits. I added popdots to back of the easter baskets and added to my card. I used Vintage Photo distress Ink to outline each card.
Thanks for stopping by and have a good month!
Supplies Used:
Cricut Expression Machine
Cuttlebug
Artiste Cartridge
Paper Doll Dress Up Cartridge
Quarter Note Cartridge
Cuttlebug D'Vine Swirls Embossing Folder
Core'dinations Cardmaker Series Pearls-Pearly White cardstock for stamping on
Inkssentails #8 Manilla Tags
Stampers Anonymous-Rabbit from Spring Sprung Collection
Stampendous Marcasite Opaque embossing powder
Studio G Easter basket stamp-2012
Ribbon-blue and orange
Tim Holtz Idea-ology Paper Stash Seasonal -Easter
Tim Holtz Distress Collection Paper-Weathered Wood and Peeled Paint
Reminisce Papers-Bunny Collage
Blue and Fuschia Cardstock
Tim Holtz Distress Ink Pens-various
Tim Holtz Distress Ink-Vintage Photo
Here are the items I added to the card.
First I cut my Weathered Wood distress cardstock into 4 x 6 sheets. Next I used my swirls embossing folder and my Cuttlebug. I added the Weathered Wood swirl paper to my card and then layered with the TH Seasonal Cardstock-Easter.
I used my Paper Doll Dress Up cartridge to cut out the grass on Peeled Paint Distress Cardstock and adhered to my card.
I used my rabbit stamp from Stampers Anonymous and heat embossed the image. I fussy cut out the rabbits and colored with Distress Ink pens. I added small pieces of cotton balls for the cotton tails and adhered with glossy accents. I used popdots and added my rabbit to the card.
Here are a few of the finished Bunny cards.
Next up are the tags I created for my Easter bags. I used both sides of the Reminisce papers. This paper had light blue polka dots on one side which is the background paper of this tag and the bunny designs on this other side. It also had the purple bunny and chicks border on it that I used on the bottom of the tags. I almost missed this cute border because it was only on the backside of the paper. I used my Artiste cartridge to cut out the names at .75 inches for 5 letter names and at 1 inch for four letter names on blue cardstock. I added a final blue ribbon to each of the guys' tags and outlined with Vintage Photo distress ink.
The girls' tags were also made from another Easter Reminisce paper which had pink polka dots on one side with a pink and green striped border on the back. I used the border on the top and bottom of each tag. I used my Quarter Note Cartridge for the fancy font names. I cut these at .75 inches for five/six letter names and 1 inch for the three letter name on fuschia cardstock. I added a orange ribbon to match their Easter bag and used Vintage Photo distress ink to outline the tag. These tags were so easy to make since I only had to cut out the paper and names and adhere with Scotch Quickdry Adhesive.
Here are the Easter bags with their bunny paper tags. I purchased these cute bags from Joann's for $3.99 for 8. Perfect for Easter but with a different paper could be used for any spring time event.Thanks for stopping by and have a good month!
Supplies Used:
Cricut Expression Machine
Cuttlebug
Artiste Cartridge
Paper Doll Dress Up Cartridge
Quarter Note Cartridge
Cuttlebug D'Vine Swirls Embossing Folder
Core'dinations Cardmaker Series Pearls-Pearly White cardstock for stamping on
Inkssentails #8 Manilla Tags
Stampers Anonymous-Rabbit from Spring Sprung Collection
Stampendous Marcasite Opaque embossing powder
Studio G Easter basket stamp-2012
Ribbon-blue and orange
Tim Holtz Idea-ology Paper Stash Seasonal -Easter
Reminisce Papers-Bunny Collage
Tim Holtz Distress Ink-Vintage Photo
Saturday, March 2, 2013
A Little St. Patties Day Drink
Hello. Cindy here from Scrap-obsessed. blogspot.com with a fun little vinyl project. I'm not a beer drinker myself, but I know some others enjoy a little green beer to celebrate St. Patrick's Day.
I saw some of these on Pinterest and knew I could make them with my Cricut. I used Paper Doll Dress Up for the mustache, Birthday Bash for the font and Indie Art for the lips. I used Cricut vinyl in black and red and cut it out using my new Cricut Mini and my Gypsy. I'm very happy with this smaller machine as it takes up a lot less room on my craft table.
I hope you like todays project. I will be making a bunch of these for a friends wedding party (minus the green beer). Cheers.
I saw some of these on Pinterest and knew I could make them with my Cricut. I used Paper Doll Dress Up for the mustache, Birthday Bash for the font and Indie Art for the lips. I used Cricut vinyl in black and red and cut it out using my new Cricut Mini and my Gypsy. I'm very happy with this smaller machine as it takes up a lot less room on my craft table.
I hope you like todays project. I will be making a bunch of these for a friends wedding party (minus the green beer). Cheers.
Wednesday, February 13, 2013
Cricut Saint Patrick's Day Card
Sis from Paper, Craft & Scissors with a Saint Patrick's Day Card (or any other Irish or coffee occasion) to share as I shared my Valentine's card previously on my blog.
I will share a few Cricut Craft Room tips that I used to make this card. If you are interested in learning more, there is a terrific resource available at the Cricut Craft Room Blog (by Narelle and Scrapalette).
I used the "Love You a Latte" card and selected frappucino 2 as the base of my Irish coffee. As designed, there is some greenery peaking out from the whipped cream, but it isn't a shamrock. Because the second base layer is the same as the first minus the greenery, I copied the shift layer and simply welded two small shamrocks from Paper Doll Dress Up.
As Irish coffee does not include sprinkles, I used the "Edit Contour" feature to hide the sprinkles cuts. I needed some eyes to smile, so I used the "pinwheel face" from Create a Critter, edited the contours, and welded the eyes and smile on the "coffee layer." To ensure the eyes and smile were visible, I also cut the "coffee layer" from black card stock (without the smile and eyes). Assembling the Irish coffee mug was a breeze and I used foam squares to attach the coffee to the label.
I selected a blue background for the label in order to highlight the coffee. The label is from Twinkle Toes (Dance Team). I also cut a label from lightweight cardstock and adhered to the blue label to add some dimension. To further highlight the featured cut, I added some copper-colored brads in the corner of the frame. The banner behind the label is from B is for Boys (once again I used Cricut Craft Room to remove the "slits" in the cut).
I like to use a variety of prints and colors to add interest and depth. I printed the sentiment and trimmed it by hand. The sentiment is also attached to a small piece of lightweight chipboard.
And there you have it, a smiling cup of Irish coffee without a bow or glitter accent in sight.
Wednesday, November 21, 2012
Elf on The Shelf Letter
Happy Holidays to all. It's L.B. from Cool Beans By L.B. and I love the holiday season. Starting with Thanksgiving and through the New Year I just love it all. One special thing that we have done in our home for the last few years is have the Elf on the Shelf visit our home. For those who do not know, the Elf on the Shelf is a story about an elf who comes and visit your home daily before Christmas. Each night it reports back to the North Poll about how the children (and adults) are behaving in that home. There is a doll that comes and it moves all over your home during it's stay...check out Pinterest for some of the crazy ideas people use. It is almost time for our elf, Conner, to arrive and I thought a letter reminding my daughter about his arrival would be a cute way to start the fun.
I found this sheet of cardstock in my holiday pile. I loved the way it looked like a postcard. I cut out a simple little elf using the Paper Doll Dress-Up cartridge. Once I had him all dressed I added some sparkle with my Stickles. I placed him onto the letter background.
Next, I used one of my favorite font cartridges: Billionaire to cut out the names for the greeting and closing. I love how this cart welds together on my Gypsy.
Once the names were on I add a simple little letter, including a message about playing in Mom's craft room. This letter will today and Conner will arrive at a special breakfast on Sunday morning. Hope you all have a wonderful Thanksgiving and are ready for the holidays to come.
Cricut Info & Supplies:
Designed By: L.B.
Cricut Machines: Expression, Gypsy
Cricut Cartridges: Paper Doll Dress-up (elf and parts cut at 5.5 inches), Billionaire (letter height 1.47 inches)
Project Theme: Christmas and holidays
Additional Supplies: Gold and Diamond Stickles, Scotch's Two Way Glue, DCWV Christmas Combo stack
Friday, October 19, 2012
Happy Halloween!
Hi Everyone! This is Kim from imlosingitonceandforall again. Hope you all are enjoying your October so far. It's amazing that we are already half way through the month! I was really undecided on what to do for this month's post but decided to go with the Halloween theme since this is the month and all. :o) So without further adieu here it is!
I had a lot of fun creating this and used several of my crafty items that I've either long forgot about or just recently purchased and didn't bother to use yet. Signing up for this blog was one of the best things for me because I really have been using things from my stash. The only thing I had to buy for this was the vellum I could have swore I had some but had no luck in locating it and really wanted the effect it would bring.
It really was super easy. I started out with a $2 unfinished frame that I purchased from Michael's some time back and painted it with an Adirondack Citrus paint dabber. I was a bit impatient for it to dry so I went ahead and used my heat gun to dry it. I actually hoped that it would age it a bit but no luck. No worries though because to get the darkened edges I just swiped my Black Soot distress stain from Tim Holtz all around.
As for the cuts I used a couple cartridges for this. The web was cut twice once in vellum and then again in black cardstock (all of the measurements are from my Gypsy so they are not in normal inch format) and are 4.93 for the width and 4.71 for the height. The bat was from Paper Doll Dress Up in purple cardstock and measured at 5.02 for width and 6.29 for the height. Lastly I cut the Boo! from Mini Monsters in orange cardstock at 3.59 for the width and 4.00 for the height.
After cutting everything out I cut the black spider from the web and glued it to the top of the vellum spider. I then found some mismatched googly eyes and glued those on.
For the bat I really wanted him to have some dimension so I scored his wings and did a little accordion fold. He also needed some googly eyes so I found a couple more and stuck them on. I also outlined the cricut cut lines to give a mouth and define his wings.
Lastly I had the Boo! to deal with. The orange was a bit bright for my taste on this project so I wanted to rough it up a bit. I recently purchased some Faber Castell Gelatos so I snagged the purple one and outlined all of the edges. I then just took my finger and smeared it everywhere to rough it up. I really liked how it turned out.
I then glued all my pieces on but I still felt that it could use something else so I pulled out my Goosebumps Shimmer Texture Spray and misted the entire project. Unfortunately the picture just won't turn out of the entire frame coated in it but you can see some of it in the other pictures I've posted. This was the first time that I've altered or dolled up a frame and I'm quite pleased. I do wish though that the picture I have in it printed out better but that's our home printer for you! I'll be looking to have one printed at the local store I think LOL
Hope you've enjoyed my project and I look forward to posting again for you next month!
Happy Halloween!
Cricut Info & Supplies Used:
Designed By: Kim
Cricut Machines Used: E2, Gypsy
Cricut Cartridges Used: Paper Trimmings, Paper Doll Dress Up, Mini Monsters
Supplies Used: Purple, Black, and Orange cardstock, vellum. Random googly eyes, wooden frame from Michael's, Goosebumps Shimmer Texture Spray, Adirondack Citrus Paint Dabber, Tim Holtz Black Soot Distress stain and Fiber Castell dark purple gelato stick.
Friday, September 21, 2012
Vacation Memories
Good day all! It's L.B. from Cool Bean By L.B. and I am so happy to be part of the Cricut FANatics family. School may be back in session but many are still clinging to summer memories. In honor of making memories today I get to share two autograph books I made for a friend about to journey to Disney World for the first time.
For these two books I started with 2 5x7 albums by The Paper Studio. These albums have 24 pages and are just the right size for autographs and pictures if desired.
My friend's son is very into Jake and the Never Land Pirates so I selected the adorable treasure chest off Life's A Party. I cut it at 3.75" high to cover the center photo hole on the album. To add the Disney touch I cut gold coin Mickey Heads at 1/2 inch from the Disney-Mickey Font cartridge.
Every princess needs a castle so for an adorable little girl's autograph book I cut one from Paper Doll Dress Up at 2.65 inches high. I placed the castle on a double layer of backing from Lacy Labels(4.3 height and 3.64 height)
I have made many of these autograph books for my own daughter and family friends. They have so much room to get the signatures you want and you can always add photos or stickers to them to capture the full memory.
Thanks for joining us at Cricut FANatics today and we hope to
"See Ya Real Soon!"
Cricut Info & Supplies Used:
Designed By: L.B.
Cricut Machine: Expression (with Gypsy)
Cricut Cartridges Used: Disney - Mickey Font, Life's A Party, Paper Doll Dress Up, Lacy Labels
Other Supplies Used: Paper Studio 5x7 album, various cardstock, Scotch Scrapbooker's Glue
Subscribe to:
Posts (Atom)