

Showing posts with label School. Show all posts
Showing posts with label School. Show all posts
Saturday, November 3, 2012
A Quick Project

Saturday, September 29, 2012
Clever Paper Clip Holder
Hi Everyone, This is Stacey (StaceyM) with a back to school idea. I have been a middle school teacher for 20 years and love using my Cricut to make things for my classroom. Today, I embellished a paper mache box to make a paper clip holder. Teachers go through a lot of paper clips.


I hope you enjoyed today’s project and have enjoyed reading this blog everyday as much as I have.
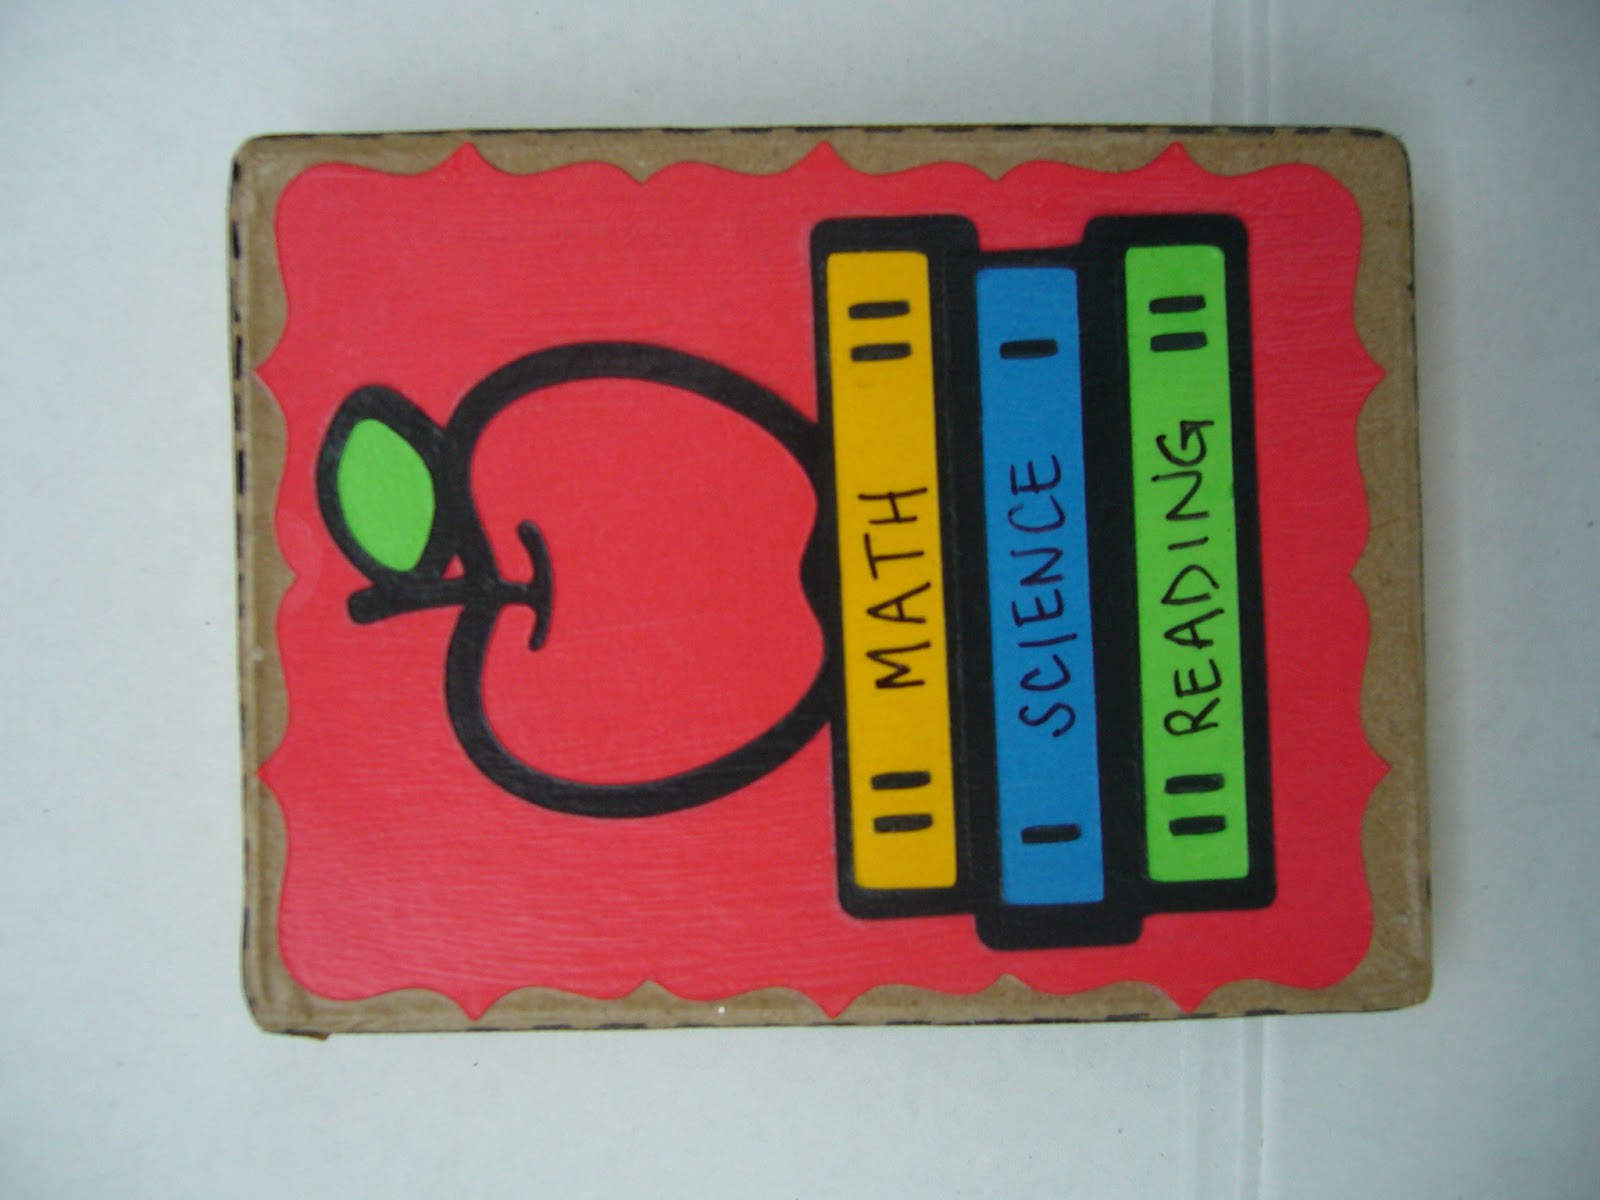
Lid Directions – I cut the apple with books (Hello Kitty Greetings) at 3.5 inches using red, green, blue and gold paper. I cut the shadow out in black. Next, I cut the oblong burst (Elegant Edges) at 4.5 inches out of the same red as the apple. I used 2-way glue to adhere the apple with books layers and then I used paper Mod Podge to adhere all pieces to the lid. I found ruler ribbon that I adhered to the outside of the lid.

Box Directions - I cut the oblong burst (Elegant Edges) four times at 4.5 inches out of the same blue as the science book. I cut eight paper clips (Locker Talk) out of silver holographic paper at 1 inch. I had some black glitter adhesive paper from DCWV that I used for the letters. I cut the word Paper Clips (Pooh Font Set) out twice at 1 inch. The blue oblong burst was trimmed to fit each side of the box. I used paper Mod Podge to adhere all pieces.

To finish the box, I put an extra coat of the paper Mod Podge over everything. I used a Sharpie black paint marker to write Math, Science, and Reading on the books and I also put stitching on the edges. I glued a piece of magnet paper to the bottom of the box to help the paper clips stay inside.

I hope you enjoyed today’s project and have enjoyed reading this blog everyday as much as I have.
Cricut Info & Supplies Used:
Designed by : Stacey M
Cricut Machine: Expression
Cricut Cartridges: Hello Kitty Greetings, Locker Talk, Elegant
Edges, Pooh Font Set
Other Supplies Used: DCWV Glitter Adhesive Paper, Paper
Mache Box, Various Colored Papers, Holographic Paper, Paper Mod Podge, 2-way
Glue, Sharpie Black Paint Pen, Ruler Ribbon
Tuesday, September 25, 2012
An apple a day....
ʺHello, this is Terri of http://www.scrappinwiththebug.blogspot.com/. Today, I have an Apple Mini photo album to show you.ʺ I made these cute little apple albums for my daughter's pre-school teacher and assistant. I made these so they could put a small 3x3 photo inside. This album will hold 24 total photos, however, I only matted the one side.
 |
| Apple mini photo album |
 |
| Finished Apple Mini Album |
I used only 3cartridges for this project.
Create A Critter - 2 Apples and worms with shadows function I hid the faces of the apples w/ the gypsy
Mini Book - Cut 6 of the Square L2 cut for inside pages
Cricut Craft Room Basics - Rounded Squares (photo mats)
 |
| Scored all pages |
Once cut I then scored the pages on the tick marks using a score board. Glue 3 of them together end to end. I simply glued the tab to the bottom of the next page. If you need more area for photos then cut out another page.
 |
| Mountain/Valley fold the pages after glued together |
I folded each of the pages in Mountain/Valley style or fan fold.
 |
| Glue pages to apples
|
Once folded then I glued the pages tot he inside of the apples. I glued some twine under the 1st page to make a pretty little bow. Hold down the album and carefully glue the back page on.
 |
| Add photo mats and tie |
Once the inside pages were glued down I added a red photo mat cut with Craft Room Basics for the mats. I find I like to use my machines to make the photo mats.
I then decorated the Apple shadow cut. I added the brown layer, then the green leafs, and the red apple layer. I added the cut little worm to the side with foam dots.
Cartridge Cut w/ Measurements:
Create a Critter Apples: 5 1/2" - cut 2 of them - one for each album w/shadow function & layers
Create a Critter Worms: 2" - cut 2 of them one for each album w/ shadow function and layers
Mini Books - 3 1/2" Square L2 - cut 6 of them 3 for each album (unless you need more space for photos).
** A little tip - if you try to cut the L2 squares at 3 1/2" on the expression it will beep at you and say that it won't fit. That is because it is very close to the edge of the 12x12 mats. Here is a little trick - select the Mat Size 24 function and still use the 12x12 mat. It will really cut almost to each edge so make sure the paper is 12x12. ***
Cricut Info & Supplies Used:
Designed by: Terri S.
Cricut Cartridges Used: Create a Critter, Mini Book and Cricut Craft room basics
Cricut Machines Used: Cricut Expression and Gypsy (to hide the face on the apple
Project type: Mini Album
Project theme: Teacher
Other Supplies Used: Paper from Michael's, scotch liquid glue, ATG tape, white gel pen
Monday, September 24, 2012
Cute School Home Decor Project
Good morning everyone! This is Julie (Hurricane Zuri on the Cricut
message board) of http://mommys-playroom.blogspot.ca/.
I am really happy to be a part of the Cricut FANatics. Today I have a home décor project to share
with you.
As I was thinking about what type of
project to do, I was also dealing with my entire family being sick. It seems that the beginning of each school
year brings home new germs. So I decided
that a school themed tissue box cover would be an appropriate project.


To make the box cover I used the Gypsy and
the George and Basic Shapes Cricut cartridge.
The yellow portion of the cover measures 15“ x 4 ¼ ”. It is scored at 5 ¼” and 9 ¾”. The red portion is the same size with four 1”
x 5 ¼ ” rectangles welded to it and scored for the tabs. I welded an oval (cut at 1 ¼” wide and 3 ½ “
tall on the Gypsy) to both pieces for the opening on the top.

The chalkboards measure 4 ¼ “ x 5 “ with
white faux stitching added using a white pigment ink gel pen. All of the images are from the Recess Cricut cartridge
and were adhered with pop dots. The pile
of books was cut at 2 ¾”. I embossed the
apple using the PC Divine Swirl embossing folder to make the apple pop a
little. I love the dimension it adds.
The veins on the leaves were drawn in with a Stampin’ Up Old Olive marker. The stem was colored using a Stampin’ Up Early
Espresso marker. I embossed the pages of
the book using the Stampin’ Up Woodgrain
embossing folder.

My favorite part of the tissue box cover is
the old-fashioned school house. It was
cut at 3 ¾ “.

I always picture an old school house as brick. I used the PC Brickyard embossing folder to
create the look. The school bus was cut at 2 “ and the ABC was cut at 2 ½ “.
I hope you enjoyed my project today. Have a wonderful week!
Cricut Info & Supplies
Used:
Designed By: Julie (Hurricane
Zuri on the Cricut message board)
Cricut Machines Used: Gypsy,
Expression, Cuttlebug
Cricut Cartridges Used: George and Basic Shapes, Recess
Other Supplies Used: PC Brickyard embossing folder, PC Divine Swirl embossing folder, Stampin’ Up Woodgrain embossing folder, assorted colors of cardstock, Uni-ball Signo white gel pen, Stampin’ Up markers, pop dots, adhesive
DON'T FORGET TO LEAVE A COMMENT THIS WEEK ON EACH DESIGNERS POST SO YOU HAVE A CHANCE TO WIN A CARTRIDGE.
Tuesday, September 18, 2012
Bus 87
Hello everyone! This is Michele, aka dancingarden on the Cricut Message Board. You can visit my blog at Scrap - N - Dance! I have created a layout for you with the Cricut Stencil material!

I wanted to go along with the "back to school" theme for the month but we will be homeschooling our son... however, I just started this year working part-time driving a school bus! My son gets to ride with me so we don't have to do any sort of day-care - what a great job perk! So I decided I would do a page about me driving the bus (and my son riding along!).
Some of us Circle members got to use the Cricut Craft Room Exclusives for free during August! So I spent most of the past month and a half cutting things from those CCR exclusives, using my gypsy. In this case, I used the CCR exclusive Teresa Collins Basics, the honeycomb background, which I used to cut the Cricut Stencil material. I set it up on my gypsy to cut as large as it could on the mat, which you can also do on CCR.

Have you ever used the stencil material? It's SO EASY! I followed the settings instructions on the box: Speed 3, Pressure 5, Blade Depth 6 and multicut 2.

The stencil cut perfectly! I actually cut two of these since the stencil sheet is 12x24, and gave one to a friend. :)
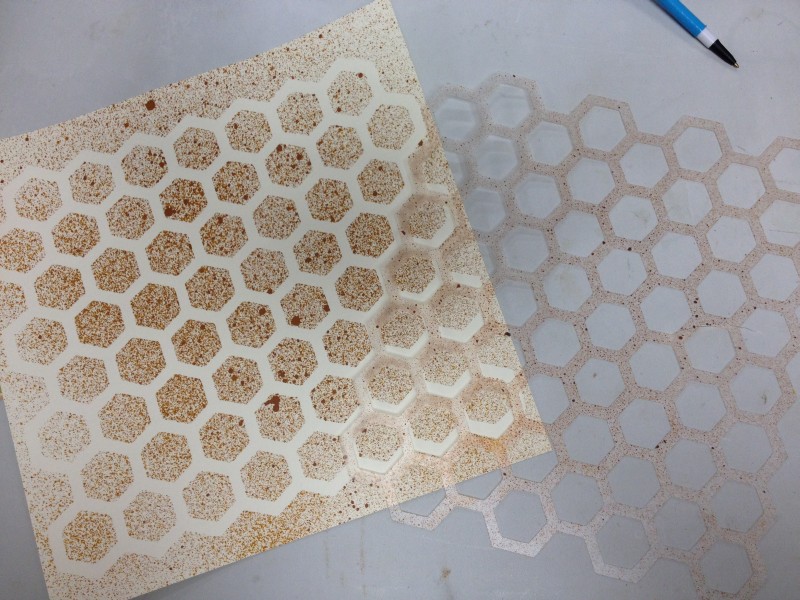
I used some spray mist (in this case, Ranger's Butterscotch) to spray the stencil and cardstock. Do you know the stencil has a sticky back? You just remove the backing and stick it to the cardstock (or other surface). It came right off the cardstock after I'd let it dry. However, after I used this color, I realized it didn't "go" with my photos!

So I tried a different color, Glimmermist Jazz Blue. :) This color was perfect for my project! I love that my stencil is re-usable!
I finished up my layout with Jillibean papers and stickers from my stash (I've been trying to use up my stash!), the title is cut from the Street Sign cartridge.
I hope you try out the stencil material! I loved working with it and I'm glad I have another package of it! :) Happy crafting!
Cricut Info & Supplies Used:
Designed by: Michele Donner-Ramsey
Cricut Machines used: Gypsy, Expression
Cricut Cartridges used: CCR Exclusive Teresa Collins Basics, Street Sign
Other supplies: Jillibean papers, stickers; Glimmermist Jazz Blue, EK Circles Scallop border punch, mini alpha stickers, cardstock, Cricut Cutables Adhesive-backed Stencil Material
Saturday, September 15, 2012
Special Guest Designer: Michele Kovack
Cricut FANatics is very pleased to announce that our very first Special Guest Designer is one of our all time favorite Cricut Designers, the very talented Michele Kovack. As many of you know, Michele was a former Circle Blog Design Team Member and is also a contributor to the Cricut Magazine by Northridge Publishing. Michele was very excited to hear we were creating a Cricut inspiration blog and was gracious enough to agree to be our first Special Guest Designer.
Let's give Michele a warm Cricut FANatics Welcome !
Hi there everyone. Michele Kovack here from Thoughts of a Cardmaking Scrapbooker! I am so excited to be sharing here with you! I feel a bit "out of the loop" lately and am so happy for this opportunity to connect with all of you!
As many of you know I am a teacher....a 5th grade teacher to be exact. School is in full swing, and life has gotten a wee bit crazy! Soon I will be back in a routine and it will feel like I never left. ; )
So of course I had to make a school house. A vintage school house at that! I used the new Something to Remember cartridge. It is such a cute cartridge and I just fell in love with this image. I love making shaped cards because I feel they are so much more interesting....so I welded the two school house cuts using CCR. I used all of the layers and added a bit of vellum behind the windows.

Lace, seam binding, and a glittery wooden button were added to add a bit of charm....

And of course a flower....I can't seem to help myself from adding a flower to everything lately.

I am so glad to have had the opportunity to guest design here today....
.and reconnect with old friends, and make new ones!
As a SPECIAL SURPRISE, I want to do a giveaway to help inaugurate the new Cricut FANatics Blog. I will draw a winner from all comments made on this post by Monday 9/17 at 10 pm CST

The Giveaway includes: Type Candy Font Cricut Cartridge, a Cricut Cartridge Binder, 2 My LIttle Shoebox stamp sets, Piggy Tales Interactive Barndoors, Faber Castell Watercolor Canvas Art, Fancy Pants Glitter Cuts, and a Maya Road Clear Album.
Cricut Info & Supplies Used :
Cricut Machines Used: CCR, Cricut Expression
Cricut Cartridges Used: Something to Remember Cartridge
Other Supplies Used: Cardstock: Kraft, black, cream,Vellum,Designer Paper: red/white, blue/white
Lace, Wooden button, Twine, Glitter, Seam binding, Pearl Black brads
Cricut Cuts:
Something to Remember
Use CCR to weld 2<FstDyScl> at 5.5"
Select Layer 1 and cut 1<FstDyScl> at 5.5"
Cut 1<FstScl-s> at 5.5"
Select Layer 2 and cut 1<FstDyScl> at 5.5"
Friday, September 7, 2012
School Days
Happy Friday!!! This is Anita
from Landlockedislandgirl Blog ! My only Son graduated from
College this past Summer, so this is the first September in 17 years that
I haven't had to prepare for "Back to School" is one way or another.
This project brought back many "First Day of School"
memories.
The inspiration for my project came from the Graphic 45 "An ABC Primer" paper collection. Now, I don't know if you all have the same addiction to "collecting" the beautiful Graphic 45 paper, but I think I own every collection and find it PAINFUL to actually use it! I have to admit, after completing my project, I ran out and bought another pack to replace the pack I used.....
The inspiration for my project came from the Graphic 45 "An ABC Primer" paper collection. Now, I don't know if you all have the same addiction to "collecting" the beautiful Graphic 45 paper, but I think I own every collection and find it PAINFUL to actually use it! I have to admit, after completing my project, I ran out and bought another pack to replace the pack I used.....

The "canvas" for my
project is the 7 gypsies Artist Printers Tray. I started by cutting 2
3/4" x 3 3/4" rectangles and inking the edges with Tim Holtz Distress
Ink Pad in Walnut Stain. I glued each piece down in each cubby with
Aleene's Tacky Glue (it's important to use a good glue, regular adhesive won't
stand the test of time. This I learned the hard way!!!).

I edged the project with the
alphabet, cut from one of the pages from the collection (I just trimmed out the
middle of the page). All of the cuts were cut on my Expression, from A
Child's Year and TBBM. The silhouettes on the Child's Year cart are some
of my favorites! The chalkboard silhouette, apple and tag (TBBM) were cut
at 3", the reading girl and "READ" for the tag were cut at 1
1/2". The other embellishments were cut from the papers in the collection.


As I fill up this tray with his
school pics, I'll remember all the school day memories....the first days, the
plays, graduations, Proms, moving him into the Dorms, all the calls home for
money and how proud I was to see him take that final walk across the stage!
Tuesday, September 4, 2012
Turn Taking Made Easy
Hello, this Beth from SeaSwan's Thoughts . I made these "Super Hero" Shields to help me maintain computer time in my classroom. My school is using a Super Hero theme this year so I am trying to incorporate the theme as much as possible. My students have had great time choosing their shield. I wrote their names on the shields using a permanent marker. This idea could also be used for scout meetings, church groups or even family chore charts.
I cut the shields at 3" real dial on using Letter Envy. I used my Gypsy to help me place the shields on the 4" x 6" inch wallpaper samples. The art teacher has boxes of vinyl wallpaper samples so I used those. I used the regular blade with a multi-cut of 4. I then attached apiece of magnetic tape to he back of each shield. I have easily organized Computer Time in my classroom.
Cricut Info and Supplies Used:
Designed By: Beth
Cricut Machine Used: Expression, Gypsy
Cricut Cartridges Used: Letter Envy
Other Supplies Used: Vinyl wallpaper, magnetic strips
I cut the shields at 3" real dial on using Letter Envy. I used my Gypsy to help me place the shields on the 4" x 6" inch wallpaper samples. The art teacher has boxes of vinyl wallpaper samples so I used those. I used the regular blade with a multi-cut of 4. I then attached apiece of magnetic tape to he back of each shield. I have easily organized Computer Time in my classroom.
 |
| Part of the set of 40 shields I made. |
 |
| Back of shield. Shows the layer of magnetic tape. |
Designed By: Beth
Cricut Machine Used: Expression, Gypsy
Cricut Cartridges Used: Letter Envy
Other Supplies Used: Vinyl wallpaper, magnetic strips
DON'T FORGET TO LEAVE A COMMENT TO BE ENTERED TO WIN OUR WEEKLY DRAWING IN SEPTEMBER.
Subscribe to:
Posts (Atom)
