Hello. Cindy here from Scrap-obsessed. I have a quick layout today that I made using a couple of older cartridges. I took this picture of my grand-daughter a couple of weeks ago and knew I had to highlight it in a scrapbook page.
The title was made using the Storybook cartridge cut at 3". The shape under the title was also cut from the Storybook cartridge at 4". The dandelion was made using the Creative Memories Cheerful Seasons cartridge at 3 1/2". All of the papers are from Close to my Heart.
I hope you like the layout. Don't forget to get out your older cartridges and put them to use.
Showing posts with label Layouts. Show all posts
Sunday, June 2, 2013
Monday, March 18, 2013
River Ride
Hello everyone! This is Michele aka dancingarden from scrap-n-dance.blogspot.com.
This month I decided to use another shape trend that's been popular lately. I haven't been so fond of the chevron patterned papers... they are often too "busy" for my eyes.
Well I was looking through my cartridges for something to cut to represent water on my layout and I could not find anything to blew my skirt up. lol... all the waves I saw were just not working for me really as they reminded me of the ocean, not the river we were on that day. However, chevrons are stylized enough that the image is water-like yet doesn't scream "ocean" to me. Plus, they are trendy. LOL
I discovered there really aren't just chevrons to cut on the 250 some cartridges I own... I found a couple but they weren't sharp or clean chevrons... more like zig zags. However, I was paging through Letter Envy and found a square shapeish thing that was made of chevrons, though they were deeper than I wanted.
So I took that shape from Letter Envy (key 14 shift crest) and stretched it out on my gypsy to width 16.25" and height 6.25" over a 12x24 mat on the gypsy (though I cut them out on a 12x12 mat). This made the chevrons less deep and long enough to cover 12x12 pages. We know that cutting on a 12x12 mat, the cricut does not cut all the way to the edge of the paper. So I had to carefully snip at the edges of the chevrons to make them fully 12 inches wide. Not a big deal, but wanted to be clear. There were more than enough chevrons to use across 2 pages, and I had some chevrons left over.
I like to look in my cartridges for shapes I can use to fit with trends yet not have to buy anything! A little adjustment on my gypsy (or use CCR!) and I have exactly what I need.
Happy crafting!
Cricut Info and Supplies used:
Designed by Michele Donner-Ramsey
Machines used: Expression, Gypsy
Cartridges used: Letter Envy
Other Supplies: KaiserCraft papers, Thickers, brads
Wednesday, March 6, 2013
St. Patrick's Day parade layout
Hello! This is Michele Green from www.michelegreen.com, here to share a layout with you today. St. Patrick's Day is a huge celebration in my town, complete with the state's largest parade. It's an event to behold!
Something I challenged myself to do with this layout was to create it without looking at my photos first. I am always impressed by people who can do this. It turned out well but truthfully, I was there so I knew in the back of my mind what pictures I had in my stash...
Now for a dew details:
The horseshoe is from Everyday Pop Ups @ 3". The mini shamrock circle on the other side of the layout is from Designer's Calendar @ 1.25". I hand cut the flag. I inked anything that was a solid color with a light green cat's eye stamper.
Here is what the layout looked like after I added my photos. The thing about used patterned papers as mats is that when you put your photos in, all that gets covered up!
My tip for today - If you are going to blog about or recreate your project again later, keep notes as you go along about the materials you are using. Here is my "note sheet" for this layout:
I hope you enjoyed my layout today and be sure to come back and visit this blog often!
Something I challenged myself to do with this layout was to create it without looking at my photos first. I am always impressed by people who can do this. It turned out well but truthfully, I was there so I knew in the back of my mind what pictures I had in my stash...
Now for a dew details:
The horseshoe is from Everyday Pop Ups @ 3". The mini shamrock circle on the other side of the layout is from Designer's Calendar @ 1.25". I hand cut the flag. I inked anything that was a solid color with a light green cat's eye stamper.
Here is what the layout looked like after I added my photos. The thing about used patterned papers as mats is that when you put your photos in, all that gets covered up!
My tip for today - If you are going to blog about or recreate your project again later, keep notes as you go along about the materials you are using. Here is my "note sheet" for this layout:
I hope you enjoyed my layout today and be sure to come back and visit this blog often!
Cricut Info & Supplies Used:
Designed By: Michele Green
Cricut Machine Used: Cricut Expression
Cricut Cartridges Used: Everyday Pop Ups, Designer's Calendar
Other Supplies Used: Cardstock, Studio G stamps, Staz On green ink, twine, Reminisce March paper
Monday, February 18, 2013
Snapshot
Hello all!
This is Michele from Scrap-n-Dance. Today I have a layout for you as well as a cut file!
You know how certain iconic items become all the rage? I've seen things like those old rotary fans, coffee stain stamps and more. Lately I've seen the viewmaster disks around. what memories those bring back!
Just recently someone on the Cricut message board asked me where I get my ideas for layouts. I get inspiration from everywhere, but I have no problem scraplifting! Especially if I want to experiment in a style of crafting that I'm not used to doing... as is the case with this layout... I am never quite comfortable doing layouts like this... But I like how it turned out. Sometimes I just see one little thing somewhere that inspires, sometimes the whole layout inspires me. In the latter case, I often translate someone's layout into a "sketch" and go from there, using my own supplies to re-interpret the "sketch". Today's layout is definitely scraplifted! It was her viewmaster disk that caught my eye at first, but then I fell in love with the whole layout. To see my inspiration, click here.
However I did not have any viewmaster disk embellishments. So I had to create one! That meant a little research. It turned out that Capadia had made a tutorial for a cut file for a different machine. I was able to translate that to my gypsy and created my own viewmaster disk cut file for my cricut on my gypsy. You can download the Gypsy viewmaster disk file from Box.com by clicking here.
The gypsy file includes the disk in two sizes, the smaller one is based on measurements I found for the disks... close but not quite exact I am sure. The larger one was the size I wanted for my layout. The images are grouped separately so you can move them or resize them as you please. On the second layer is a blackout version of the disk, in case you want a black background for the photo holes, as I did in this layout.
By the way, this layout was made entirely with stash that I've had from 4 months to 4 years. :) I dug out several things I'd made ages ago and stored away (grungepaper flowers, UTEE'd heart).
Thanks for coming to see my project today!
Cricut Info and supplies used:
Designed by: Michele Donner-Ramsey
Machines used: Expression, Gypsy
Cartridges used: Elegant Edges, viewmaster file: B is for Boy, George, Plantin
Other tools: Sizzix, Tim Holtz rosettes dies, EK notebook punch
Other supplies: The Girls' Paperie letters, Printed cardstock from Graphic 45, Studio Calico, Simple Stories. Camera rubon from Kaiser, seam binding, Art Parts hand, grungepaper, buttons, Charlene's Button Box button (yellow square button). twine.
This is Michele from Scrap-n-Dance. Today I have a layout for you as well as a cut file!
You know how certain iconic items become all the rage? I've seen things like those old rotary fans, coffee stain stamps and more. Lately I've seen the viewmaster disks around. what memories those bring back!
Just recently someone on the Cricut message board asked me where I get my ideas for layouts. I get inspiration from everywhere, but I have no problem scraplifting! Especially if I want to experiment in a style of crafting that I'm not used to doing... as is the case with this layout... I am never quite comfortable doing layouts like this... But I like how it turned out. Sometimes I just see one little thing somewhere that inspires, sometimes the whole layout inspires me. In the latter case, I often translate someone's layout into a "sketch" and go from there, using my own supplies to re-interpret the "sketch". Today's layout is definitely scraplifted! It was her viewmaster disk that caught my eye at first, but then I fell in love with the whole layout. To see my inspiration, click here.
However I did not have any viewmaster disk embellishments. So I had to create one! That meant a little research. It turned out that Capadia had made a tutorial for a cut file for a different machine. I was able to translate that to my gypsy and created my own viewmaster disk cut file for my cricut on my gypsy. You can download the Gypsy viewmaster disk file from Box.com by clicking here.
The gypsy file includes the disk in two sizes, the smaller one is based on measurements I found for the disks... close but not quite exact I am sure. The larger one was the size I wanted for my layout. The images are grouped separately so you can move them or resize them as you please. On the second layer is a blackout version of the disk, in case you want a black background for the photo holes, as I did in this layout.
By the way, this layout was made entirely with stash that I've had from 4 months to 4 years. :) I dug out several things I'd made ages ago and stored away (grungepaper flowers, UTEE'd heart).
Thanks for coming to see my project today!
Cricut Info and supplies used:
Designed by: Michele Donner-Ramsey
Machines used: Expression, Gypsy
Cartridges used: Elegant Edges, viewmaster file: B is for Boy, George, Plantin
Other tools: Sizzix, Tim Holtz rosettes dies, EK notebook punch
Other supplies: The Girls' Paperie letters, Printed cardstock from Graphic 45, Studio Calico, Simple Stories. Camera rubon from Kaiser, seam binding, Art Parts hand, grungepaper, buttons, Charlene's Button Box button (yellow square button). twine.
Friday, November 9, 2012
Hello all...it's Maura aka Happy Granny here today to share a project with you. The past
month has been unusually busy and I have no had the time to create anything new
so I thought I would share a scrapbook page I did previously of my first Granddaughter's
newborn pictures.
I cut the
poodle from "Summer in Paris" at 4" and added glitter, ribbon
and a little faux pearl
for the eye.
For her name I cut the O from
"Elegant Cakes" at 2" and added Gemstones
to girl it up. The rest of her name was cut from "Opposites Attract"
at 1" and I used my gypsy to weld them together.
I then cut
the border from "Elegant Cakes" at 2" added little gemstone
hearts for the centers and popped the flowers up off the page. Matted and added
my pictures And it was
done.
May everyone
have a safe and happy Thanksgiving !
Cricut Info and Supplies Used:
Designed by: Maura aka Happy Granny
Cricut Machine Used: Expression. Gypsy
Cricut Cartridges Used: Summer in
Paris, Elegant
Cakes, Opposites
Attract
Other Supplies Used: Patterned Paper, cardstock, pearl embellishments, glitter
Labels:
Elegant Cakes,
Expression,
Gypsy,
Layouts,
Opposites Attract,
Summer in Paris
Tuesday, November 6, 2012
Thankful for Layout
Hello! Michele here from MicheleGreen.com. I can't believe how fast the months are flying by! Do you know this is the third month of our Cricut FANatics blog already?! Wow!
Today I am going to share a layout with you. I created this based off of one of the layouts in the Scrapbooking with Cricut book. It came together really quickly. I would definitely recommend it :)
The papers are from a Fall Stack I received in a swap. It's hard to tell but the base dark red one is printed with leaves so it adds an extra touch of fall. The tiny stickers are from Archiver's. The embellishment pieces are from K&Co. The red polka dot was an oval cut with Plantin Schoolbook at 11.5", trimmed to 8". The font was from Kate's ABCs at 1.5".
So you know how sometimes you pay too much for paper but you want the quality stuff? I got this tan sheet from Archiver's. So that's $0.69 for one piece! I double dipped a little bit by using my rotary cutter to cut out the matting for my photo right out of the center of the sheet.
I did the same for the red leaf piece. When they are put together it looks like this:
But then you put the front pieces on and you would never know! Tricky, huh?
I hope you enjoyed my layout today and I wish you a happy fall! Fall always makes me feel home-y and want to snuggle in. My family is the absolute best thing in my life! What are you thankful for?
Today I am going to share a layout with you. I created this based off of one of the layouts in the Scrapbooking with Cricut book. It came together really quickly. I would definitely recommend it :)
The papers are from a Fall Stack I received in a swap. It's hard to tell but the base dark red one is printed with leaves so it adds an extra touch of fall. The tiny stickers are from Archiver's. The embellishment pieces are from K&Co. The red polka dot was an oval cut with Plantin Schoolbook at 11.5", trimmed to 8". The font was from Kate's ABCs at 1.5".
So you know how sometimes you pay too much for paper but you want the quality stuff? I got this tan sheet from Archiver's. So that's $0.69 for one piece! I double dipped a little bit by using my rotary cutter to cut out the matting for my photo right out of the center of the sheet.
I did the same for the red leaf piece. When they are put together it looks like this:
But then you put the front pieces on and you would never know! Tricky, huh?
I hope you enjoyed my layout today and I wish you a happy fall! Fall always makes me feel home-y and want to snuggle in. My family is the absolute best thing in my life! What are you thankful for?
Cricut Info & Supplies Used:
Designed By: Michele Green
Cricut Machine Used: Cricut Expression
Cricut Cartridges Used: Plantin Schoolbook, Kate's ABCs
Other Supplies Used: Cardstock, brads, K&Co fall embellishments
Thursday, October 18, 2012
Halloween Zombie Layout
Hey there, it's Freda of CannCreate Designs. It's an honor to be here sharing my
favorite hobby with you again. I've got a Halloween Layout I made for my
grandson's Halloween costume this year. He has decided to be a Zombie again
this year. Not one of those cutesy little ones, he and his dad go all out -
complete with fake bloody wounds with glow in the dark maggots...Gross!!!
Obviously, I had to make a layout fit for their gory get-ups...no cutesy layout
again this year...lol I have included a link to the CCR cut file for this
project since I manipulated the height/width ratios on 3 of the cuts which
can't be done outside of the software.
Zombies:
Zombies Title and
Shadow @ 1.75" (I wanted an additional layer so I glued the top layer to
black cardstock and hand trimmed a thin border before adhering to the cream
shadow
Cricut
Craft Room Basics:
2012 @ .625"
out of black cardstock (if using craft room place these letters over the gate
sign, do not
weld so they cut
out of the sign.
Happy
Hauntings:
Frames - Page
43-Cut 2 <Frame6> @ 5"
Hands - Page 47-Cut
3<Fram10-s> Layer 1 @ 2.5"
Hands - Page 47-Cut
3<Fram10-s> Layer 1-Flipped @ 2.5"
Hands - Page 47-Cut
1<Fram10-s> Layer 1-Adjust height to 5" and width to 2.75
Hands - Page
47-Cut1 <Fram10-s> Layer 1-Flipped-Adjust height to 5" and width to
2.75
Moon - Page 60-Cut
1 <Grave1> Layer 1 - Hide grass make moon 10.5" Or any 10.5"
Circle
Gate - Page 60-Cut
1 <Graveyrd> @ 5.75"
Headstones - Page
60-Cut 1 <Grvyrd-s> @ 5.75" leave height the same, change width to
11.25
Grass Mound - Page
60-Cut 1 <Graveyrd-s> @ 5.75" leave height the same, change width to
11.25
Gate Sign - Page
60-Cut 1 <Grvyrd-s> Layer 1 at 5.75" I hid the brad holes in Craft
Room and added the 2012 to make a single layer sign
Assembly
Directions:
Step 1
- Start with a dark blue 12 x 12 piece of carstock for a base, sponge with
white ink/chalk to make it look like a night sky with faint clouds.
Step 2
- Sponge areas of black and white on the Moon cut to give it a little texture.
Step 3
- Have your orange gate sign, a post it note (use the adhesive part of the post
it to cover the 2012 letters-including the center of the "0" in the
correct position), some black glitter and a glitter tray. Spray the front of
the gate with spray adhesive, move gate to glitter tray, quickly place the gate
sign in place-remove post it then cover gate in black glitter. Shake off excess
glitter and remove the post-it. Set aside to dry.
Step 4
- Using black ink or chalk, sponge around the hands, grass, tombstones, frames.
Step 5
- Overlap the cuffs on the hands and glue as seen in the pictures. Take a black
marker and create "fingernails" on the fingers of each of the hands.
Using a Sakura glitter gel pen of your color choice color over the black
fingernails. Let dry and apply a second layer of gel pen.
Step 6
- Adhere the tombstone layer even with the bottom of the page leaving a spot at
the top of the mound to slide the moon behind.
Step 7
- Adhere the moon with the bottom slightly behind the tombstone layer.
Step 8
- Next adhere the bottom only of the grass lined up with the tombstone layer.
arrange the 3 small pairs of hands between the grass and tombstone layers in
front of each tombstone. Place adhesive on the back and front of the cuff on
the hands so the grass layer is secured.
Step 9
- Place adhesive on the bottom flat portion of the gate only. Line up with the
bottom of the page and adhere. Choose one of the hands that is by the gate and
pull it through to the front...( the rest of the gate will be glued down in a
later step)
Step 10
- Arrange the 2 frames around the gate, leaving room for the title. Place a
small dot of glue on the bottom flourish of each frame (leave enough space to
add your pictures).
Step 11
- Arrange the large Zombie hands behind the gate sign area and arrange fingers
over the photo frame area. Glue cuffs behind the gate sign. Place 1 pop dot in
the palm area of each hand, place 2 pop dots stacked on top of each other
closer to the finger area of each hand.
Step 12
- Glue a few loose edges of the gate down, add a Queen and Company Goosebump
Teardrop to the finial of the gate. Place Black pearls on the Gate Sign, the
picture frame and skull eyes in the title.
Step 13
-Pop dot the Zombies title in place.
Happy
Hauntings!!!! Happy Halloween.... Freda
Cricut Info & Supplies Used:
Designed By: Freda
Cricut Machines Used: E2, Cricut Craft Room
Cricut Cartridges Used: Craft Room Exclusives Zombie, Cricut Craft Room Basics, Happy Hauntings
Supplies Used: Dk Blue, Gray, Black, Orange Metallic, and Cream Cardstock. Sakura Gel Pen-turqoise colored. Queen & Company Black Pearls and Turquoise teardrop. Martha Stewart's Fine Black Glitter. Adhesive spray, Pop Dots and Scotch Fast Dry Adhesive.
Labels:
CCR Basics,
CCR Zombie,
Halloween,
Happy Hauntings,
Layouts
Nuts About You
Greetings fellow Cricut FANatics! This is Michele from Scrap-n-Dance.blogspot.com! I have created a fall themed two page layout for you!
I have a few friends that have asked me to create kits for them, and this is one that I finished up not too long ago. I really like how this one turned out. Let me tell you how I created it!
I used my Gypsy to do this, so if you want to copy it exactly, you'll need a Gypsy or Design Studio, mainly because the tree is sized so big that it's trunk is off the mat, and only the Gypsy or Design Studio can cut something sized bigger than the mat.
I loved the title, but I worried that the words might get lost on the busy background paper, and there was no shadow option for it. But, you don't always have to use a shadow of the shape, all you need is something to set it off... and I thought two acorns welded together as a background for the title was perfect. In fact, I liked it more because it was different from the usual phrase shadow.
If you like, before you put all the pieces together, ink the edges of them. "Cutesy" pages like this can seem more "grown up" after inking the edges of everything with dark brown ink. I found this out when one friend, who'd seen these pages in their initial stages before ink, and then saw it later when it was completely done... She didn't want a kit at first, it was too cutesy for her. But the inking changed her mind completely.
The ribbon is seam binding that I had dyed using Distress Stain in Fired Brick color. I laid down a strip of tacky tape adhesive, then as I laid down the ribbon, I pinched pleats in it. This gives the layout texture and dimension, more than even pop dots can!
Tree: Create A Critter 2 @ 13.85 inches (with the lower trunk hanging off the mat)
Squirrel: Create A Critter @ 4 inches (I hid the mouth on my Gypsy, as I don't care for those weird smiles sometimes)
Title: Just Because Cards @ 13.50 inches
Leaves: Doodlecharms @ 2 inches
Acorn title background: Create A Critter @ 6.53 inches, TWO welded together
Small Acorns: Create A Critter @ 2.25 inches
Cricut Info & Supplies used:
Designed by Michele Donner-Ramsey
Cricut Machines used: Gypsy, Expression
Cricut Cartridges used: Create A Critter 2, Create A Critter, Just Because Cards, Doodlecharms
Other Supplies: Bazzill Cardstock, DCWV Autumn Melody Stack, Seam Binding ribbon, Ranger Distress Fired Brick Stain, Ranger Distress Ink Walnut Stain, adhesives
I have a few friends that have asked me to create kits for them, and this is one that I finished up not too long ago. I really like how this one turned out. Let me tell you how I created it!
I used my Gypsy to do this, so if you want to copy it exactly, you'll need a Gypsy or Design Studio, mainly because the tree is sized so big that it's trunk is off the mat, and only the Gypsy or Design Studio can cut something sized bigger than the mat.
I loved the title, but I worried that the words might get lost on the busy background paper, and there was no shadow option for it. But, you don't always have to use a shadow of the shape, all you need is something to set it off... and I thought two acorns welded together as a background for the title was perfect. In fact, I liked it more because it was different from the usual phrase shadow.
If you like, before you put all the pieces together, ink the edges of them. "Cutesy" pages like this can seem more "grown up" after inking the edges of everything with dark brown ink. I found this out when one friend, who'd seen these pages in their initial stages before ink, and then saw it later when it was completely done... She didn't want a kit at first, it was too cutesy for her. But the inking changed her mind completely.
The ribbon is seam binding that I had dyed using Distress Stain in Fired Brick color. I laid down a strip of tacky tape adhesive, then as I laid down the ribbon, I pinched pleats in it. This gives the layout texture and dimension, more than even pop dots can!
Tree: Create A Critter 2 @ 13.85 inches (with the lower trunk hanging off the mat)
Squirrel: Create A Critter @ 4 inches (I hid the mouth on my Gypsy, as I don't care for those weird smiles sometimes)
Title: Just Because Cards @ 13.50 inches
Leaves: Doodlecharms @ 2 inches
Acorn title background: Create A Critter @ 6.53 inches, TWO welded together
Small Acorns: Create A Critter @ 2.25 inches
Cricut Info & Supplies used:
Designed by Michele Donner-Ramsey
Cricut Machines used: Gypsy, Expression
Cricut Cartridges used: Create A Critter 2, Create A Critter, Just Because Cards, Doodlecharms
Other Supplies: Bazzill Cardstock, DCWV Autumn Melody Stack, Seam Binding ribbon, Ranger Distress Fired Brick Stain, Ranger Distress Ink Walnut Stain, adhesives
Sunday, October 7, 2012
Pirate's Cove
Hello! It's
Anita from Landlockedislandgirl Blog ! Every Halloween, our
cul-de-sac transforms into Pirate's Cove!! Hundreds of neighborhood kids
come to our court to watch the Black Pearl and the Flying Dutchman battle it out.
Last year, we had over 1200 trick-or-treaters. It's truly a labor
of love and it inspired this months project.
I started by printing out 2 parchment pages from the Buccaneer cart. I cut around the edges of the paper to give the appearance of a treasure map. I backed both on plain 12x12 black cardstock. All of the paper and embellishments were printed and cut from Buccaneer on my Imagine. The font used in the Pirate's Cove title were cut from Blackletter at 2 1/4 inches and shadowed on my E2.
Skeleton Pirate was cut at 4.8"
The "X " was cut at 3"
Ghost Ship was cut at 4.3"
Crab was cut at 2"
I hope everyone has a
safe Halloween!
I started by printing out 2 parchment pages from the Buccaneer cart. I cut around the edges of the paper to give the appearance of a treasure map. I backed both on plain 12x12 black cardstock. All of the paper and embellishments were printed and cut from Buccaneer on my Imagine. The font used in the Pirate's Cove title were cut from Blackletter at 2 1/4 inches and shadowed on my E2.
All of the
embellishments were popped up, using pop dots. I finished the pages off
with random dotted lines that I drew freehand with a black, fine point Sharpie
from the ship to the X on
the opposite page.
The flags were cut at 4.5" the 2nd flag was flipped.
Crow's nest was cut at 4.5"Skeleton Pirate was cut at 4.8"
The "X " was cut at 3"
Ghost Ship was cut at 4.3"
Crab was cut at 2"
Cricut Info & Other Supplies:
Designed By: Anita
Cricut Machine Used: Imagine
Cricut Cartridge Used: Buccaneer
Other supplies used: pop dots, black sharpie
Friday, September 28, 2012
Fall Festival time!
Hello, this is Chris of http://scrappin-nanapuddin.blogspot.com. I'm so honored and excited to be a part of the Cricut Fanatics! I have a layout today from the scrapbook I am working on for the outgoing president of Azle Lions Club. The page is from the Azle Library Fall Festival. What I want to show you is how awesome and fun it is to make the snow cones! They look real IRL!
Aren't they awesome!? I used Imagine Yummy cart, the banners, cut at 2.5 inches for the snow cone bases. I tried white but just didn't like it! Not enough color, even sprayed with Glimmer Mist! I cut circles for the "ice" part and embossed with the Cricut cuttlebug folder "tiny bubble". I tried to do one without the embossing and it did make a huge difference in how the snow cone appeared. It didn't look as much like ice! If you look close you can see the tiny bubbles in the background of the pink one. I then covered the top portion of the circle with Glossy Accents and then poured on "Diamond Dust" and let it sit until dry. Then sprayed with Perfect pearls in the "bubblegum" color mixed with water, and the Perfect Pearls in "Blue Raspberry" mixed with water. And let dry. It will be a little sharp due to the diamond dust! but its awesome looking on scrapbook pages!
For the rest of the page, I designed in Cricut Craftroom using:
Cricut Imagine
Cricut Craftroom
Imagine Cart - Yummy
Imagine Cart - Best Friends, for the little girls and the balloons
Independence Day - Firetruck cut at 2"
Imagine Cart - Imagine More for the banner, but I changed the patterns on the banners to patterns on the Imagine Hopscotch pattern cart
Thanks for looking today! Hope you find a way to use these instructions and make your own fun snow cones or something icy! I don't know about you but we're still boiling here in Fort Worth and my air conditioner is on the fritz! A/c and if you have any questions about the cones, be sure to ask! I'm "scrappin-nanapuddin" on the circle board or contact me at my blog!
Don't forget about the GRAND PRIZE... everyone who makes a comment on each designers post will be entered to win the Grand Prize drawing at the end of the month! Just a couple more days! I can't believe its almost October! You won't want to miss this BIG package of goodies.
Aren't they awesome!? I used Imagine Yummy cart, the banners, cut at 2.5 inches for the snow cone bases. I tried white but just didn't like it! Not enough color, even sprayed with Glimmer Mist! I cut circles for the "ice" part and embossed with the Cricut cuttlebug folder "tiny bubble". I tried to do one without the embossing and it did make a huge difference in how the snow cone appeared. It didn't look as much like ice! If you look close you can see the tiny bubbles in the background of the pink one. I then covered the top portion of the circle with Glossy Accents and then poured on "Diamond Dust" and let it sit until dry. Then sprayed with Perfect pearls in the "bubblegum" color mixed with water, and the Perfect Pearls in "Blue Raspberry" mixed with water. And let dry. It will be a little sharp due to the diamond dust! but its awesome looking on scrapbook pages!
For the rest of the page, I designed in Cricut Craftroom using:
Cricut Imagine
Cricut Craftroom
Imagine Cart - Yummy
Imagine Cart - Best Friends, for the little girls and the balloons
Independence Day - Firetruck cut at 2"
Imagine Cart - Imagine More for the banner, but I changed the patterns on the banners to patterns on the Imagine Hopscotch pattern cart
Thanks for looking today! Hope you find a way to use these instructions and make your own fun snow cones or something icy! I don't know about you but we're still boiling here in Fort Worth and my air conditioner is on the fritz! A/c and if you have any questions about the cones, be sure to ask! I'm "scrappin-nanapuddin" on the circle board or contact me at my blog!
Don't forget about the GRAND PRIZE... everyone who makes a comment on each designers post will be entered to win the Grand Prize drawing at the end of the month! Just a couple more days! I can't believe its almost October! You won't want to miss this BIG package of goodies.
Have a great weekend everyone !
Thursday, September 27, 2012
State Fair Layout
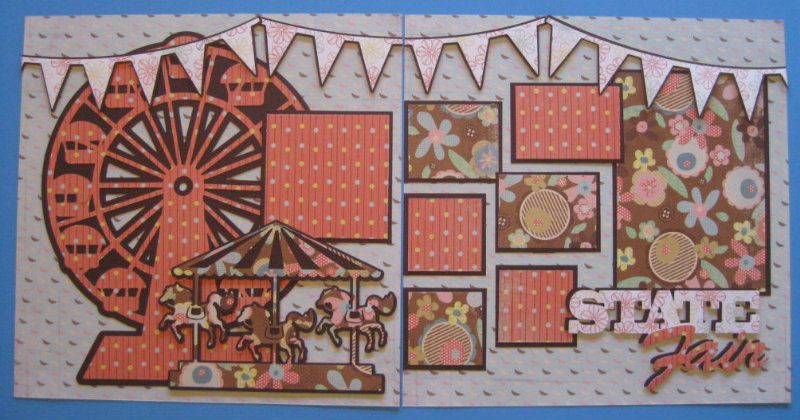
Hi Cricut Fans! This is Rita of Rita's Paper Obsession. Some of the fun memories of summer include going to an amusement park, carnival or fair. Today I have a layout to share with you.
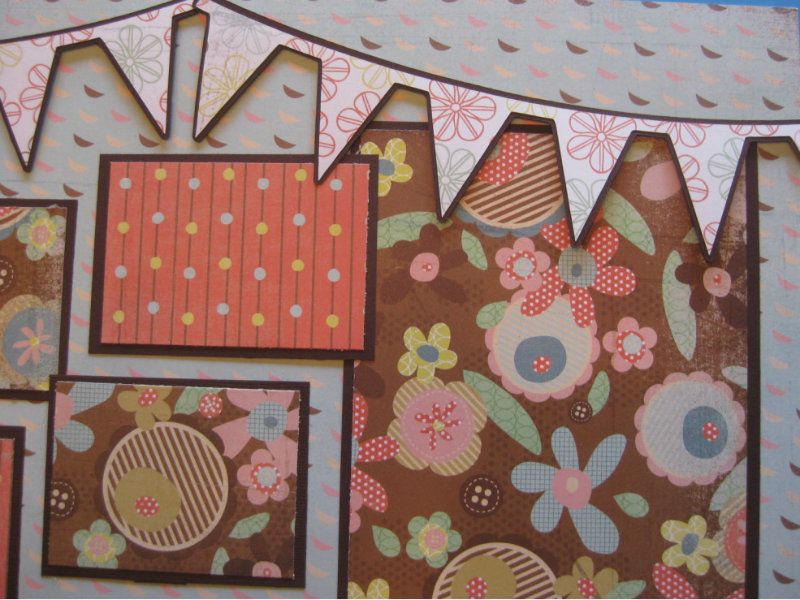
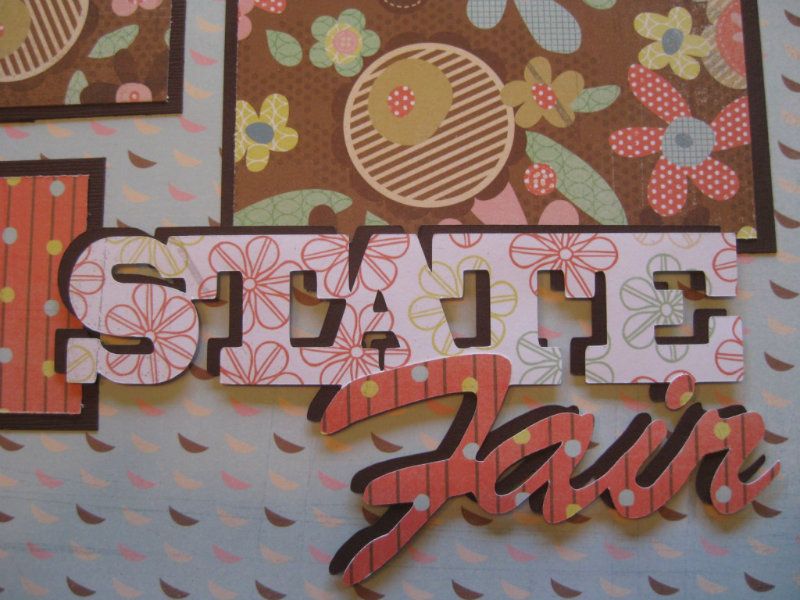
For this layout I used sheets of solid card stock and three different coordinating patterned papers. Cuts are from the Carousel cartridge as follows: Ferris Wheel (Ride5) 10.5 inches; Merry-go-round (Ride4) 5 inches; "State Fair" 3 inches cut in pattern paper and solid; and three Banners 3.5 inches. Photo mats are cut to fit the photos I selected for the layout.
Merry-go-round, banners and title are secured with dimensional tape to add some depth.
The title does not have a shadow cut so I cut the base cut from the solid to create the shadow and off set the pattern cut to make it stand out.
Thanks for letting me share today. Check out the Carousel cartridge, it has a lot of great cuts for your amusement park, carnival, fair and even circus photos. Happy scrapping!
For this layout I used sheets of solid card stock and three different coordinating patterned papers. Cuts are from the Carousel cartridge as follows: Ferris Wheel (Ride5) 10.5 inches; Merry-go-round (Ride4) 5 inches; "State Fair" 3 inches cut in pattern paper and solid; and three Banners 3.5 inches. Photo mats are cut to fit the photos I selected for the layout.
Merry-go-round, banners and title are secured with dimensional tape to add some depth.
The title does not have a shadow cut so I cut the base cut from the solid to create the shadow and off set the pattern cut to make it stand out.
Thanks for letting me share today. Check out the Carousel cartridge, it has a lot of great cuts for your amusement park, carnival, fair and even circus photos. Happy scrapping!
Cricut Info
& Other Supplies:
Designed By- Rita Poteat
Cricut Machines Used- Expression
Cricut Cartridges Used- Carousel
Other Supplies Used- Bazzill "Mud Pie" and Hopscotch patterns "Jump Rope" "Hoppy Taw" and "First Dance", foam tape
Tuesday, September 25, 2012
Baby layout
Hi, this is Kelly Bienvenu from kbiendesigns. First I'd like to say I am very excited and honored to be a part of such a wonderful group of ladies! From what I've seen, there are lots of super talented ladies out there!
I was recently asked to make a baby album for a soon to be born little girl. I was asked to incorporate guitars into the book in a few places. I have no idea what this was all about, but if guitars and music were that important I would do my best.
Here are two of the pages from the book. For these two facing pages, I chose to print my paper from Teresa Collins Baby Boutique on my Imagine. It's a very, very pale pink background which worked perfectly with the colors I had chosen, which were black and white, with a touch of pink.
I then cut the word "Lullaby" from Everyday Pop Up Cards at 3" on white cardstock, using black cardstock for the shadow feature, again at 3". The guitar is from American Alphabet (one of the pre-loaded carts on the E2) and was also cut out at 3". I used Tim Holtz tissue tape to border the page and made a flower for the bottom left hand corner.
The facing page also began with Teresa Collins Baby Boutique paper printed on the Imagine.
I wanted a banner, but since I did not have a baby name, I decided to use the storks from the Pretty Pennants cartridge. These were cut at 1". I added the baby carriage from Everyday Pop Up Cards, cut at 2". Again I used black and white cardstock, but thought the carriage needed something, so I used black and white ribbon to dress it up a bit.
The alphabet is 7 Gypsies tape which went perfectly with my theme of black and white!
All in all, these pages were very easy to make, and even though I used a lot of different carts, the process was quick! Thanks for looking!
Thursday, September 20, 2012
Sketch Challenge #1
Welcome to our Sketch Challenge.
This is Amy from Amy's Digi Scraps and welcome to the first of our Sketch Challenges!
On the 20th of each month, I will post
a sketch for you to enjoy! Then, I will post a card variation and Debbie will post a layout
page variation. Please visit the Sketch Challenge link for more information about our monthly Sketch Challenges.
For this month, and the start of our Sketch Challenges,
I made a very simple sketch, primarily for a card, but can easily be adapted for a layout as well. Intended to allow you a base to jump
from, this sketch includes mostly blocking areas that you can change to
be wording or images or embellishments.
Card Sample by Amy:
My son just turned 17 and I needed a card to celebrate
him. He is a musician and has his own local band, so naturally anything
music related would work. Hannah Montana happens to be one of my
favorite cartridges, and it is versatile enough to use for masculine
cards and layouts.
For the electric guitar, I cut it in black and
blue and sprayed two layers of Goosebumps to give it a glossy, textured
look. Then I layered the image and use a black fine tip pen and a
silver metallic pen to add highlights and dimensions.
I cut "Rock"
for the Hannah Montana cartridge, but I used the Old English font from
Blackletter to make the "on" and welded a small flourish with my Gypsy
onto the "n" so that it would match. I used my silver metallic pen to
highlight the letters.
I have two different thicknesses of pop adhesives. I used the thicker one for the guitar element and the thinner for the words.
Inking
with Close To My Heart ink pads was added around the card edges and the
paper layer, which was distressed slightly with my scissors first.
(Silly me, I adhered the card form to the layers upside down and had to
cut it apart and redo the card form - so check your orientation before
adhering!) Perhaps I should have used a slightly darker ink for the
layer so that it would have popped a bit more?
Layout Sample by Debbie:
Hi everyone, this is Debbie of Debs Eclectic Thoughts Blog. I love to take sketches and make layouts with them. For Amy's sketch, I made it into a one page 12X12 layout. (sorry the picture is a little off, I was having trouble photographing it at night and keeping the shadows off of it.)
To start the sketch process, I used a white cardtock base then added the bright orange cardstock to the center. For the title/journaling spot on the sketch I used Birthday Bash Cartridge to cut out the Birthday Wishes title and Lacey Labels cartridge to cut the title background shape. Next I followed the sketch design and added some of the yellow polka dot patterned paper to the bottom to create that bottom block but instead of laying it over the center square as in the sketch, I layered it slightly under the center square instead and used it to anchor my embellishments for the page of various patterned papers cut into ribbbons and some buttons with twine. A couple of stickers completed the bottom portion. After looking at the layout, I felt like I wanted to add a little bit of balance to create a stronger visual triangle between the title and lower embellishments so I added a grouping of patterened paper strips and a large button with twine on the upper right of the page. The great thing about sketches is that they are a jumping off point for your design and you are free to change it up to make it your own design. Isn't that cool about sketches ?
We would love to see what you can do with this Sketch. Please create a card or layout and upload the image to this post in the InLinkz! Remember that you must use your Cricut in creating your project for the Sketch Challenge.
Tuesday, September 18, 2012
Bus 87
Hello everyone! This is Michele, aka dancingarden on the Cricut Message Board. You can visit my blog at Scrap - N - Dance! I have created a layout for you with the Cricut Stencil material!
I wanted to go along with the "back to school" theme for the month but we will be homeschooling our son... however, I just started this year working part-time driving a school bus! My son gets to ride with me so we don't have to do any sort of day-care - what a great job perk! So I decided I would do a page about me driving the bus (and my son riding along!).
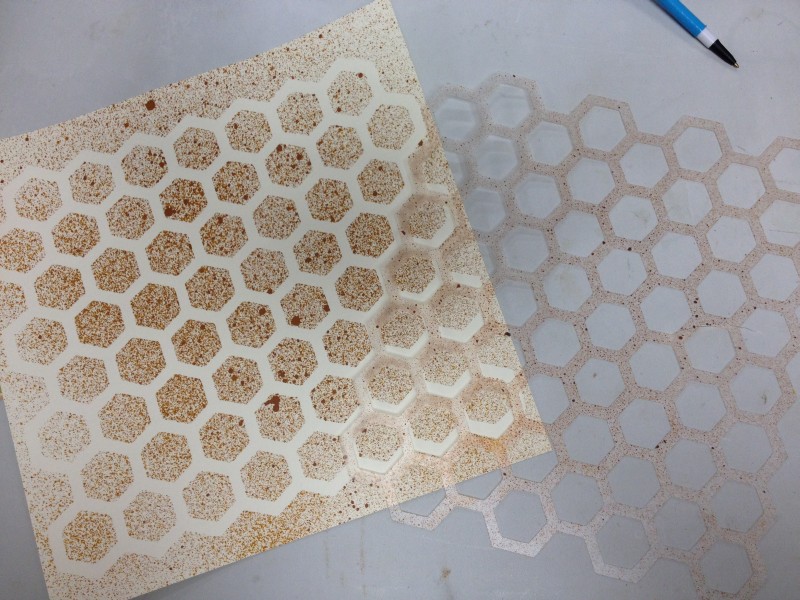
Some of us Circle members got to use the Cricut Craft Room Exclusives for free during August! So I spent most of the past month and a half cutting things from those CCR exclusives, using my gypsy. In this case, I used the CCR exclusive Teresa Collins Basics, the honeycomb background, which I used to cut the Cricut Stencil material. I set it up on my gypsy to cut as large as it could on the mat, which you can also do on CCR.
Have you ever used the stencil material? It's SO EASY! I followed the settings instructions on the box: Speed 3, Pressure 5, Blade Depth 6 and multicut 2.
The stencil cut perfectly! I actually cut two of these since the stencil sheet is 12x24, and gave one to a friend. :)
I used some spray mist (in this case, Ranger's Butterscotch) to spray the stencil and cardstock. Do you know the stencil has a sticky back? You just remove the backing and stick it to the cardstock (or other surface). It came right off the cardstock after I'd let it dry. However, after I used this color, I realized it didn't "go" with my photos!
So I tried a different color, Glimmermist Jazz Blue. :) This color was perfect for my project! I love that my stencil is re-usable!
I finished up my layout with Jillibean papers and stickers from my stash (I've been trying to use up my stash!), the title is cut from the Street Sign cartridge.
I hope you try out the stencil material! I loved working with it and I'm glad I have another package of it! :) Happy crafting!
Cricut Info & Supplies Used:
Designed by: Michele Donner-Ramsey
Cricut Machines used: Gypsy, Expression
Cricut Cartridges used: CCR Exclusive Teresa Collins Basics, Street Sign
Other supplies: Jillibean papers, stickers; Glimmermist Jazz Blue, EK Circles Scallop border punch, mini alpha stickers, cardstock, Cricut Cutables Adhesive-backed Stencil Material
Sunday, September 9, 2012
Gone Fishin'
Hi everyone, I’m Helen of Scrapbooking Fun.Biz and I’m so excited to be able to share a 12x12 scrapbooking page I created!
As you all know it's not that easy to get good photo's of older boys, so I’m only using one photo to scrap. Our kids are older now and vacation time is done whenever the opportunity arises, so this mid week mini vacation worked out perfectly for us and our older son. We planned to do some fishing, so we planned a charter boat fishing trip! We really enjoyed the chartered fishing, so we did the boat thing the next day too! We caught so many fish and just incase you're wondering who caught the biggest fish on this trip.....it was me! It was a Walleye!!
For my 12x12 scrapbooking page I didn't want to use to many embellishment, so it didn't look feminine. The photo I used is of my husband and our oldest son as we're waiting for the charter boat to leave the dock. For the base of my page I used the 12x12 School Days Multimedia Pad by Martha Stewart.
I couldn't find a bobber in any of the Cricut images by PC, so I had to create my own. I also wrapped some twine around the two "i" to make it look a little more nautical.
I used one of the Cuttlebug embossing folder from the Asian Bundle on the cloud cuts and I added some Pearl Ex to give them a little sparkle. I also use some Gum Arabic to adhere the Pearl Ex, so it wouldn't all rub off.
I used some twine to wrap around the bout and the hand writing on the boat is the date and I made it to resemble a boat license. The waves are embossed using one of the Cuttlebug Wedding Borders and I also used the Pearl Ex on them.
Cricut Info & Supplies Used:
Designed By: Helen Hodge
Cartridge(s) used: All Mixed Up, April Showers, Create A Critter, Crocs Rule, Fun in the Sun, George & Basic Shapes, Going Places, Wildlife.
Cricut Machine(s) used: Expression 2, CCR, Cuttlebug
Project Type: Scrapbook Page
Other Supplies used: Twine, Pearl Ex, Gum Arabic, Uniball Signo Black Pen, Pop Dots, Tombo Liquid Glue, ATG Adhesive
Sizes:
Title: Gone Fishin’ – 5” Relative one red and one white – Wildlife.
Boat: 4” Relative – hide control the waves – Going Places.
Fly Fisherman: 3” Relative – Fun in the Sun.
Waves: 3.5” Real – Crocs Rule.
Cloud: 2.5 Real – Create A Critter.
Cloud: 2” Real – April Showers.
Bobbers: .375” Real Circles – All Mixed Up.
Bobbers: .5” Real Circles – All Mixed Up.
Bobbersr: .375 Real Cylinders – George & Basic Shapes.
DON'T FORGET TO LEAVE A COMMENT TO BE ENTERED TO WIN OUR WEEKLY DRAWING IN SEPTEMBER.
Sunday, September 2, 2012
Hawaii Vacation Layout
Greetings Everyone! This is Cindy of Scrap-obsessed Blog . Happy September and the last holiday weekend of the summer. I hope everyone is having a nice three day weekend. I'm hoping to spend some quality time in my craft room at least two out of the three days I have off work. I'm not ready for summer to end. There are still so many things I want to do while the weather is still warm. One thing I would love to do is go on vacation to Hawaii. Unfortunately I will have to wait until January. Until then I can have fun preparing for it though.
My layout today was made using three different Cricut Cartridges.
For the title of my layout and for the airplane in the clouds I used the Cricut Circle Exclusive cartridge Something to Remember. They were both cut at 4" except for the word Hawaii. That was cut at 1 1/2".
The green scallops on the top and bottom of the pages were made using the Art Philosophy cartridge, cut at 1/2". I used my Gypsy to weld 4 of them together to get the 12" long size that I needed.
The hibiscus flower was cut at 1 3/4" from the Life's a Beach cartridge. The photo mat on the left side will hold a 5x7 photo and the mat on the right side will hold a 4x6 photo.
I hope you've enjoyed my project today. Other Hawaii pages and projects will be posted to my blog as I prepare for my first big vacation. I have a feeling I'll be needing a lot of layouts! Thanks for looking. Cindy
My layout today was made using three different Cricut Cartridges.
For the title of my layout and for the airplane in the clouds I used the Cricut Circle Exclusive cartridge Something to Remember. They were both cut at 4" except for the word Hawaii. That was cut at 1 1/2".
The green scallops on the top and bottom of the pages were made using the Art Philosophy cartridge, cut at 1/2". I used my Gypsy to weld 4 of them together to get the 12" long size that I needed.
The hibiscus flower was cut at 1 3/4" from the Life's a Beach cartridge. The photo mat on the left side will hold a 5x7 photo and the mat on the right side will hold a 4x6 photo.
I hope you've enjoyed my project today. Other Hawaii pages and projects will be posted to my blog as I prepare for my first big vacation. I have a feeling I'll be needing a lot of layouts! Thanks for looking. Cindy
Cricut Info and Supplies Used:
Designed by: Cindy
Cricut Cartridges Used: Art Philosophy, Life's a Beach, Something to Remember
Cricut Machine Used: Expression, Gypsy
Other Supplies Used: cardstock, patterened paper
DON'T FORGET TO LEAVE A COMMENT TO BE ENTERED TO WIN OUR WEEKLY DRAWING IN SEPTEMBER.
Getting crafty with the Cricut
Greetings-Christel AKA the scrapworm here of Scrapworm Blog ! Very delighted to be part of this incredible blog. I have several projects to share with you today but first I would like to tell you a little about myself. I live in western Kentucky. I am employed a school teacher. I teach history and special education.
I have a wonderful husband and four children(two girls and two boys). My children's ages range from 18 to 14. To top it off, we have two dogs(a havanese and mountain cur) and two cats(shorthair and longhair). One of the kids,Allee, graduated this year and she is now enrolled studying to be a nurse while working fulltime as a CNA. She had a full ride to play softball but decided to stay home and go to school. Katee who is a junior runs cross country and track. Brett and Bryce both play football. My husband and I are constantly on the run shuffling kids to practice, meets or games. Well more than enough about me. Let's get onto crafting!
Using the cricut to make a ruffled spirit scarf: First project I would like to show you today is what I call a spirit scarf. I saw this on Pinterest and decided it would make a great accessory to where to games to try and spiff up wearing blue jeans and a tee. I used my cricut to try and make one. Here are the steps to make a ruffled scraf.
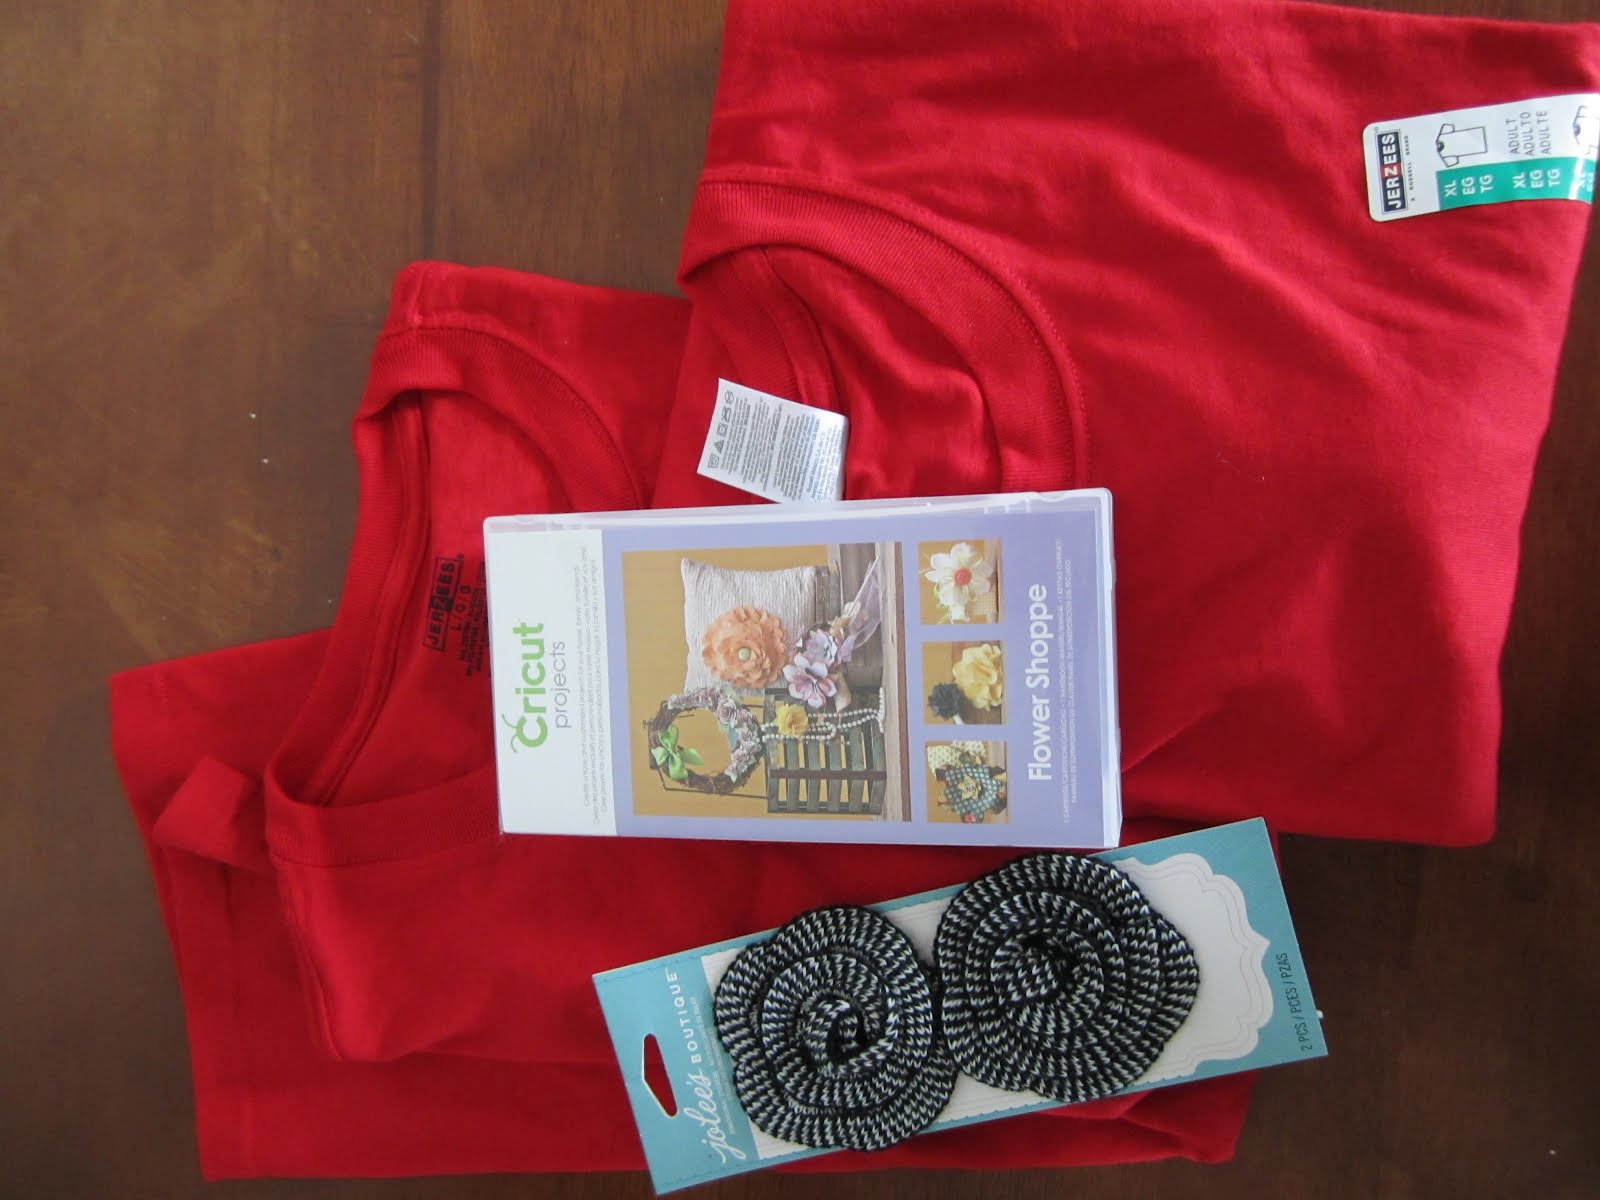
1. You will need Flower Shoppe cartridge, two XL tees, fabric glue or sewing machine and flower embellishment (if you choose to put a flower on the scarf).And of course, your cricut expression.
2. Cut of sleeves, neckline and bottom seam. Next, cut the sides.
3.Cut 12 ten inch squares.
4. Place one square on the cricut mat. Put in the Flower Shoppe cartridge. Using the Fun1 image cut a 9 inch segment. Note: I used the heavy cutting blade instead of regular. I put my settings on medium cutting each image twice. You may want to play around to see how your cricut reacts to fabric.
5. Once you have cut out all twelve pieces, take each piece and stretch it. Do not be timid. This stretching allows the fabric to curl inwards. Hence, no sewing for the strands. Then, hold one piece by the end and run your hand down the fabric. Kinda like milking a cow! Do this for each piece.
6.Taking two strands, place them end to end. Join them together with fabric glue or sewing. Do this until you have no more fabric. You should have six strands all together. If you glue them, allow ample time to dry before going on to the next step. 7. Gather strands together grasping in the center, place around neck. With a scrap from the tees tie the strands together in front about in the middle. 8. Take a flower embellishment and pin to the scrap. Now, you are ready for the game!
Note-I have an alternate version. Instead of using Flower Shoppe, use Cricut Basics circle. Once you have cut 12 circles, cut about two inches into the circle making a swirl. Do not worry about being precise, the stretching and pulling will take care of minor impurities. Follow the rest of the directions. Another option is to cut four "fun1" images and 8 circles. Just have fun with it.
Using mulberry paper for dimension When using my Create a Critter or Camping Critters, I like to use mulberry paper to add depth to my scrapbook pages or cards. Another thing I like to do is tell a story using several pages. Materials needed are the Camping Critters cartridge, Zombies from CCR. Mulberry paper, 12 by 12 paper of your choice, glue, leaves, glue, ink and chalk. Last but not least your cricut expression.
For the first two scrapbook pages, I used the Camping Critters cartridge. I cut out the raccoon and bigfoot images. I used mulberry paper on the outer layer to give the images dimension. The raccoon was cut at four inches. Big Foot was cut at six inches. Also, on the raccoon, I chalked the mask. I used leaves and an evergreen branch (which was secured down with a glue gun)to give the pages a more wilderness feeling. The pictures I added were from this summer which commerate my first mountain biking experience. Look how happy my daughter and I are. An 11 mile trail should have took about an hour and half took us over four hours.
The final image was cut using the CCR exclusive file called Zombies. I used the girly skull and nuclear symbol. The skull was cut at five inches. I dropped ink on the notebook paper where the word zombie is. This page is the final of our mountain bike narrative. Katee contracted some funky mess in the woods. Hence, the zombie title. I said she had zombie bumps because all of the crazy news stories about zombies. She had to get a steriod shot and passed out in the doctor's office which landed her in the hospital.
Hope you enjoy the rest of your day! God Bless and craft often!
Using the cricut to make a ruffled spirit scarf: First project I would like to show you today is what I call a spirit scarf. I saw this on Pinterest and decided it would make a great accessory to where to games to try and spiff up wearing blue jeans and a tee. I used my cricut to try and make one. Here are the steps to make a ruffled scraf.
1. You will need Flower Shoppe cartridge, two XL tees, fabric glue or sewing machine and flower embellishment (if you choose to put a flower on the scarf).And of course, your cricut expression.
2. Cut of sleeves, neckline and bottom seam. Next, cut the sides.
3.Cut 12 ten inch squares.
4. Place one square on the cricut mat. Put in the Flower Shoppe cartridge. Using the Fun1 image cut a 9 inch segment. Note: I used the heavy cutting blade instead of regular. I put my settings on medium cutting each image twice. You may want to play around to see how your cricut reacts to fabric.
5. Once you have cut out all twelve pieces, take each piece and stretch it. Do not be timid. This stretching allows the fabric to curl inwards. Hence, no sewing for the strands. Then, hold one piece by the end and run your hand down the fabric. Kinda like milking a cow! Do this for each piece.
6.Taking two strands, place them end to end. Join them together with fabric glue or sewing. Do this until you have no more fabric. You should have six strands all together. If you glue them, allow ample time to dry before going on to the next step. 7. Gather strands together grasping in the center, place around neck. With a scrap from the tees tie the strands together in front about in the middle. 8. Take a flower embellishment and pin to the scrap. Now, you are ready for the game!
Note-I have an alternate version. Instead of using Flower Shoppe, use Cricut Basics circle. Once you have cut 12 circles, cut about two inches into the circle making a swirl. Do not worry about being precise, the stretching and pulling will take care of minor impurities. Follow the rest of the directions. Another option is to cut four "fun1" images and 8 circles. Just have fun with it.
Using mulberry paper for dimension When using my Create a Critter or Camping Critters, I like to use mulberry paper to add depth to my scrapbook pages or cards. Another thing I like to do is tell a story using several pages. Materials needed are the Camping Critters cartridge, Zombies from CCR. Mulberry paper, 12 by 12 paper of your choice, glue, leaves, glue, ink and chalk. Last but not least your cricut expression.
For the first two scrapbook pages, I used the Camping Critters cartridge. I cut out the raccoon and bigfoot images. I used mulberry paper on the outer layer to give the images dimension. The raccoon was cut at four inches. Big Foot was cut at six inches. Also, on the raccoon, I chalked the mask. I used leaves and an evergreen branch (which was secured down with a glue gun)to give the pages a more wilderness feeling. The pictures I added were from this summer which commerate my first mountain biking experience. Look how happy my daughter and I are. An 11 mile trail should have took about an hour and half took us over four hours.
The final image was cut using the CCR exclusive file called Zombies. I used the girly skull and nuclear symbol. The skull was cut at five inches. I dropped ink on the notebook paper where the word zombie is. This page is the final of our mountain bike narrative. Katee contracted some funky mess in the woods. Hence, the zombie title. I said she had zombie bumps because all of the crazy news stories about zombies. She had to get a steriod shot and passed out in the doctor's office which landed her in the hospital.
Hope you enjoy the rest of your day! God Bless and craft often!
Cricut Info and Supplies Used:
Designed by: Christel
Cricut Cartridges Used: Campin Critter, Flower Shoppe, Zombies
Cricut Machine Used: Expression
Other Supplies Used: t-hsirts, fabric glue, sewing machine, mulberry paper, cardstock, patterened paper, ink, chalk, artificial foliage
DON'T FORGET TO LEAVE A COMMENT TO BE ENTERED TO WIN OUR WEEKLY DRAWING IN SEPTEMBER.
Subscribe to:
Posts (Atom)