While we are no longer making active post of Cricut projects on this blog as of 8/1/2013, we invite you to use it for continued die cut inspiration as we will leave the blog up for viewing. Happy Cricuting !

Showing posts with label Teddy Bear Parade. Show all posts

Saturday, May 25, 2013

Thanks Teacher


Hello again fellow crafters it's Terri from http://www.scrappinwiththebug.blogspot.com/ bringing you a quick and simple little card.

On Wednesday it was my daughter's last day of preschool - (Sniffle Sniffle). So I wanted to give the teachers a special gift and a fun little simple card to. My daughter had 2 teachers both who I've grown to adore over the past 2 years she was in preschool. They are so sweet and wonderful I wanted them to feel special. So I bought them a fun little locket style necklace that holds little charms. I had the charms customized with their initials, and a sweet little apple.

Since I made them an apple card for Teacher's appreciation I waned to make a different card for the last day. I made these cuties. I was debating on using the graduation bear or the little school girl bear. As you can see I chose the school girl bear. Isn't she just so sweet.

I used Teddy Bear parade and cut the bear at 3" - if you notice I took Nadia's advice to make the object a little more dimensional. I inked around her and around her face to give her a little depth. You can't really see it here but I added glossy accents to the nose, and apple.

I then attached her to an action wobble spring to make her move.

I added a small brown square and then also some SRM stitched stickers on the side along with stickers saying, Thanks, Thank you... I thought it was perfect little addition to these cards.

They were simple and fun to make.

Hope you enjoy..

Made by Terri Szymanski

Cricut Cartridges: Teddy Bear Parade
Cricut Machine: Expression

Other Supplies: DCWV pre folded cards, rhinestones, SRM stickers

Friday, March 8, 2013

St Paddy's Bear

Hi-Meg here from PeacockPaperie This months offering is a fun St Patrick's day card that I made featuring 2 cricut cartridges- Teddy Bear Parade and Spring Holiday Cards. The card is cut at 5 1/2 inches and the bear is cut at 2 1/2. Wishing you a happy ST Paddys day and may the luck o' the Irish be with ye!

Friday, January 25, 2013

Happy 1st Birthday - Teddy Bear style


Hi this is Terri from http://www.scrappinwiththebug.blogspot.com/. Wow where has this year already gone.
A few weeks ago a friend asked me to help her create a cute little "bear" theme for her son's 1st birthday. She also owns a cricut and wasn't too failure with it. So I told her to come over and we would play I mean create something. We brain stormed for a while and came up with what she wanted.

This took us a few weeks to put together as it was lots of little things - and then also design changes, waiting for a special product.
The fun thing about the bear is we did laminate him - and I made several extra noses - they used the noses with names on them to play pin the nose on the bear.
The first thing was we found the perfect bear from the BEST cartridge - I mean my new favorite cartridge Teddy Bear on Parade. I cut the bear welcome sign at 15" - and I will admit I cheated. I didn't use a 12x24 paper (as I didn't have brown in that color). I used my gypsy and created the upper section - since I knew the bear would be covered then I just cut the top 1/2 of the bear then the bottom 1/2 of the bear by moving the bear up/down on the mat.

The paper is all printed from the imagine - and what I did was just made little .4" small circles on the screen then colored them differently . She wanted to keep with a royal, teal, green, light blue theme. The shirt comes on the Birthday Bear but not the pants. She wanted little pants (actually her husband said it looked like a skirt w/ the banner). So I found another bear w/ pants and made them and tweaked them slightly on the gypsy.  I knew she was going to use this a few different places/times so I actually cut it out 3 times 2 out of cardstock and 1 out of thin cereal box so it would with stand the different uses.

All the letters are from Birthday Bash cartridge - these on the Welcome banner were cut at 3/4", and the name Brayden cut at 3/4" welded w/ the gypsy.
Next we worked on the Happy 1st Birthday, and I am 1 signs.
We used stock card stock from Michael's - and cut a 5" scallops, 4" circles and 3" letters.

The smaller bears holding the banner are cut at 5".

Now here was the fun fun fun part. We made his cute little T-shirt. It is from a special iron- on printable fabric from Square1 masterpiece. I will say this was so fun making the shirt. We made the #1, Brayden on the little birthday hat too from the same stuff.

I again selected small circles on the imagine at .8" and flood field the circles w/ the different colors. I then cut out the 1 from Birthday Bash that measures at 5.12 x 3.22. (I used the gypsy and then cut it off on my expression). The bear measures at 2" printed again on the iron on fabric. The name Brayden is 1" x 5 long welded. We did use the layer function and I will say this was very easy to put together. Just iron and it was done. The cool thing is it is washable.


We also made the cute little birthday hat. That is also printed iron-on fabric. I will admit I didn't make the bib - my friend did though - using just regular iron on transfer paper. The saying is very cute, "It's about time I got some cake to wash down all that milk". She also printed it on the back of his shirt.

Well I hope you enjoyed this cute little birthday decorations.

Designed By: Terri Szymanski
 
Machine Used: Cricut Expression, Imagine, and Gypsy

Cartridges Used: Teddy Bear on Parade

Other Materials: Card stock, Square1 master piece printable iron on fabric.
 
Thanks for stopping buy and Happy Scrappin'

Saturday, December 1, 2012

Ho Ho Ho...Guess who is coming to town ?

Holiday Greetings everyone !  Its Debbie from Debs Eclectic Thoughts Blog to share with you this fine December 1st.  Wow, can you believe it is December already? Where has the time gone this year? 
 
With December upon us, I know most of us are already scrambling to get our holiday gifts bought and wrapped before the big day arrives.  I have two quick holiday gift wrapping ideas to share with you today.

Project 1: Nugget Type Tin Gift Holder - Great for treats or a gift card or any small flat gift

I know a lot of you probably bought those cute metal nugget tins this year. I was tempted to order some but never made the effort but I did find a way to improvise.  I have several of the Maya Roads metal tins that their products are packaged in and have saved them to use when I was inspired so my project today starts out with that story ...

Out in the craft room there arose such a clatter...I rushed over to see just what was the matter.  
 
Why on the back of the tin was a horrible sight...a clear sticker that was surely a project blight.
 
But luckily it was easy to peel right off so on to the next challenge... to cover the top.


And what should your wondering eyes should appear....
 
 
Why yes, it is some of my favorite washi tape to cover up the embossed writing
on that tin's front ! 
 
 
And not only did it cover the top but made decorating the sides such a breeze...
 

I had time to create this adorable guy...why yes it is Santa Bear, ready to please !
 
Directions: The decorative washi tape was so easy to use and stuck really well to the metal tin.  I just used my scissors to trim the corners since they were rounded slightly.  The Santa Bear is, of course, made from the adorable Teddy Bear Parade Cartridge, cut at 5" to fit the front of the tin.  I used some white crinkle ribbon to hold the box closed after I stuffed it with goodies and adhered Sana Bear to the top!
 
Project 2 : Quick Santa Wrap Using Cardstock and a Circle Punch 
 

To follow up on my Santa gift theme, I wrapped a box to look like Santa Claus' suit.
 
Directions: I used a sheet of red 12X12 cardstock to wrap a gift box.  Cut a 2"X12" strip of white cardstock and adhered to look like the suits white trim.  I cut a 2 1/2" strip of black cardstock for the belt and took a rectangle scrap of gold glitter paper and cut out the center to form the belt buckle and adhered over the belt.  To finish off the look, I used a circle punch to create buttons out of black cardstock scraps.  
 
As we rush in to the holiday gift giving season, I want to wish each of you  a moment or two to take in the wonders of the season !  I know every time I see a Santa anything over the holidays it brings back fond memories of my childhood and all the fun memories shared with family and friends during this time of year. 
 
Before I drive this sleigh out of sight until next year...Merry Christmas to all and be of Good Cheer !  
 
Cricut Info & Other Supply Info:
Designed by: Debbie O'Neal
Cricut Machines Used:  Cricut Expression, Cricut Cuttlebug
Cricut Cartridges Used: Teddy Bear Parade
Other Supplies Used:  Washi Tape, Cardstock, Ribbon, googlie eyes, metal tin, circle punch 


Sunday, November 4, 2012

Cricut Crafty Challenge #3- Fall Inspiration

Hi Everyone
It's Becka here from Creations With Becka. Today is the 3rd Cricut Crafty Challenge and this month we are doing a Fall Inspiration theme.  I absolutely love this time of year. I love the changing colors of the trees, the bright oranges, and deep maroons, the cooler temperatures, the smalls of yummy pies baking and Thanksgiving.  I just love Fall in general.
So, are you ready for your challenge??
The challenge this month is to make a project using the photo below as inspiration.
Here are the guidelines that must be followed:
1. Use the picture above as guidence for you project
2. Your project must include the colors orange
3. Your project must include at least one Cricut cut
4. Your porject can be anything you choose, card, layout, home decor etc...
5. You must link your project by November 25th at midnight. If you are linking from your blog please link the exact post not just a link to your blog in general.

Here is the project I made for this. I have been trying some new crafts this year and I have never made ATC card before so I thought I would try my hade and see what I could come up with.


Now, it is your turn, please link your project below for a chance to win a $25 gift certificate from What's Scrappin. This is my online store and Ispecialize in trying to find great deals for my customers.  Please check it out and start making your list of what you would like to buy with your $25 gift certificate. But don't forget you can't win if you don't play.

Wednesday, October 3, 2012

Two Cards: Enjoying Autumn & "Scare" Globe

Hi!  This is Lori from The Singing Shell blog with an autumnal card and a Halloween card for you.

I had no idea what to make for this month's post but then I got inspired to make two cards.  Here is the first:

ENJOYING AUTUMN


I love autumn for all its beautiful colors and for the cool breezes it brings.  I wanted to make something whimsical and carefree so I chose the barefooted girl riding a bike from the  Something to Celebrate cartridge.  She is on page 37.  With her hair flying behind her, she looks happy - doesn't she?  (Even though she has no facial features!  I am reading body language :)   She was cut at 3 1/2 inches. .  I also used Distress Ink Pads for the hardware on the bike.

  I used Distress Markers to outline the edges of the dress
and then added glitter to make her stand out.   

The tree [tree3] is from the Heritage cartridge and is cut at 4 1/2 inches.  I inked that up with lots of different Distress Ink Pads because I couldn't find the right paper.  I gently tapped the colors randomly onto the die cut.

Colors used: Evergreen Bough, Festive Berries,
Antique Linen, Wild Honey.  

The leaves [leaf] are from the Doodlecharms cartridge - an oldie but a goodie.  I cut those at a 1/2 and 3/4 inches.  I was nervous because I never cut anything that small on purpose.  But it worked like a charm.  I inked those up with the same Distress Pads, too.  That way they would match my tree.


Now for the background.  I used washi tape to create a kind of road across the background.  I used the Musical Flourish folder for the background and then inked the embossed parts lightly.  I only embossed the part above the washi tape to create a distinction between earth and sky.  I rounded the corners with We R Memory Keepers corner chompers.

I purposely made the tree bigger than I needed so
I had to trim it.  It took me a day to find
the courage!


The final product :)


So that's it - an auutmnal card for any occasion.


"SCARE" GLOBE

This is a snow globe with a twist.  And I know - it is not really a “scare” globe.  This little guy is too cute to scare anybody:)  I picked "scare"for strictly for its Halloween appeal. 


The snow globe aka “scare” globe is from Joy of the Season and is cut at 5.25 inches.  I added a little blue on the left side of the globe to give it a little dimension.  I used the Tumbled Glass Distress marker and then just went over it with a wet detail brush to lighten it up and spread it out a bit.  The spider web is from Chic & Scary and cut it at 3 inches.  I used only the edges and then cut off the top.


Mister Bear from Teddy Bear Parade is cut at 3 inches.  I didn’t use the trick or treat bag because it would have made the little scene too busy.  I ran the Spiced Marmalade Distress Marker over the edges of the orange part of the markers.  I used the Forest Moss Distress Marker for the green.  For the ears, I used a Rose Red Copic Marker.  For the muzzle I also used a Copic Marker – Chamois.
 
TIP: You can make your own custom color ribbon.
 The ribbon is actually plain seam binding that I colored with
 Spiced Marmalade and Forest Moss Distress Markers.
 I added some water to soften the colors. 

Although I really loved creating Mister Bear, I loved making the spiders more!  I added glitter - Glow-in-the-Dark Glitter.  First, I cut the spiders from Doodlecharms at a ½ inch.  Then, I made their eyes with Glossy Accents.  That way when I added the glow-in-the-dark glitter and turned off the lights, you would be able to see the eyes, too.

Spiders Before.
 
Spiders After
 
I hope this inspires you to make your own "scare" globes.  They might even be scarier than mine!

Thank you very much for all your compliments last time.  It made me feel great for days!

Enjoying Autumn Card
Cricut Info & Supplies Used:
Designed by: Lori Sjogren
Cricut Machine used: Create
Cricut Cartridges used: Something to Celebrate, Heritage, Doodlecharms
Other supplies: Bazzil, solid cardstock; Webster's Pages, pattern cardstock; Musical Flourish embossing folder, Cuttlebug; Ranger, Distress Markers and Distress Ink Pads; Denami Designs, Sparklets Lemon Sorbet glitter; Close to My Heart, Vanilla Cream ink pad; We R Memory Keepers, corner chomper.

 "Scare" Globe Card
Cricut Info & Supplies Used:
Designed by: Lori Sjogren
Cricut Machine used: Create
Cricut Cartridges used:  Teddy Bear Parade, Chic n Scary, Joy of the Season, Doodlecharms
Other supplies: Bazzil & Recollections, solid cardstock; Die Cuts With a View, pattern cardstock; Ranger, Distress Markers & Glossy Accents; Martha Stewart Crafts, Glow-in-the-Dark glitter;

Friday, September 14, 2012

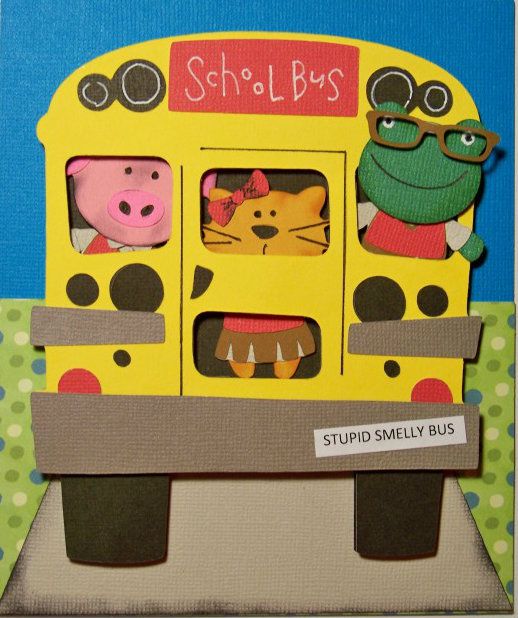
Back-to-School Card -- Stupid Smelly Bus

Hello!  It's Nadia from my blog, With Glittering Eyes, and I have a fun back-to-school project to share!  Later this month, I will be out-of-town for a few school days so I thought colorful cards for my daughter would be fun ways to remind her that I am thinking of her even though I will be far away!  I am sharing one here today!

For my card, I used animals that I morphed together with Teddy Bear Parade to create new and different critters that wear the little school uniforms!  You can see my initial post on that by clicking here to see a whole menagerie of characters!  Some of the critters from that post were used on this card.  

Stupid Smelly Bus card...


Here's a little background bit:
There are no buses at my daughter's school but we always get behind at least one heading to another school on our morning commute! In Kindergarten and First Grade, my daughter used to enjoy reading Junie B. Jones stories.  Once she read the Stupid Smelly Bus, we started referring to all school buses that way, in honor of Junie!  My daughter is always intrigued by what goes on in a school bus... always making up scenarios as we pass them or follow them.

For this card, I used three critters from a previous post on my blog, adding school uniforms.  I stuffed 'em in my favorite bus cut and added a little scenery to plant the bus on the road! 


Crafty Details for Stupid Smelly Bus:
  • This card finishes at 5" wide by 6" tall and is created by simply scoring a 6" x 10" rectangle of card stock in the middle.
  • Pig - body cut at 2" on the Expression from Teddy Bear Parade; head cut at 2" from County Fair. (Head was manually separated from the body).  School uniform cut from Teddy Bear Parade at 2".
  • Cat -  body cut at 2" on the Expression from Teddy Bear Parade; head cut at 1" from Doodlecharms.  School uniform cut from Teddy Bear Parade at 2".  
  • Frog -  body cut at 2" on the Expression from Teddy Bear Parade; head cut at 1-1/2" (real dial size) from New Arrival.  School uniform and glasses cut from Teddy Bear Parade at 2".  His glasses are popped up 1/8".

  • School bus - cut at 5" on the Expression from Locker Talk (page 34).  Rear bumper was popped up 1/8".  Two black bases were cut and 1/8" pop dots were used between the two bases to create a little space for the critters to exist in.  I adhered one black base to the the yellow bus, removing the windows.  (After the critters were placed, I connected the two bases with the pop dots.)   The bumper sticker was trimmer-cut after printing with Microsoft font.

  • Blue base - trimmer-cut at 5" x 6"
  • Green mat - trimmer-cut at 5" x 3"
  • Gray mat - trimmer-cut at 2-1/2" high with top cut at 2-7/8" and bottom cut at 5"


If you enjoyed this card, check out my new project on my blog.  It is a whole classroom vignette in a shadowbox, called Ms. Elephant's Third Grade!  There are lots of fun details, pictures, tips, and lots of new morphed animals!  Additionally, later in the month on my blog, I will be posting the whole set of back-to-school kids cards like the one I have shared here.  Hope to see you over there! 


Here's a sneak peek of Ms. Elephant's Third Grade:


Cricut Info & Supplies Used:
Designed By: Nadia Herbst-McConnell
Cricut Machines Used: Expression
Project Type: card
Project Theme: Kids
Cricut Cartridges Used: Teddy Bear Parade, Locker Talk, County Fair, Doodlecharms, New Arrival
Suppies Used: Card stock from my scrap bin, ATG tape, Scotch Scrapbookers glue, 1/8" foam squares (pop dots), white and black gel pens, black ink and sponge applicator
DON'T FORGET TO LEAVE A COMMENT TO BE ENTERED TO WIN OUR WEEKLY DRAWING IN SEPTEMBER.