While we are no longer making active post of Cricut projects on this blog as of 8/1/2013, we invite you to use it for continued die cut inspiration as we will leave the blog up for viewing. Happy Cricuting !

Saturday, March 30, 2013

Dashing Through The Snow

Hi There,

Yvonne here from Ink-spirations and I'm glad to be back for another post. I missed last month as there are only 28 days in February!
I know winter still isn't over in some parts of the country although I'm glad I don't have any snow. I've had my share of the white stuff and will have more opportunities to live in it in my future.

My son and grandson are out enjoying some sledding time. Apparently Xavier doesn't enjoy speed, yet!
Blue cardstock for the background. The snowflakes paper was purchased.
The word snow was cut using Speaking of Winter. The white letters were glittered as well as the tops of the torn white paper. The brads that are in the centre of some of the snowflakes were covered in glossy accents and then glitter applied.


Animal Antics for the lettering. Art Philosophy for the banners. Using the text mode on CCR I typed the words and sized them to fit on the yellow banner ( I did this using two separate layers). With the gel pen inserted in the cricut I drew the lettering on the cardstock. I DID NOT unload the paper afterwards. Because I had positioned the words overtop of the yellow banner I changed out the gel pen for the blade housing and then cut the yellow layer.
Joys of the Season for the sleigh and mittens cut. The snowball created using puffy paint.
The negative cut from the red banners used on the page.
Can't seem to find the cartridge I cut the snowflakes from, however they were covered in glitter and then printed on Grafix Rub-Onz for the journalling.
Even though this is a wintery page I'm wishing everyone a Happy Easter.
Details on this card can be found on my blog.
 
Yvonne
Cricut Info & Supplies Used
Designer: Yvonne Balmer
Machines Used: Expression 2
Cartridges Used: Joys of the Season
Art Philosophy
Animal Antics
Speaking of Winter
Other Supplies: Dimensionals, Glitter,
Brads, Graftix Rub Onz, Yarn, Puffy Paint


Friday, March 29, 2013

Spring Break and "Fancy Nancy's" Tea Party!

Hello! This is Chris from www.scrappin-nanapuddin.blogspot.com. I can't believe Spring Break is gone and it's Easter already!! We are a little chilly right now, only in the upper 60's, but 70's are coming back tomorrow and hopefully Easter!! Gotta be nice for the Easter Egg hunt!! So I have an Easter Card and a layout for you today!


Our awesome library has programs for the children during spring break and summer reading program. This year during spring break they had a "Fancy Nancy's Tea Party" and it was awesome! They had a professional ballerina come in and teach the girls some ballet steps for about 20 minutes and the girls were "Ecstatic"!!! to say the least! One of Fancy Nancy's favorite words I'm told. I never read the books, did you? But my granddaughter will be reading them now!! These are the first 2 pages my DGD and I worked on this weekend. And my DGD being the wonderful drama queen she is, and thats DRAMA with a capital D!, said "Nana, I can feel it!" and she had been complaining about a sore ankle from a fall at school so I asked it her ankle hurt. She places hands on chest and says "No, I can feel the love in those pages"! OMG! I about fell out of my chair! 

The pages are 8x8 and they are from a scrapbook I bought years ago on clearance because the pages were already decorated and I was just started to get into scrapbooking. Now they are perfect for this occasion. The title and the Ecstatic card were from the party. The top pic title as well as the teaparty die cut and tea set was cut using my own font and an SVG with an older version of SCAL. The white doily mat was cut using one of the new WRMK mini 8 and matching border punch.The tea set looked kinda plain even though it was cut using DCWV shimmer paper. So I "stickled" them! The tea cup border was cut using Wall Decor at 1". The Tea party invite and balloons and princess was cut using "Best Friends" Imagine cart.

The Easter card is an A2 size card cut using CTMH Art Philosophy cart. The cross is from "Wedding" and they were embossed using Swiss Dots and a new AG Pirouette folder. Butterflies were cut using DCWV glitter paper and MS punch. And was glimmer misted with Dazzling Diamonds, of course!

Hope you enjoyed both! Happy Easter! Visit my blog and tell me what you think! I'd love to hear your comments! 

Thursday, March 28, 2013

Easter Charger Plate

Hello, Diane here from http://happyscrapperdiane.blogspot.com sharing this fast and easy Easter charger plate. This was super simple and I used the Easter Magic Digital cartridge.  I like that we can buy small digitals for special holidays and even though I am not a CCR user, I love they load on my Gypsy too! Below the pictures are the materials and sizes of the cuts.  Happy Easter!


Machines used: Cricut Expressions 2 and Gypsy
Cartridges:  Easter Magic Digital
Materials: Cardstock Michaels
                Stickles  Rangers
                Charger  Michaels
                Ink  Colorbox

Wednesday, March 27, 2013

Easter Place Setting

Happy Spring Cricut FANatics!  This is Rita with Rita's Paper Obsession.  For this month's post, I have a quick home decor project.  I was inspired by a Michael's ad for their spring charger plates.  The ad showed a clear plate with a rabbit etched in the center on top of a charger plate, very festive!

My table ready for Easter brunch.


I selected the EstrBny2 image from the Martha Stewart Seasonal Cake cart.

To start, using Contact paper, I cut a circle from George Basic Shapes the diameter of the plate bottom.  The bunny image was centered in the circle and flipped so that the image faced left as shown in the handbook.  I used Design Studio to accomplish the centering and flipping.  Then using the "kiss cut" method, blade depth 3 and pressure set at low, I cut the bunny image from the vinyl.  The plates are 10" with a bottom surface area of 5 3/4", the bunny image was cut at 5 1/4".

The Contact paper image was then adhered to the underneath side of the plate and the etching solution applied according to the directions.


Wishing you a Happy Easter!


Designed by: Rita Poteat
Cricut Cartridges Used: Martha Stewart Seasonal Cake
Cricut Machines Used: Cricut Expression, Design Studio
Project type: Home decor
Project theme: Easter/Holiday
Other Supplies Used: Glass plate, vinyl shelf paper, etching solution, foam brush

Tuesday, March 26, 2013

Exploring the Cuts in the Cricut Craft Room

Good morning!!! (or afternoon, or possibly evening)...this is Liz from http://lizziesworldofcrafting.blogspot.com/.  I used the $50.00 credit that was generously given us from PC and purchased Teresa Collin's basics.  Boy oh boy do I LOVE the cuts!!!  See for yourself:


 Here is a close up of the doily cut:

and I used the Craft Room Basics Font for the wording: 


I hope you have enjoyed the layout.

Have a sparkling day!
Liz


Monday, March 25, 2013

See through Easter Egg card


Hellow this is Terri from www.scrappinwiththebug.blogspot.com wishing you a very HAPPY SPRING. I know wehre I live it's ANYTHING but Spring here. It's cold, damp and possibility of snow.

So with that being said I figured I'd make a cute fun little spring/ Easter card. A friend of mine was making/selling those fun panaramic sugar eggs so this is where my inspiration came from.  On the inside of the egg she put a cute little egg and bunny w/ some grass. I thought I'd just make a fun bunny.

The Bunny is cut at 3" from Create a Critter 2 - I just love that cartridge it's just so fun. 
The Egg card was from Art Philosophy cut at 5" using the card function
The window opening also from Art Philosophy - I hid the inner egg line and then cut the vellum out so it would fit over the opening.
The grass is made from Easter 2010 cartridge - cut at 1.8"

I added a little tag - made from Emma with www.creativetimeforme.com 's mini tag die and mini tag sentiments.
I added a small flower brad.

I hope you enjoy it and

Happy Scrappin'


Designed by: Terri Szymanski
Cartridges used: Arts Philosophy, Create a Critter 2
Papers: We R Memory Keepers and bazzill pink, brown
Other Materials: My Creative Time's mini tag/ and die, brad.

Friday, March 22, 2013

A Masculine Birthday Banner


Hello Everyone! It's Colleen from Col's Creative Corner and I am so happy to be sharing  a banner with you today. I am the "go to" person whenever any one from my friends and family needs a banner. I like having that distinction, I love that feeling I get when I share my paper crafts with others. Today's banner keeps with L.B.'s masculine theme.  My best friend needed a special banner for her nephew who is turning 21 next week. He is in a rock and roll band with her son, so it was easy to decide on a theme for him. I have been thinking about how many carts I have and how I rarely use my older carts, so I challenged myself to use an older cart for this banner. I only used 3 carts on this banner, Blackletter, Indie Art and Cricut Alphabet for the stars.


I used the two guitars from Indie Art. I really dig the flying V.  I cut 4 of them and did 2 in silver and 2 in gold.


All the lettering and the pennants are from Blackletter.


The skull is also from Indie Art
This really is a great cart for guys!
 

Are you wondering what the design in the picture above is? I bet you are! That is my Cricut Version of their band logo. Her son and nephew love the really heavy stuff. I have finally decided that I am too old for rock and roll, because they call their band Napalm Party and well, I just don't get it. LOL! The cuts are from Indie Art, I colored the flame with copics. 
 
Below are pictures of the banner close up spelling Happy 21st Birthday Brandon!


 All the papers are from Die Cut With A View. The banner is made with the DCWV Blackboard  Stack. The shadows for the letters are also from the Blackboard Stack. All the guitars, stars and the skull are made with DCWV Glitzy Glitter Stack. Who says you can't use glitter on a guy project? Usually my hubby says that and even he agreed that Glitzy Glitter Papers were cool.

Thank you for stopping by the Cricut FANatics blog today!

Happy Crafting!

 
Designed by: Colleen McCauley using my Gypsy and cut with my Cricut AE2
Cartridges used: Blackletter, Indie Art and Cricut Alphabet
Papers: Die Cut With A View Blackboard and Glitzy Glitter stacks
Other Materials: Ribbon, adhesives


Thursday, March 21, 2013

Cheers to Masculine Cards!

Good day all. It is L.B. from Cool Beans by L.B. and today I am continuing my quest to bring masculine themed projects your way. Today I am sharing a card I made using a very masculine themed cartridge: Father's Day.
I cut this can shaped card using my Gypsy. I used the hide/contour button to remove all the inside cuts from two cans and welded them together (measurements below).  The welded card came out  great.
I added the "cheers" from Everyday Pop-up Cards to the cover and on the inside I used Birthday Bash and a stamp to finish it off.
I am finding this quest to be very enjoyable.  Hope I am helping inspire you in your projects for those great men in you life. Have a great day!

Project Details:
Cricut Cuts:
- Father's Day welded cans 3.27x5.49.
- Father's Day other layers of can 3.03x5.07. 
- Birthday Bash: to you!
- Everyday Pop-up Cards: Cheers!
Gypsy and Expression 
Stamp: Pink By Design Artisan Tags


Wednesday, March 20, 2013

Google Reader Changes...What's does that mean to us?

Many of you may have heard or read that Google Reader is going away very soon.  You may be asking yourself, What is that?  How does it affect you and Cricut FANatics?

First off, what is Google Reader?  Google Reader is Google's RSS Feed.  RSS Feed is a way to keep up with all the blogs you follow in one place or through daily digest sent to your email address you provided.  Unfortunately, Google has decided to stop this service as of July 1, 2013 because fewer and fewer people are using them.  You can read more about that HERE on the Google Blog. There are other services that you can check on using instead but that will take time to select one and then transfer all your feeds.  We won't go into all that on Cricut FANatics blog.  Just be aware you do need to do some research if this is important to you.

So how does that news affect you and Cricut FANatics? We originally only offered a RSS feed for you to sign up to follow Cricut FANatics and you all signed up for that.  When you did that, you got a daily digest of each Cricut FANatics post sent to your email.  Well now that Google Reader is going away, you will no longer have that option. 

In fact, improving communications with our readers and using the latest tools is one of the reasons why we implemented the NEW SUBSCRIPTION BOX to the right of the screen so that we didn't have to rely on RSS feed to get you updates on Cricut FANaticsAnd no, we didn't have a crystal ball when we made that decision a few months ago but it will serve us well with the announcement that Google Reader is ending.   

What can you do to keep following Cricut FANatics so you don't miss anything?   
If you have NOT already signed up using the NEW SUBSCRIPTION BOX to the right of screen, PLEASE  DO SO NOW.  Plus you get the added bonus of receiving a fun Checklist of 30 Ways to Embellish Your Die Cuts to help inspire your creativity. So it is a WIN, WIN for taking a minute to sign up!  Once you sign up, you receive the Checklist PDF attached to your subscriber confirmation email.  Then you receive a weekly blog digest of all the post from the week in your email and an occassional extra announcement we make at Cricut FANatics.  It makes it easy when you do have a few minutes to quickly find the amazing post from our Cricut FANatic Designers.

HOW ABOUT A PRIZE?

Thanks to all of you who have already signed up in the past couple of months. There is no need to do so again.

Are you enjoying using your Checklist of 30 Ways to Embellish Your Die Cuts
Leave a comment on this post of how you have used it recently and be entered to win a little prize.  A winner will be drawn from the comments section next Saturday 3/30 at Midnight and will post a winner on April 1st. 
 
Thanks for following Cricut FANatics. And don't forget to leave our Designers a little love when you do stop by to check out their amazing projects.


.

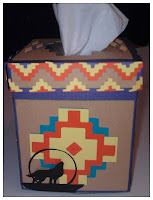
Southwest Tissue Box

Hi Everyone! This is Melody from MelodyLaneDesigns.com This is my first post here at Cricut FANatics, I am excited to be a part of such a great group of designers. I will be here as a Guest Designer on the 20th of every month.

For my first project I decided to make a tissue box cover using the free Southwest cartridge in Cricut Craft Room, well it was free for 2 weeks I think today may be the last day. I am also entering this into the contest at Cricut.com

This project took me about 3 hours to create in Cricut Craft Room. I have the cut file here for you to download if you like. You do need to own the Southwest Cricut cartridge to make this, it goes on sale Thursday.

To make the Tissue box cover you can download the cut file and just make the box using the free cartridge in CCR. With this box I did use the Southwest cartridge to create the opening at the top of the box. If you would like to just create the box with out the Southwest cartridge I have another cut file here that is free and no cart is needed.
You will need to score the base pieces at 1/2" and 5". For the lid score at 1" on every side. Cut 1" up on the score line on the right til you touch the other score line, turn and do to every side.

Here is how the layers are placed. As you can see I made one layer say Get Well to give this as a Get Well gift instead of a card with a box of tissue.

I cut out the Southwest designs I wanted and adhered to the side of box before I put box together. I put the designs together in the 1st video below.

Next step is to put adhesive on the 1/2" tab you see on the left of both pieces and adhere pieces together to create a box. I show more details of this in the Southwest Tissue Box Part 2 video below. Below are pictures of each side of the box.


 I made 2 videos, this first one shows just putting together the southwest designs.

This video shows the box being put together with the southwest images being put into place.
Thank You all for joining me today, I am looking forward to creating more for you in the future. I hope you will visit my Blog and Like my Facebook page and follow me on Pinterest and subscribe to my Youtube Channel.

Designed By: Melody Lane
Cricut Machine Used:  Cricut Expression 2, Cricut Craft Room
Cricut Cartridge Used:Southwest and Craft Room Basics
Other Supplies Used:Cardstock, adhesive and box of tissues.