While we are no longer making active post of Cricut projects on this blog as of 8/1/2013, we invite you to use it for continued die cut inspiration as we will leave the blog up for viewing. Happy Cricuting !

Friday, November 30, 2012

Wibbly Wobbly!

Hi There Crafters!

Yvonne here from Ink-spirations. Glad to be back with another project. With December just around the corner I'm working hard on getting all my Christmas cards done.

The little penquin is on an action wobbler. Just too cute!  I started with CCR cause it is so easy to make sure your sizes are going to be correct for your card base size.

 
Printed all paper with the Imagine using Christmas Wish. The sentiment and penquin are from Create A Critter 2.  Some puffy paint added to his hat and some pink chalk to rosy up those cheeks. I like using chalk cause if I make a mistake I can just eraser it and try again.

Card Base - 5 1/2" square
Pattern base - 5 1/4" square
Circle base - 4.375"
Circle pattern - 4.25"
Border base - 1 3/8" x 5.25"
Border pattern - 1.25" x 5.25"
Santa Penquin - 3"
Words - 1.25"

Designed by Yvonne Balmer
Machines Used: Imagine, CCR
Cartridges: Create A Critter 2, Christmas Wish
Other items - glitter, puffy paint, dew drops, chalk, xyron (to make the front of the letters sticky for the glitter)
Thanks for stopping by!
 
Yvonne

Wednesday, November 28, 2012

Imagine meets Artiste!

Hello everyone, Chris here from http://scrappin-nanapuddin.blogspot.com, with a couple of very easy cards made with CTMH Artiste and Imagine Snow Angel. Hope you are all recuperated from Thanksgiving and maybe some or all of your Christmas shopping is done! I have all my grandkids done! the easy part actually! And today is my 42nd wedding anniversary! And they said it wouldn't last! they "still" say it won't last!!! Guess I should have made an anniversary card! Guess I'll start now! I'm a very big procrastinator, obviously! Anywho, I'm sorry, I digress.


The card shapes are both on the CTMH Artiste cart and I used CCR to match the shapes to shape on the card. The Seasons Greetings layer on the top is an Icon is on Snow Angel and matches that card shape perfectly!I did also cut out an extra sleigh to layer on top for dimension, also on the cart!, and added stickles for glistening ice and snow! Can't get much quicker or easier than that! Who doesn't need that at this time of year?! LOL! The paper is also printed with patterns from Snow Angel. My Imagine is still not well and is in shop! This was a friends and hers works so much better than mine ever did! It prints and cuts correctly all the way to the bottom of the page! I'm trying to get her to sell it to me for a backup because she has only used it once!!! Hope everyone has a happy and joyous holiday season!

Let's Trim the Tree

Welcome!  Diane here from http://happyscrapperdiane.blogspot.com sharing a layout with you.  It's time to decorate the tree and the home and you need to capture those memories for your scrapbook.  I used the cartridges Teresa Collins Dec. 25 and Holiday Cakes for this project. Details are below for this project and can't wait to see your creations and pictures.


Details:
Created by:  Diane Kielman of http://happyscrapperdiane.blogspot.com
Cartridges used: Teresa Collins Dec. 25-Title cut at 2.5 inches
                                                              Holly Frame cut at 5.5 inches
                                                              Holly cut at 2 inches
                          Holiday Cakes-ornaments cut at 3.5 inches
Machines Used-Gypsy and Expressions 2
Pattern Paper-Simple Stories 25 Days of Christmas
Cardstock-Recollections
Stickles-Ranger
Additional tools-EK Sucess border punch
                         Ribbon
                         Jewels and Pearls

Tuesday, November 27, 2012

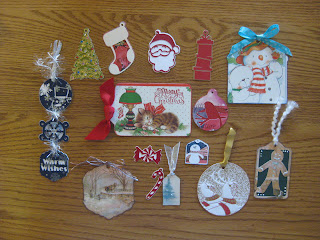
Gift Tags from Old Greeting Cards

Happy Tuesday!  This is Rita from Rita's Paper Obsession.  I hope everyone had a wonderful Thanksgiving.  You probably have recovered from the large turkey dinner and started your Christmas shopping.  If you are like me, chosing the right wrapping and gift tag is just as important as the gift.  Creating gift tags from old greeting cards is fun and easy to do with our Cricut machines.

Over the years I have saved my greeting cards, I just hate throwing them away.  I love the graphics, colors and paper quality of greeting cards.  So this year I pulled out my stash of cards and the Very Merry Tags cartridge and went to work.


Below are examples using the base tag with the images from the greeting cards. Sometimes there are images inside and/or on the back of the card that look stamped so be sure to consider using those as well.  I let the image size determine my cut size.  


Cut two base tags and use the positive and negative layer cuts.


Using chalk inks I inked the edges to remove the stark white edges.
 
Now it's time to embellish.  I used gel glitter pens, alcohol ink, Versamark ink, Perfect Pearls, Liquid Pearls, Glossy Accents, chalk inks, rubber stamps, Stickles, gems, buttons and ribbons.
 
The lightbulb layer was cut from a very shiny white card.  Alcohol inks and Perfect Pearls add a colorful and cheerful look to the tags.


The Christmas tree layer was cut from a card embellished in gold.  I'm sorry the image isn't very good as this is one of my favorite tags.  It looks so pretty with the colorful gems.  
 
 
Add gems


Add buttons
Add Liquid Pearls
Add gel glitter, Stickles and Gloss Accents


Selection of finished tags
Cards that have large images are great for making gift card holders.  Cut the tags at 4 1/2 inches or larger to accommodate the pocket for the gift card.


Gift card holders


Wishing you a happy and crafty holiday season.
 
Cricut Info & Other Supplies:
Designed By- Rita Poteat
Cricut Machines Used- Expression
Cricut Cartridges Used- Very Merry Tags


Monday, November 26, 2012

Wow...A Christmas Card to Share Before December!

Hi, Liz here from http://lizziesworldofcrafting.blogspot.com/ and today I have a Christmas card that I made to share with you.

Every year I try and get them finished in time to mail out the first week of December and I finally succeeded in doing so this year.  I got the inspiration from a picture I saw online and used my cricut for the finished product.

 I used Stampin Up card stock in sand and cut it to fit the front of an A2 sized card.  I used George and Basic Shapes to cut the two squares (2") for the top of the door and a 3" rectangle for the bottom of the door.  The ribbon is ruby red stampin' up.  I used Christmas Cheer for the wreath cut at 2".  A rhinestone and viva decor pen in red completed the wreath.

I inked the edges of the door with Tim Holtz walnut distress ink and used stampin up ruby red for the sentiment.  The stamp is from the Recollection brand at Michaels.  A brad completes the door handle.

I hope every one has a joyful holiday season.

Have a sparkling day and thanks for stopping by!!!

Liz

Machine used:  Expression
Cartridges used:  George and Basic Shapes and Christmas Cheer
Other materials used:  Stampin Up Cardstock in Sand, Stampin Up Ruby Red ink and ribbon, viva decor pearl pen in red, Tim Holtz walnut distress in, brad, rhinestones.

Sunday, November 25, 2012

Easy Christmas Tree

Hi everyone!  This is Kelly.  Today I have an easy Christmas decoration.  One of my favorite color combinations for Christmas is cream and gold.  When I was looking at the TC December 25 cartridge, the fleur de lis snowflake caught my eye.  Being from New Orleans, I love anything with fleur de lis; it reminds me of home!


I cut out a variety of snowflakes in sizes of 2", 1.5", and 1".  I used CTMH Colonial White paper, which is not white, but more of an ecru, off white color, since I could not find the right cream/ecru color glitter paper.  Naturally I had to add snow glitter to the snowflakes.  Normally I hate using glitter because it's such a mess, but this project had to have it!

Next I covered a 5" Styrofoam cone/tree with the gold lacy ribbon I found at Michael's.  I wanted the white of the Styrofoam to show through, so this ribbon was perfect!


I then started randomly placing the snowflakes on the tree.  Instead of hot glue, I used pearl headed stick pins!  This made it easy to place and adjust the placement of the snowflakes.

Once I finished adding all of the snowflakes, I added a strand of pearls to the bottom and top, a gold ribbon bow to the top and I was done!


Frying Tom Thanksgiving layout

Layout before adding journaling and photos

Turkey - 3" Create a Critter 2


 Hi this is Terri from http://scrappinwiththebug.blogspot.com/ this month for my project I am sharing a layout I made reflective of this past Thanksgiving. Hoping everyone had a GREAT Thanksgiving. I know I did.
The past few years the tradition has been to get a Turkey and fry him. This year was no different. My family all crammed into my brother's apartment for Turkey Day. My husband was in charge of frying the bird. I will say - for those who have never had a fried turkey it is so super yummy. We use an electric fryer and it works wonderfully.
I must admit in the past 8 years of frying the turkey I have never taken photos. So this year I knew instantly that I wanted to make a series of photos showing what steps go into making the this wonderful bird.

I used the paper from DCWV -- Citrus stack and also Fall harvest stack (for the solid paper).

Cartridges used:
Create a Critter 2 - Turkey cut at 3"
Arts Philosophy - Square 4 cut at 4"
Arts Philosophy - Banner  1" each
Billionaire - Welded the words Frying Tom cut at 1"
Billionaire - 2012 - cut .80"

I used a Martha Stewart punch for the accent red and also used a square punch to cut  date tag at the bottom.

The orange rhinestones are from Queen & Co.
Hemp Twine - from Michael's


Designed By:  Terri S.

Cricut Machine Used: Expression, gypsy

Cricut Cartridges Used:  Arts Philosophy, Billionaire, Create a Critter 2,

Other Supplies Used: DCWV paper Citrus and Fall Harvest paper stacks, ATG adhesive, Queen & Co - rhinestones, hemp twine

Friday, November 23, 2012

Deck the Halls

Happy Saturday everyone!  This is Julie from Mommy's Playroom.  I hope everyone had a wonderful Thanksgiving!

We will be moving into our new house in another city only a couple of days before Christmas so I won't have much time to decorate.  I wanted to create a quick and easy home decor project  to make Christmas decorating a little faster.

I am a huge Teresa Collins fans so I decided to base my project on the reindeer silhouette on her December 25th Cricut cartridge.

I started with the reindeer silhouette using the fit to page feature to make it as large as possible.


The title was also cut from December 25th.  The paper is from Bo Bunny and is called St. Nick stocking.

 
The ornaments are from Christmas Cheer and were cut at 2.5".  The snowflake is from a Stampin' Up punch.  It was cut on setting 3.


I wanted to add a little sparkle to the project so I covered the title with Candy Cane Stickles.  Black Diamond, Green, and Candy Cane Stickles were used on the ornaments.  The snowflake is covered in Crystal Stickles. 


I wanted to decorate something other than a Christmas tree for my project so I used Stampin' Up silver elastic cord to tie the ornaments to the reindeer's antlers.  I think he looks adorable!


Designed By:  Julie K.
Cricut Machine Used:  Expression 2
Cricut Cartridges Used:  December 25th & Christmas Cheer
Other Supplies Used: MME paper - 12 Days of Christmas "Wrap It Up"; Bo Bunny paper - St. Nick Stocking; Stampin' Up cardstock - Whisper White, Read Red, Basic black; silver paper from my scraps; Stickles - Candy Cane, Green, Crystal, Black Diamond; Stampin' Up silver elastic cord; Tombow Multi Liquid Glue


Two Projects with the Artiste Cartridge

Hello There, Jami Larson, cricutfarmer, from the messageboard.  I am posting two projects this month, because I managed to drop the ball last month and forgot to post,
sorry.  Both of these were made using the CTMH Artiste cartridge.  This project holds a set of standard size cards and envelopes.  Depending on the amount of embellishments you add to the card you will be able to add 4-6 cards and envelopes.  I intend to add a bit of greenery with my Martha Stewart punch and use this as a gift for a favorite music teacher for Christmas.  The box was cut at 5 1/2"  and the keyboard was stamped from the "Sweet Music" set from CTMH found here Stamp Set ,or from your CTMH demonstrator, which you can get for 1/2 price until the end of the month with a $50.00 purchase.  The cards were made from paper from October Afternoon.


  This is the very basic Advent calendar that I put together using the "Artiste" cartridge, CTMH advent calendar, and October Afternoon paper.  I filled each of the boxes with accessories that go with the "Crib Life" doll that I will give to my niece on the 25th.  I have given Advent calendars to my niece and nephews for years and absolutely love that this one gives me a box large enough to put more in than just a small piece of candy.

Thursday, November 22, 2012

Happy Thanksgiving!

Hi Everyone!  This is Alex from www.cardsinthetree.blogspot.com.
I hope everyone is enjoying the day with their families and stuffing their faces with great food!


In the spirit of the Thanksgiving I had to create a traditional type turkey.  He is layered from several cuts from the Create a Critter cartridge.  His body was distress inked and embossed using the alligator skin embossing folder.  The feathers are cut from the feather page from the WeR paper pack.  You can actually see the full paper of this patten on the front and inside of the card.  His eyes are small hot set gems with bronze sharpie eye lashes.  The layer that the turkey is glued to is raised above the base of the card layers with foam tape.


The base of the card is layered again with papers from the WeR pack.  The "Thanksgiving" stamp is stamped in chocolate ink at the base of a layer.  Three colored twine strands were braided together and wrapped around 3 times at the top of the layer.


On the inside of the card a few more layers were glued into place.  The "Happy Thanksgiving" was cut out with M.S. Seasonal Cake Art Cartridge and glued into place.


Here is the full front view.  


Happy Turkey Day!
Gobble til you Wobble! 

Cricut Info & Supplies Used:
Designed By:  Alex B.
Cricut Machine Used:  Cricut Mini, Gypsy, & Cuttlebug
Cricut Cartridges Used:  Create a Critter & M.S. Seasonal Cake Art
Other Supplies Used: Close to My Heart Paper in Colonial White, Chocolate, & Sunflower, & Cranberry; Tulip Hot Set Brown Gems and Setter; Close to My Heart Ink in Chocolate; Close to My Heart Stamp Set "So Grateful"; Tim Holtz Distress Ink in Gathered Twigs, Aged Mahogany, & Rusted Hinge; Alligator Embossing Plate; Assorted We R Memory Keepers Autumn Splendor Papers; American Crafts Twine in Cream, Green, and Brown; Foam Tape and Assorted Adhesives; & Sharpie Marker in Bronze.

Wednesday, November 21, 2012

Elf on The Shelf Letter

Happy Holidays to all. It's L.B. from Cool Beans By L.B. and I love the holiday season. Starting with Thanksgiving and through the New Year I just love it all. One special thing that we have done in our home for the last few years is have the Elf on the Shelf visit our home. For those who do not know, the Elf on the Shelf is a story about an elf who comes and visit your home daily before Christmas. Each night it reports back to the North Poll about how the children (and adults) are behaving in that home. There is a doll that comes and it moves all over your home during it's stay...check out Pinterest for some of the crazy ideas people use.  It is almost time for our elf, Conner, to arrive and I thought a letter reminding my daughter about his arrival would be a cute way to start the fun.
I found this sheet of cardstock in my holiday pile. I loved the way it looked like a postcard. I cut out a simple little elf using the Paper Doll Dress-Up cartridge. Once I had him all dressed I added some sparkle with my Stickles. I placed him onto the letter background.
Next, I used one of my favorite font cartridges: Billionaire to cut out the names for the greeting and closing. I love how this cart welds together on my Gypsy.
Once the names were on I add a simple little letter, including a message about playing in Mom's craft room. This letter will today and Conner will arrive at a special breakfast on Sunday morning. Hope you all have a wonderful Thanksgiving and are ready for the holidays to come.

Cricut Info & Supplies:
Designed By: L.B.
Cricut Machines: Expression, Gypsy
Cricut Cartridges: Paper Doll Dress-up (elf and parts cut at 5.5 inches), Billionaire (letter height 1.47 inches)
Project Theme: Christmas and holidays
Additional Supplies: Gold and Diamond Stickles, Scotch's Two Way Glue, DCWV Christmas Combo stack

Tuesday, November 20, 2012

Sketch Challenge #3

Welcome to our Sketch Challenge.  
This is Amy from Amy's Digi Scraps and welcome to the another Sketch Challenge! On the 20th of each month, I will post a sketch for you to enjoy!  I posted a card variation but you can make it a layout as well.  Please visit the Sketch Challenge link for more information about our monthly Sketch Challenges.


Here is Sketch #3 and with the popularity of Twine and String and such, I incorporated it onto this sketch.  Oddly enough, though, I ended up not using Twine on my card - this time.  

Instead of twine, I went with torn paper.  A friend had done a similar card and I really liked it, so this is a fold up card with the torn edge where the twine would have been.  An embossed stamp (I borrowed this from a cropping friend so I do not know the name or company) with layered matting (done with my cricut so that I would have the exact sizing I needed), a little bit of chalk along the torn edges, and two eyelets at the bottom - this card is ready!


But!  To add a little more oomph, I used watercolor pencils and water brushes and colored the embossed stamp.
Just lovely.
And here it is in another color:


We would love to see what you can do with this Sketch.  Please create a card or layout and upload the image to this post in the InLinkz!  Remember that you must use your Cricut in creating your project for the Sketch Challenge.

Monday, November 19, 2012

Winter holiday cards!

Ooops!  I was supposed to post my project yesterday! Darn it! Well at least I remembered today! This is Michele from Scrap-n-Dance!

So, I've been trying to make our winter holiday cards for the last few years. I try to make a "simple" design in the hopes I get them done quick, but gluing these together took a while so they weren't as simple as I'd wanted. lol

This year I also wanted to stick to using only my stash, which meant that I had to find enough cardstock of each color to make the cut top layer, and another layer for one of the mats. Fortunately, I found enough cool blues and purples to make these. A few of these colors may be non-traditional but hey... I managed to not buy a thing! :)  I still need to do something with the insides, probably a stamped sentiment. But at least I got 40 of these done and I can finish up the stamping this weekend.

These cards were created by welding snowflakes and a sentiment from several cartridges into a rectangle frame that I sized to fit a card that would fit into a regular size #10 business envelope. See below for the cartridges used!

Cricut Info and other supplies used:
Designed by Michele Donner-Ramsey

Cricut machines:  Expression and Gypsy
Cartridges used:  A Child's Year, Cake Basics, Christmas, Country Life (Sentiment), Art Philosophy, Joys of the Season, MS Seasonal Cake Art, Plantin
Supplies: white and colored cardstock, adhesive