Hello, everyone! It’s Lori from The Singing Shell and I am so happy to bring you a Thanksgiving project I have been working on. I am happy because I know how blessed I have been these past couple of days in the aftermath of Sandy
I have the pleasure of hosting Thanksgiving dinner at my house this year. Because of limited time, I needed to make something that I could mass produce without a lot of hassle. I wanted to try something clean and simple, too. Let me tell ya: It is hard to leave white space alone! I kept wanted to stick something in those areas – a diecut, a stamp, a rhinestone, a ribbon, a photo corner, anything. It is amazing the amount of embellishments one can use. I had to chant to myself: Leave it alone! Leave it alone! Eventually, I was okay with it… eventually.
I have been playing around with the notion of making my own embossing folder when I came across a great site: Paper, Scissors, and Ink. She tells you how to make your images to emboss without the folder! How cool is that? I used to the idea to deboss my images instead, though. I like that look, too, because I think it is elegant..
1. I cut the leaves image (page 35) in Art Philosophy eight times using regular card stock. It took less that 2 minutes. If you use thicker cardstock you can cut less images.
 |
| Take four of the 8 and paste. |
2. I pasted four images together to get two thick leaves diecuts.
3. I arranged them on my paper and used a rubber mat on top. I used a rubber mat from Papertrey Ink, but you can use any brand. In fact, plumbers red rubber gasket sheets from the hardware store work just as well and are cheaper!
4. The sandwich I used was A – B – rubber mat + paper – B. No shim needed. You may need to play around with your sandwich depending on the paper and rubber mat you use.
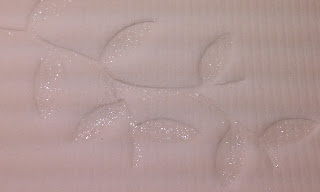
5. Voila! A debossed image from my Cricut instead of a folder. A lot more possibilities for the future, too!
6. I added some Perfect Pearls to the sunken image. Because the Perfect Pearls is so light, it is very forgiving and I was able to go over the leaves very quickly and it took no time at all to do this step.
 |
| First, I added a white shimmer. |
 |
| Then, I added the gold shimmer. |
7. I added my Thanksgiving Celebration sentiment welded on the Gypsy using a font from Quarter Note. That font is so pretty!
8. Lastly, I adhered the cream cardstock onto the pattern card stock and added the invitation information in the back!
You can use the
pieces over and over again. Here is a modified version I made for my
parents in Spanish. I used the label from from Folk Art Festival on page
69 for the sentiment.
So there you have it! A clean and simple invitation using an image I wanted instead of an image I had to use from my collection of embossing folders. I wish you all a Happy Thanksgiving. Don’t forget to hug those loved ones!
Cricut Info & Supplies Used:
Designed By: Lori Sjogren
Designed By: Lori Sjogren
Cricut Machine Used: Cricut Create
Cricut Cartridges Used: Art Philosophy, Quarter Note
Other Supplies Used: SEI - Patterned paper; Bazille - Plain cardstock, Cuttlebug, Ranger - White and Gold Perfect Pearls
Cricut Cartridges Used: Art Philosophy, Quarter Note
Other Supplies Used: SEI - Patterned paper; Bazille - Plain cardstock, Cuttlebug, Ranger - White and Gold Perfect Pearls


OMG!! This is a fabulous idea Lori!
ReplyDeleteI'm so glad you are safe and well. And I will certainly be giving extra hugs today.
I am so happy that you and yours are safe. Love your idea! I will give lots of hugs today.
ReplyDeleteLovely. Thank you for the tutorial as well. Seems simple enough even I could do it!
ReplyDeletewhat a wonderful idea ! I can think of many shapes I would love to have embossing folders for...will give this a try for sure.
ReplyDeletethanks for the great idea !
Beautiful, Lori. I love the techniques and the beautiful invitations you created. Thank you also for your lovely message of Thanksgiving.
ReplyDeleteWhat a very cool technique! Love your card too! Thanks for sharing.
ReplyDeleteReally pretty. I will need to try this technique using a tulip.
ReplyDeleteGreat job! Thanks for the links.
ReplyDeleteLove learning new techniques!! What a great idea and thanks for all the tips for making our own shapes!!
ReplyDeleteOH my goodness what a GREAT GREAT idea. I'm going to try this. Thanks for sharig.
ReplyDeleteGreat idea! TFS your awesome tip
ReplyDeleteBeautiful card!
ReplyDeleteI am so thankful that you are all safe and sound. Thanks for the easy instructions for a fun new technique! Love the invite, it's simple yet elegant.
ReplyDeleteLove your leaves! They look great!
ReplyDeleteGorgeous! Love how you built up the leaves with layers!
ReplyDeleteWhat a wonderful idea!!! I still haven't gotten up the courage to make my own embossing folders, but this way I wouldn't have to!! this is a keeper idea....
ReplyDeleteOoops, forgot to say how nice I thought your card was!!! Very elegant.
ReplyDelete