While we are no longer making active post of Cricut projects on this blog as of 8/1/2013, we invite you to use it for continued die cut inspiration as we will leave the blog up for viewing. Happy Cricuting !

Sunday, December 30, 2012

Let It Glow

Hi There,

This is Yvonne from Ink-spirations. Hope everyone had a wonderful Christmas. My daughter came home so everything was great. Today I'll get to skype with my son and his family while they open Christmas presents! Isn't technology wonderful.

My project I'm sharing is actually decorating the tree with my son and family in 2011. I had visited early in November so I could be part of the decorating so they purchased an artificial tree.
It was my Grandsons first Christmas that he could really help with the decorating. It was so much fun.


The pattern paper was from a Christmas pack by The Paper Studio called Holiday Wonder. Remaining cardstock Bazzill. I had lots of picture as so created an illusion of how we used to hand our Christmas cards - on a string usually hung against a wall. Now fewer people actually send cards.
Lots of glitter and bling used on the pages - after all it is Christmas!

Wishing everyone all the best for 2013!
Yvonne
Designer - Yvonne Balmer
Project - Scrapbooking
Cricut Machine - Imagine & Expression & CCR
Cartridges
Elegant Edges (scalloped square) 9.35" & 9.00"
Art Philosophy - Let It Glow - 1"
Art Philosophy - Snowflake - 3.50"
Art Philosophy - Snowflake Border - 9" length
Art Philosophy - Presents - 1.75"
Create A Critter2 - Tree - 4.25"
Celebrate With A Flourish - Lights - 1.75"

Friday, December 28, 2012

Cheers!

Hello, Chris here from Scrappin-nanapuddin.blogspot.com. Hope you all had a nice Christmas and got all the crafty things your little heart desired! I got that AND a WHITE Christmas! in Texas, no less!! Only 3 on record! I know some of you got a whole lot more than our piddly 3 inches, but its rare for us! And I feel bad for anyone that got more! It's pretty but it  is a  headache! at least for us Texans!
My project for today was to make some New Years cards for my family and friends! and my "new" used Imagine came in handy as well as Greeting Cards inside and out! I haven't really figured that whole cart out yet, but can usually get accomplished what I set out to do! I don't know if you recall but my Imagine was broke last time and part could not be found by Provocraft but they're refunding my $500!! A friend of mine had actually traded for 1 that was not used much by previous owner, and she was intimidated by it so I traded my E2 for it! woohoo! it works great right now. Keep your fingers crossed it lasts!


You can't really see the glimmer mist in this picture but its really pretty IRL!
Recipe:
Cricut Imagine
Imagine Greeting Cards Inside and Out
Ranger Holographic Embossing powder (love this stuff!)
Martha Stewart Glue Pen for embossing
Tattered Angels Diamond Dazzle Glimmer Mist

See y'all next year!! Cheers to a great New year!

Not too soon to plan for next year!

Hope everyone had a wonderful holiday and excited to get back to crafting!  Diane here from http://happyscrapperdiane.blogspot.com sharing  a project  and celebrating my birthday with you. This is something you can make for next Christmas.  I am a lover of thrift stores and found this old frame for 50 cents with a terrible picture in it but knew I could do something with it.  I tried painting the frame, but it looked horrible so I thought of using paper and modge podging it.  I am pleased with the results.  I used the digital image from Teresa Collins Christmas Collage and used the negative piece which was probably a little easier thank trying to glue all the positives back in the same order! lol  This was a large 10 x 13 size frame so I made the main cut as large as I could fit in.  Below the pictures are the cartridges and cuts I used.  I was pleased how it turned out and next year will place it on the hutch.

Created by:                 Diane Kielman  http://happyscrapperdiane.blogspot.com
Machines Used:          Gypsy and Cricut Expressions 2
Cartridges:                  Teresa Collins Christmas Collage Digital -art cut at 9.75 inches used negative
                                   Birthday Cake-borders page 56 Christmas 3 sized in gypsy 11.5 x 2.25
                                   Winter Woodland-poinsettia cut at 3 inches
Frame:                        Good Will Find
Pattern Paper:             Hobby Lobby red musical print
Cardstock:                  Bazzill

Thursday, December 27, 2012

Etched Glass Candle

Wishing you a belated Merry Christmas!

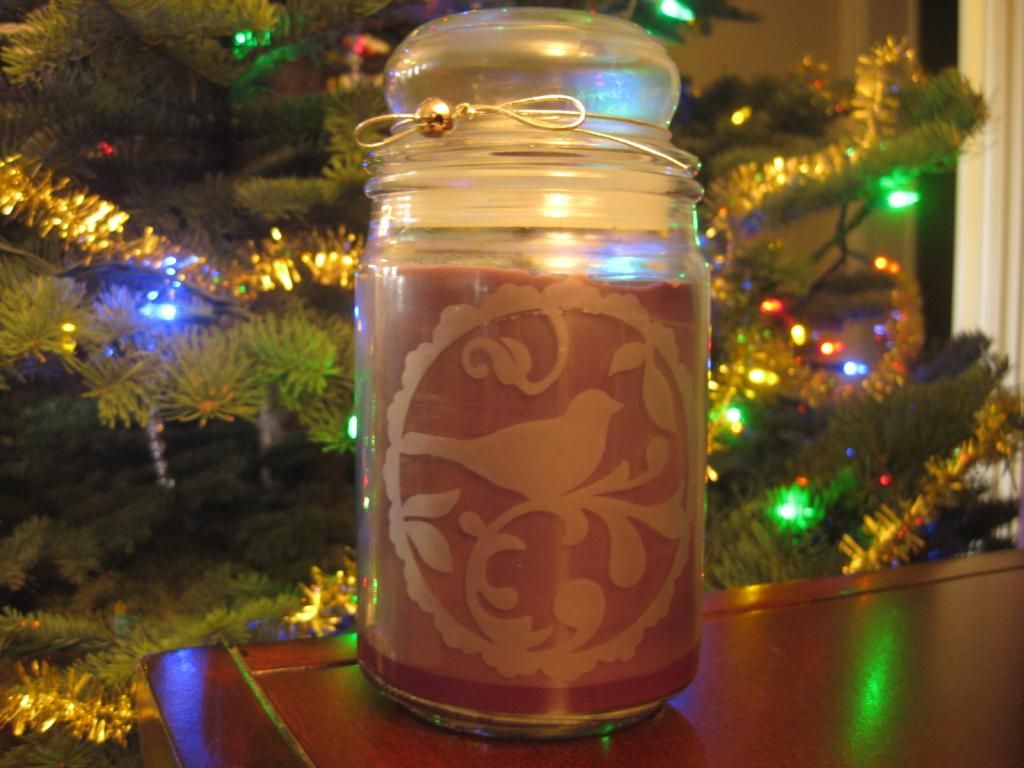
This is Rita from Rita's Paper Obsession.  This month I wanted to share how inexpensive, easy and fast it is to create a beautiful glass etched gift.


I wanted a gift that could be used throughout the year so I chose a jar candle with a lid and a simple image that can be displayed year round.  Once the candle has burned out the jar can be used as a candy jar or trinket holder.

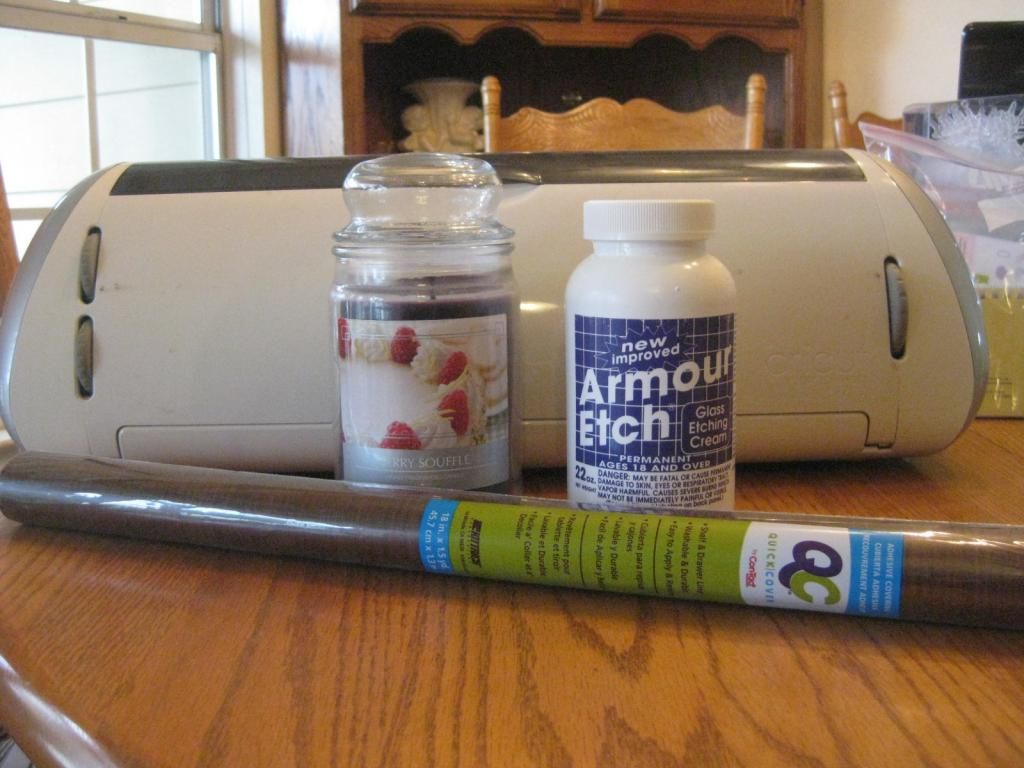
For this project you will need the item you wish to etch, vinyl shelf liner, etching creme, a foam brush, and your Cricut machine.


I used Contact paper purchased at Dollar Tree.  Etching creme can be purchased at your local craft store.

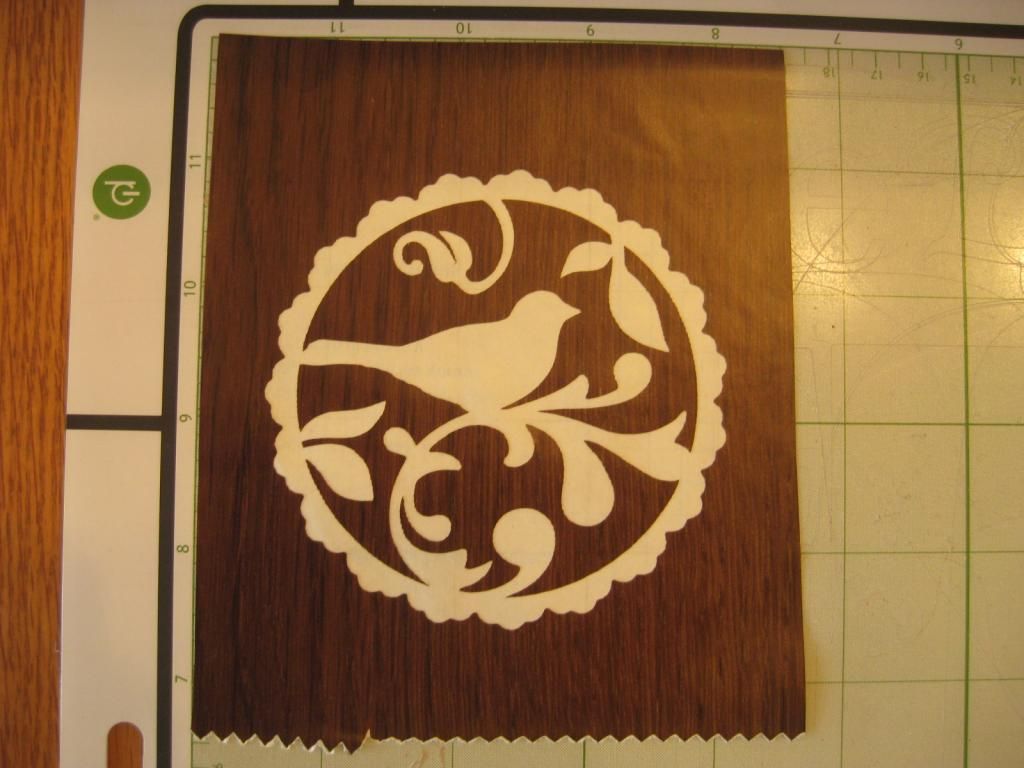
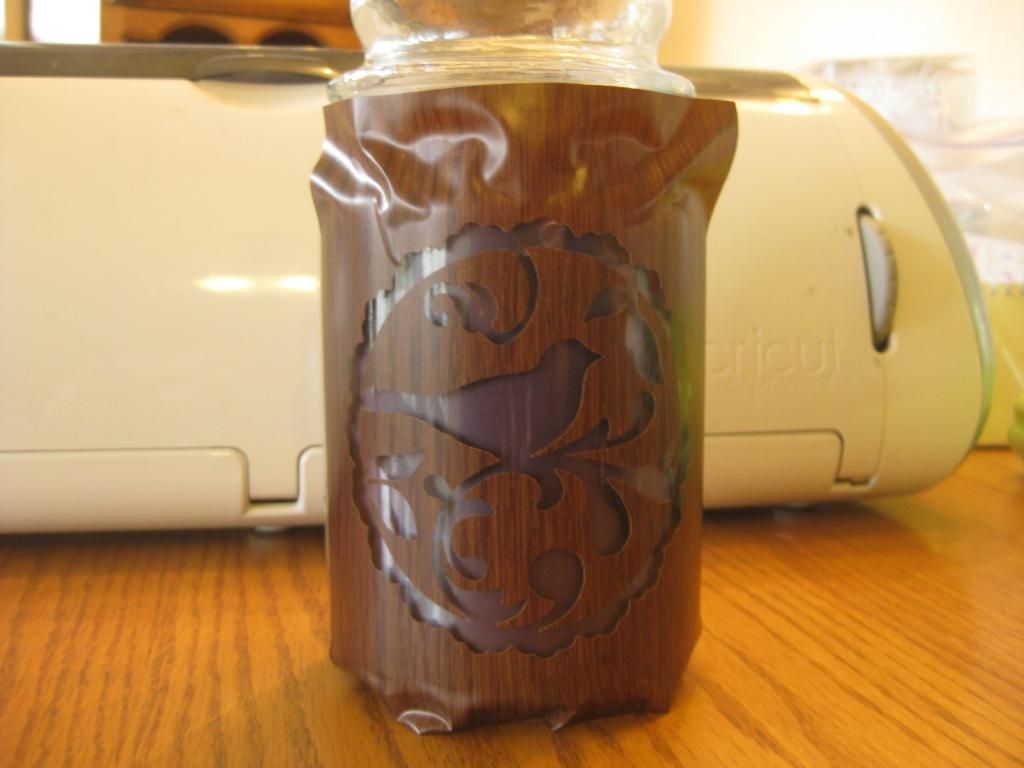
I selected the bird image from the Sophie cartridge and "kiss cut" the image at 3 1/2 inches.  Kiss cutting cuts through the vinyl but does not cut all the way through the paper backing.  You may need to experiment with the blade depth and pressure as each machine is a little different.  I used a blade depth of 3 and set the pressure on low.  Once the image is cut, "weed" the image by removing the areas that are to be exposed to the etching solution.  In the photo below, you can see the white backing of the Contact paper, this area will be the etched area on my project.

 
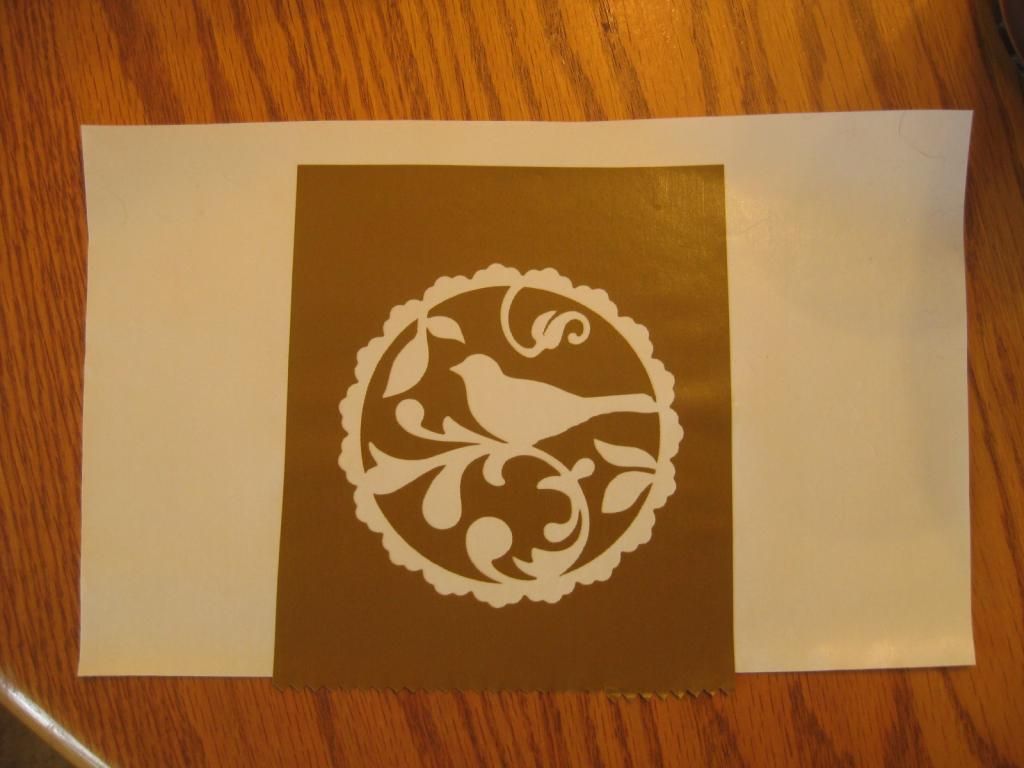
The next step is to transfer the image to the glass item.  For this process a "transfer sheet" is used to pick up the remaining parts of the image.  For this process I used a lighter colored piece of Contact paper.  Cut the "transfer sheet" larger than your image.  Remove the backing and place the "transfer sheet" over the top of the cut image.  Carefully rub the entire image to ensure it is sticking to the "transfer sheet".  Slowly remove the backing from the cut image piece.


Apply image to the glass item by rubbing the cut image onto the glass and carefully removing the "transfer sheet".


Be sure there are no bubbles or gaps in the image by rubbing the image to make sure it is secure against the glass.

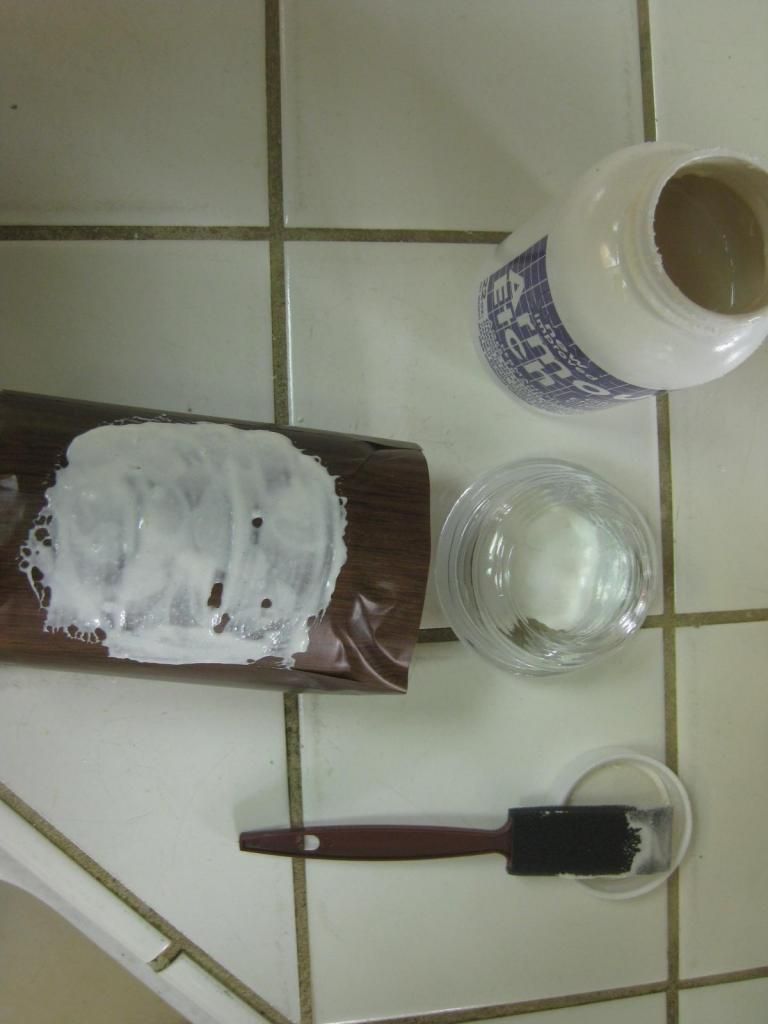
Following the directions on the glass etching creme, apply creme, allow creme to sit on glass and then remove.  It may be necessary to repeat this process if the creme was not applied evenly.


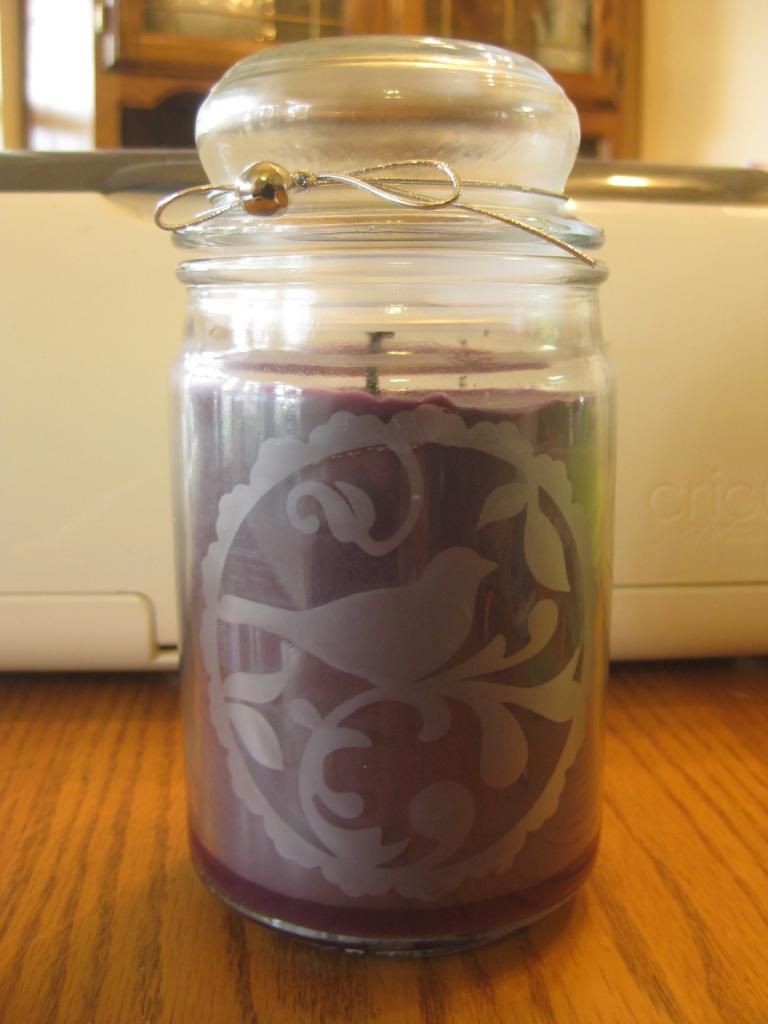
Remove vinyl and clean glass.


The whole process takes less than an hour and you have a beautiful etched image.

Wishing you a Happy New Year.


Designed by: Rita Poteat
Cricut Cartridges Used: Sophie
Cricut Machines Used: Cricut Expression 
Project type: Home decor
Project theme: Christmas/ Holiday
Other Supplies Used: Glass jar candle, vinyl shelf paper, etching solution, foam brush


Wednesday, December 26, 2012

Happy Day After Christmas

I hope everyone had a wonderful Christmas yesterday and those that traveled had safe journeys.  I just got up this morning and realized that today was my day to post.  I am hoping to have the post done in a few hours since it just slipped my mind with all the hustle and bustle.  I apologize for the delay and will be back soon with my post.

Happy Holidays!
Liz

Tuesday, December 25, 2012

 Hi everyone, this is Kelly of kbiendesigns.  Even though my Christmas card had no Cricut cuts, I wanted to post it as my way of saying Merry Christmas to you all!


Now, for my Christmas projects with the Cricut.  These are very simple, and if you've seen some of my other posts, you know that's how I like my projects lately!  A good friend of mine has some Hallmark 3d Christmas frames which are adorable.  One look at them and I though to myself, I could do that!  So I took a shadow box frame and started.  First I cut out some snowflakes (1" and 1/2") from TC December 25 cart.  Then I cut out the trees from at 5" and 3".  All were cut from white glitter cardstock.  I then hand cut the snowy hills.

The assembly was fairly easy.  I cut a piece of thin chipboard to exactly match the opening.  I then attached that to the back of the frame (I thought this would make it easy for the recipient to add a photo).  I then started layering.

I used a lot of pop dots to layer the snowy hills, then really lucked out since I was short on time, and used the chipboard stickers which matched perfectly!  My 3d look was achieved.


Easy peasy!  Thanks for looking and I hope you all have a wonderful holiday!

Santa Key

  
First I want to say Happy Holidays and hope for a safe and Happy New Year for you and your families.

This is Terri from http://scrappinwiththebug.blogspot.com/. This month I created lots of fun little projects some I gave as gifts and others I just made for fun. This year it's really fun to see Christmas through the eyes of a child - the magical elements of Christmas.

My daughter who is 4 is so excited this year and a little concerned too. She knows were going to Grandma and Papa's house and wanted to know how Santa will get in since they don't have a chimney. So I had heard about Santa's magic key so thought I'd made a little sign with a fun little poem. I had seen several poems on the Internet and liked elements of 1 and elements of others so I combined them and tweaked them to fit.

I started making the little sign by using Teresa Collins December 25th cartridge. I used my gypsy to help design this. I selected the <DEC25> button and sized it to  5x 9.50" and I flipped it so that the little box was at the bottom. I crated 3 of these pieces. On the back layer I hid the boxes. To make it look like a shadow box I cut the top layer 2 times in the same paper - layered it on the base, and then pop dot the upper piece.

Before adding the top layer I punched 2 holes in the top for the ribbon to hang on.

I then found the key I liked from Teresa Collins Sophisticated cartridge and sized that at 3.92 x 1.69 using both the shadow key and the key. (I knew I wanted to use the back of the paper I chose for the shadow - so I just simply flipped the shadow and cut that so it would be correct side).  To embellish/color the key I took Tim Holtz antique linen ink and "smeared" it over the top - this gives the key a bronze look. I then took my Tim Holtz embossing ink pad and "smeared" it over the top. I added some silver/glitter embossing powder and heat set it.

The Holly berries are cut at 1 1/2" also from the Teresa Collins December 25th Cartridge
The Bell cut at 2" from Teresa Collins December 25th Cartridge.


I printed the poem out on vellum and attached with a couple of mini heart brads. I will say that I love a trick I found a while ago - and that was if you don't have the right colored brad to make your own. I had some red embossing powder laying around and found it matched perfectly to the colors of the paper. So I took my tweezers and held the prongs of the brad and heated it up for a few seconds with my heat gun - then dipped in the embossing powder and then heated them again. I did this a total of 3 times. It works perfectly for a color matched embellishment.

 
Here is the finished sign hung on the door.
 
The paper collection is also from Teresa Collins - Christmas Cottage.
I added a few stickles in Christmas Red
The ribbon was initially white so I colored it with my Spectrum Noir Marker to match.
 
Hope you have a wonderful holiday.
 
Designed by: Terri Szymanski
Cricut Cartridges Used: TC - December 25th, and Sophisticated
Cricut Machines Used: Cricut Expression and Gypsy
Project type: Home decor
Project theme: Christmas/ Holiday
Other Supplies Used: Brads, Embossing powder, ribbon


Monday, December 24, 2012

Merry Christmas!

We would like to wish all of our followers a very Merry Christmas! We have loved being a part of your Cricut crafting these past few months and look forward to sharing lots of new projects with you in the new year!
Thank you for visiting our blog and leaving such sweet comments for our designers. We appreciate all the support our followers have given us.
As a thank you to our followers, we are giving away a new Cricut Holiday Cakes Cartridge! Please leave us a comment on this post telling us which project you've enjoyed the most and what you might like to see in the upcoming new year.


We will be drawing a winner using random.org on and announcing the winner on New Year's Day. Don't forget that this cartridge can be used in any of our Cricut machines.

Once again, from our hearts to yours,

Thank you! Merry Christmas!
The Cricut Fanatics Blog Design Team

Saturday, December 22, 2012

Better late than Never!

Meg here from PeacockPaperie. Sorry I am late with this months posting- I got super sick and then the Christmas crunch just SLAMMED me!. Here's a fun little LO that I did featuring the Teddy Bear Parade cartridge (I hope that you are not sick of these lil cuties- I know they have been EVERYWHERE!) I confess to being a total goober and a have a scrapbook album devoted to my Hallmark ornament collection. Which is also a great excuse to do tons and tons of Holiday LOs. The title is from Winter Frolic.Patterned paper is Paper Studio from Hobby Lobby.

Friday, December 21, 2012

Card for Crafter

Welcome everyone I'm L.B. from Cool Beans By L.B. Can I just say that I look forward to my FANatics post day each month? I so enjoy all the work I see here and love the way Circle members came together to create this special place. With that said I want to share a card I made for a crafting friend who surprised me with a card a few weeks back.
For the card I sent back I wanted a crafting theme, so I went to my Cricut Everyday cartridge and cut out both pairs of scissors. I wanted mine to be more fun and pretty so I cut the handles using patterned paper from my leftover pieces.
Next came the card base, a simple square card cut at 5 inches and a matching lace like base from Just Because Cards. Before I put down the lace cut 100% I remembered I wanted a ribbon so I used my own scissors to hold up the space and placed the ribbon right in.
I final addition to the card was this fun sentiment stamp.
I hope she liked her card when it arrived in the mail.  I know mine was such a fun snail mail surprise and it lifter my heart the day I got it. This is the season for things like that and I hope you all have wonderful holiday times over the next few weeks.

Design Information:
Made by: L.B.
Machines & Carts: Expression & Gypsy, Just Because Cards (pg 62), Cricut Everyday (pg 55 &56)
Additional Supplies: American Craft Ribbon, Pink By Design Stamps, DCWV cardstock

Tuesday, December 18, 2012

oh Happy day

Hello there! This is Michele from Scrap -n- Dance!  Let's take a little break from the holidays for just a moment! I have to admit that I am getting a little overwhelmed by it all, so I'm going to post a layout idea I had that has nothing to do with Christmas! (officially that is... who knows what pictures may end up on the layout eventually! lol)

I love looking at quilts, and wish I had the patience for quilting myself. I've also seen a few scrapbookers use quilts as an inspiration for their pages. That that is where I too decided to look for inspiration!

The bottom half of this layout is made with quite a few "squares" pieced together to look like a quilt. I cut half of them from a blue patterned printed paper and the other half of them from an off-white pattered paper. The "squares" are not true squares at all. The edges curve slightly inward. The shape is button 14 on CTMH Art Philosophy. The edges are inked to give them more depth. Behind these squares is red cardstock, to give the shapes a contrasting background.

The flowers come from Flower Shoppe; the words "oh" welded from Songbird, "Happy" from Cake Basics, and "day" from Graphically Speaking. Oh and the blue scallop border is also from Art Philosophy! I just cut two at an inch so that the two would equal 12".

I will say, getting the "squares" lined up like this was painstaking work at first. Repositionable adhesive tape really helped! But I think the result was worth it. I won't be able to cover the all that "quilting" with pictures, that's for sure!

Cricut Info and other supplies used:
Designed by Michele Donner-Ramsey

Cricut machines:  Expression and Gypsy
Cartridges used:  Cake Basics, Art Philosophy, Songbird, Graphically Speaking, Flower Shoppe
Supplies: Off-white and red colored cardstock, Printed cardstock, buttons, ink, adhesive

Hot Chocolate Teapot Display Set


Hello again, it’s Freda from CannCreate Designs.  I posted a little teaser for this project on my blog a couple of weeks ago showing the unembellished teapot and got a really good response from viewers.  This is going to be a really easy posting for me today because SVGcuts does all the work, they produce excellent step by step videos telling you how to assemble the files you purchase from them, the only thing I had to do was decide on the papers and types of embellishing I wanted to use. 


These items were cut on my Expression using MTC, you can also use SCAL if you have that software.  They were not cut using Cricut Cartridges.


Making papers bend looks a little daunting, but if you take it step by step it is really easy.  Each piece is numbered and cut with tabs for gluing and folding so all you have to do is bend and it folds exactly as needed-no having to use a score board, assemble them together in numbered order and you’re done.  Here’s a picture of the base pieces showing the numbering of pieces, tabs and fold lines that are cut.

The Half Naked Truth-Here’s what the pot looks like before the panel pieces are attached.

 
Now presenting my Hot Chocolate Centerpiece

 
As you can see all the top panel pieces have had the edges inked with Timber Brown Ink.  The upper layer papers were from GCD Studios Ella Blue Collection by Tina Higgins.   The white base layers were cut from American Crafts White Cardstock.   I decided to use a pearl and Snug Hug Seam binding theme for embellishing.

I used two files I purchased from SVGcuts.com and the MakeTheCut software to make this set.  This should be an easy posting because they do all the work.  (disclaimer-I am not affiliated with these companies, I’m just really satisfied with the results I get when I use their products).

Tea for you and Me:


 Home for the Holidays:  (Pitcher)


There are 3 different types of pearls used on the teapot.  For the spout handle and around the top of the lid I used the small pearl “lines” made by Paper Studio (I should have checked my stash quantity first-ran out and didn’t have enough to do any of the other projects with them).  Around the the rim of the pot and the “dangly” pearls in the bow I used pearls by the yard I bought at JoAnn’s.  Around each tab on the lid and on the small dangly I used the large Queen and Company Pearls.  I’m going to make a cameo charm for this bow, the Round 25 set I used on the pitcher was too large for this spot.

 
The paper I used had a silver script writing on it, you can see a little of it in this picture.

Next we have the Pitcher from the Home for the Holidays set.  The cameo charm was made using a cut from the Cricut Heritage Cartridge at 1” and Epiphany Crafts Shape Studio Round 25 punch and the coordinating charm and bubble caps.   Pearls by the yard and Queen and Company large pearls were used on the pitcher.

 
I used the cameo and a white circle which made my cameo 2 layers of paper, when I put the bubble cap on it looked a little “milky” in spots.  I flipped the bubble cap over on a sponge (to avoid scratching the bubble) and used the cricut stylus to push the white back into the bubble cap adhesive.   After burnishing the paper to the cap, I used Glossy Accents to glue to the metal charm. 

 The Burnished Cameo

 
Doing this step makes the white back attach to the bubble cap and get’s rid of the milky appearance you get when using 2 layers of papers.
 
 
For my pearl embellishments on the teacup I used a large, medium and small pearl on each panel.  I chose a coordinating paper to do the panels on the saucer and the inside of the teacup (mostly because I didn’t have enough of the brown patterned paper-having 5 sheets would have been enough but I only had 4).  Then to top it off I threw out the scraps before assembling the spoon so I didn’t have any of the papers for the center piece of the spoon.  I also noticed that the pearl at the base of the handle had come loose and moved in this pic, it has been moved and glued back down.

Last but not least is the hot chocolate holder.  My family LOVES hot chocolate so much that I bought a Keurig for us to use last Christmas when everyone came home.  Little did I know that my son was buying me that Hot Chocolate dispensing machine too…lol

 
This piece was the only one that gave me problems, if you look close you’ll see that it’s “wavy” in spots.  This piece is a box inside of a box with trim around the top.  The space between the 2 boxes is “hollow.”  When I put the 3M quick dry adhesive on the decorative piece the base got a little distorted.  If I make another one of these I would cut some foam core to attach to the outside pieces to prevent the distorting with wet adhesive.    I used Snug Hug seam binding, a large pear and pearls by the yard for embellishments on this piece also.
 
 
I hope you enjoyed my project, it was a wee bit time consuming, but well worth it.  I’ll have a beautiful display for my counter when the kids come home for the holidays.  I just wish the sun would shine on the day I’m photographing my blog submission.  Maybe Santa will bring me a photo box for Christmas…lol
Merry Christmas to one and all, see you next year.  Freda                                                             

Cricut Info & Supplies Used:
Machine Used:  Cricut Expression

Files Used:  Cricut Heritage Cartridge for Cameo shape.  SVGcuts Home for the holidays (pitcher) and Tea for you and Me.

Paper:  GCD Studios Ella Blue Collection Pack designed by Tina Higgins.  American Crafts White Cardstock

Supplies:  3M Quick dry adhesive, Pearls-Queen & Company, By the Yard from JoAnns, Paper Studio Pearl Lines, Epiphany Crafts-Shape Studio Round 25, Bubble Caps and Charms.  Snug Hug White Seam Binding 

Monday, December 17, 2012

Christmas Card


This is Demita, aka mom2sidsquid, I want to share with you ONE of my Christmas cards. 
I started these cards in July and I just finished them this week.
 

I used CTMH Art Philosophy for the card base. 


I then cut the shape the same size in red to cover the card. 


I had to snip the pointed end. 


I then layered and added the tree.  The holly was cut from Joys of the Season and I used Candi for the berries and tied a bow with natural Jute.

Sunday, December 16, 2012

A Christmas Card

Hi there!  This is Doreen from Polka Dot Paper Princess  Today, I made a quick little card that reminded me of the days of old where there would be trees in sleighs that families would lovingly hand pick.  Now, if they are fresh picked at all, they are usually picked from a local business and then they are attached to a car or truck!  lol!  Lucky are those that still go to the woods and pick their own!  What joyful memories!

I pulled out an oldie, but a goodie cart - Christmas Cheer.  I used it for both the sleigh and the trees.  I popped the sleigh up with foam tape, added some flock  to make snow on the edges.  The trees were easily stuck behind the sleigh and left loose at the top to give it the feeling of movement.  I added a wee bit of flock to them too and they were done!  The punches on the side are from Stampin' Up! and the sentiment is from CTMH.  The card was simple, but right now, that's exactly what I'm looking for.  We don't always have time for complex, but still wanted pretty.  The Cricut makes it so easy to accomplish that!

Thanks for stopping by!  Have a merry and blessed Christmas!

Machine:  Expression
Cartridge:  Christmas Cheer

It's Christmas Time

And we'll party with the elves!


Happy Holidays Fellow Crafters! It's Colleen from Col's Creative Corner bringing you a fun Christmas wall hanging today. I made this for my son.  He is a Christmas music lover and this is a line from a song. Christmas music runs constantly from Thanksgiving until New Year's Eve in our home. I am a lover of the classic Christmas tunes, my son loves it all, but my poor husband is a guitarist and really needed some music to call his own. A few years ago, I picked him up a rockin' CD called Ho Ho Hoey-The Complete Collection, by a guitarist called Gary Hoey. He is a rock guitarist but he does a rap type of song called the Twas The Night Before Christmas. My son loves it! It's actually a funny song with some great guitar playing. One of the lines that my hubby and I rap for my son is "we party with the elves, yeah"! Naturally that puts him into fits of laughter. I've had this idea floating around in my head to make him something like this for quite some time now and today I was able to finally get it made. 
I used my Gypsy to create the hanging. The back is chipboard and I covered it with papers from my stash.


 This cut is from Art Philosophy and I fiddled with the sizing to make it longer. It measures 9.75 high by 11 inches wide. Then I used two Christmas papers from my stash and cut one just slightly smaller to make a layer. I know the top layer is from K&Company, but I can't say for sure where the bottom layer of paper came from.


The elves are from Jolly Holidays. I wanted the elves to look like they were jumping, so I used the elf with the wagon, then I cut the wagon off. I also flipped two of the three elves. The are cut at 4.20 wide by 3.10 high. I used K&Company Paper for their suits. I added a little chalk to their cheeks for a rosy glow. I embellished them with some pen stitching and used Stickles to give them some sparkle.


The center elf is attached to an Action Wobbler. My son likes to make him wobble.
Santa is 4.5 high by 4.0 inches wide. He is also attached to an Action Wobbler. I used Stickles on him and Glossy Accents on his umbrella to give it a wet appearance. I added a belt buckle to his belt using a Gold paint pen and added some fake stitching to his suit. I also used the paint pen to add a little accent to his shoes.


The letters for "party and elves" are from an oldie but goodie cartridge, Cuttin' Up. They are 2.5 inches tall. I used Calligraphy Collection for the words "with the". I like the contrast they provide. 

Finally, since it is for my son, I didn't want to use ribbon on it, so I used some jewelry wire to hang the sign up. I wanted it to look curly in keeping with the fun theme, so I twisted it around a paint brush. 


I used my Big Bite to punch a couple of holes and ran the wire through the back. 


I am so happy I finally got around to creating this and have enjoyed sharing it with you today! 
I wish everyone a joyous holiday! Merry Christmas and Happy New Year!

Designed by:  Colleen McCauley
Machines Used:  Cricut Expression, Gypsy
Cartridges Used: Cuttin' Up, Calligraphy Collection, CTMH Art Philosophy and Jolly Holidays
Supplies Used: Action Wobblers, Paper from my stash, Glossy Accents, Stickles, Pebbles Chalk, Wire and Chipboard.