While we are no longer making active post of Cricut projects on this blog as of 8/1/2013, we invite you to use it for continued die cut inspiration as we will leave the blog up for viewing. Happy Cricuting !

Tuesday, April 30, 2013

Spread Your Wings

Hi There Crafters!

This is Yvonne from Ink-spirations. I started out with a LEVER card design that I had seen over at Splitcoaststampers.

The images and pattern paper printed using Lori's Garden cartridge and the Imagine. After I had picked the design and the paper I decided this would make a good graduation card.
Blue paper textured with Swiss Dots, inked with Tim Holtz Tumbled Glass ink and faux stitched.
The sentiment was computer generated.
Bird House - 2.4" Height
Bird - 2.15" Height
Blue Square on front - 3.4"
Thanks for visiting.
 
Yvonne
Designed by: Yvonne Balmer
Machine Used: Imagine
Cartridges Used: Lori's Garden
                            Elegant Edges
Category: Cards
Other products: Bazill cardstock, paper flowers, brads, micron pen, dimensionals, Swiss Dots
Cuttlebug, Tumbled Glass Distress Ink

Monday, April 29, 2013

Pretty Purse and Gift Enclosure Cards

Hello Cricut Fanatics Fans! Happy Monday! Chris here from scrappin-nanapuddin.blogspot.com sharing my new obsession! I love making these little gift enclosure card sets with the purse and I make them for the Azle Lions Club raffle! I love to see the ladies all hoping that they get their number drawn first, because the purse and cards are always first to go! I make all kinds of colors and patterns but this one is my favorite.
The purse was cut on CCR using the CTMH Artiste at 5.7x10.35 will hold the 3x3 cards perfectly. The doily was stamped and embossed using the CTMH  Love Doily as well as the Celebrate. The butterfly is a MS butterfly punch. These make awesome gift enclosure cards and the little purse can also be used for a small gift or make a few for favors if you are maybe having a bridal shower?! The ladies at Lions love the little purse best! Me too!! All the card were cut at 3x6 using the rounded card on the Artiste cartridge also! Best cartridge Cricut/CTMH made, IMHO! If this cart doesn't have it, you don't need it, I always say!! LOL!

This is the same purse, cut a little bigger to hold the butterfly cards which are 3x4. CTMH Cricut Art Philosophy was used to make these. I used "hide contour" to move the butterflies where I wanted them! So I could emboss the butterfly in white on the front, the stamp also from CTMH. The paper was cut with white Colorbok paper and colored with gelatos! if you haven't tried gelatos, you are missing some fun! You can make any color you want or need!
Have any questions, please ask! thanks for visiting today! Have a great week!

Sunday, April 28, 2013

Beautiful flowers layout

Welcome to Cricut Fanatics. Diane here today from http://happyscrapperdiane.blogspot.com sharing this one page layout with you.  This is my baby granddaughter Peyton and she had this picture done for Easter and I love the colors.  I created this layout using the cartridges Elegant Edges, Art Philosophy, and Indie Art.  Below are the materials and directions for this page. 
Supplies and Materials.
Created by:  Diane Kielman
Cartridges used: Elegant Edges-leaves tag on page 29 cut at 3 inches
                         Art Philosophy-flower page 21 cut at 2 inches
                                                 flower page 29 cut at 3 inches
                                                 flower page 39 cut at 2.25 and 2.5 inches
                                                 flower page 50 cut at 1.5 and 2 inches
                                                 Date and title cut at1.25 inches(3 was cut at same height, but looks bigger)
                          Indie Art-butterfly cut at 1.75 inches
Machines used:  Cricut Expressions 2 and Gypsy
Pattern paper: Bo Bunny Jazmyne
Cardstock:  Recollections
Pearls: Recollections
ribbon in stash and stickles

Saturday, April 27, 2013

Mini Pinatas

Hi Cricut Fanatics!  I hope this Saturday finds you all well.  This is Rita with Rita's Paper Obsession.  I apologize for the late post, I went on a long weekend trip to visit family and came home with a stomach bug. 

My post for today is a party favor I made for our office celebration of our clerical staff on Administrative Professionals Day.  We decided to serve breakfast burritos and give a gift card to a local restaurant for the seven support staff in our office.  A fiesta theme seemed to suit best and I wanted a gift card holder that was unique to the theme.  You can't have a fiesta without a pinata with the goodies in it, right?  A little pushed for time, I had searched the Internet to buy something but didn't like anything I came across.  I finally found a blog that had a DIY version of exactly what I was looking for so I decided to make them instead.

I chose the donkey pinata from Birthday Bash and cut two at 7 inches from a 7 1/2 square piece of poster board.  I didn't worry about flipping the image as it was going to get covered by tissue paper.  I then cut four 1 1/2 x 7 1/2 inch strips.


The image was a little wider than the piece of poster board but that wasn't a problem as I cut off the tail and the front ear and mane between the ears.

I ran each strip of poster board along a pen a couple of times to make it a little more pliable.


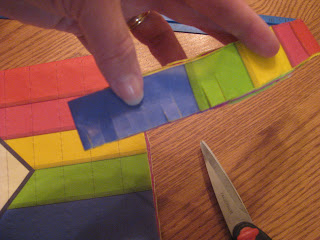
I wanted a little trap door in the bottom to put the goodies in so I scored about 2 inches from the end of the first strip and started taping it to one side of the donkey with masking tape.  Joining the other strips to make it all the way around the cut, trimming off the excess. 


Next step was to adhere the opposite donkey side.

As I had seven of these to make, I learned that it was easier and faster to put a strip of masking tape on the poster board strip, then cut little slits along the edge that would be taped to the donkey.  Sorry, I didn't take pictures of that process.  I used four strips instead of one long one as I thought it would be easier to work with.  I'm not quite sure about that as I had to tape the ends together.  The process of taping the donkey together at first took me about an hour but as I perfected my technique I could tape one together in about half that time.

At this point I filled the shape with the gift card and chocolate candies through the little trap door on the bottom and taped that shut.

From a muli-colored pack of tissue paper, I cut off 1 inch sections.  At home I used my scissors but it was a lot easier using the heavy duty guillotine paper cutter at work.


For the fringe I cut slits along the tissue strip about half way.


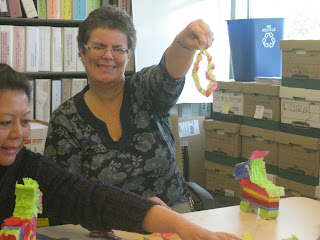
Next was the fun part of decorating.  I decorated one as a sample and then enlisted some coworkers to help with this process.


At first everyone was a little worried about doing it right. They aren't a crafty bunch and I was making them use glue! 


But once they got into it they created some really fun colorful pinatas.


Eyes were cut from cardstock using a 3/4 inch paper punch for the white and my two-hole desk punch for the black.   Some added tails from 1/2 inch strips of tissue paper and other clever accessories.


Unfortunately I didn't take any pictures of the completed pinatas as I wanted to take them on the tables on Administrative Professionals Day.  My mistake as I missed the whole thing.  I was told they were a huge hit with the staff.

Designed by: Rita Poteat
Cricut Cartridges Used: Birthday Bash
Cricut Machines Used: Cricut Expression
Project type: Party favor
Project theme: Fiesta
Supplies Used: Poster board, masking tape, tissue paper, glue, scrap of white and black cardstock, 3/4" circle punch, regular size hole punch and a fun group of co-workers.

Western Decor Giveaway Winner.....

Sooooo sorry for the delay...had a cable tech coming out about the issues with the cable...(Internet repair person was here last week...).  He showed up at 10:30 am....checked everything out and decided to redo the lines starting at the pole and going throughout my house...no tv...internet...or phone all day yesterday!!!  They left just in time for me to shower and meet our friends for dinner.

Got up this morning and nothing would reconnect to the internet...guess we didn't check that before they left since they were there for the cable issues...got everything reset and am able to announce the winner....

I had my hubby pick a number between 1 and 22 (the number of entries before the Noon Friday deadline) and he picked #20....so the lucky winner is.....


Drum Roll Please..............................

Nanapuddin


OMG! that is just 2 cute! great job! TFS and the inspiration!

nanapuddin2u at gmail dot com
 
 
Congratulations.....I'll be in touch to exchange mailing information....
 
Thanks to everyone who participated...
 
Freda

Thursday, April 25, 2013

Graduation Banner


Hello again it's Terri from http://www.scrappinwiththebug.blogspot.com/ bringing you a fun graduation banner.
A few weeks ago a friend asked me if I would make a banner for her daughter who is graduation from high school. The colors are royal blue and silver. She just gave me a size wanted and the name and told me I had free rain for the rest.

I went with the traditional Congratulations and her name then I added some additional banners w/ the fun graduate, diploma, class of and a few little stars.

Banners were cut at 5" w/ the shadow feature from Birthday Bash
The letters were all cut from Something to Remember at 3" - 3.2" I used my gypsy to size them accordingly.
I also did the shadow function with those.
The girl was from Paper dolls - and I used the "hide" feature so I could stamp some PKS faces on them. She was cut at 3.5"

The Class of 2013- I did again with the gypsy and sized the letters at 1.6 and welded them together.

The diploma was cut at 1.5" from Wrap it up. (You know those cartridges you forget about when buy them having awesome fun features).

I since she only wanted Royal Blue and silver I pop dotted the letters up so they would really stand out on the banner.

The paper is Cord'inations - royal blue and some light weight silver paper from bazzill.


Machine used: Gypsy, and Expression
Cartridges: Birthday Bash, Paper dolls, Something to Remember, Wrap it up

Thanks for stopping by today hope you have a GREAT DAY

Terri

Monday, April 22, 2013

Wedding Card With Matching Gift Box

 
Hi friends and fellow crafters! It's Colleen from Col's Creative Corner sharing a Wedding Card project with you today. Wedding season is fast upon us and I have already gotten my first request to make a card. This set is for my Mom's best friend, Rosalie. Her Granddaughter is getting married and she asked if I could make her a special card. I decided to incorporate the bridal colors into the card's design.
 
I was very excited because this gave me the chance to use my new Anna Griffin Embossing folders. I chose the Rosa folder for the background design. It embossed the papers beautifully and there was no tearing. Here is a close up of the embossing.
 
Card Embossing
Box and Tag Embossing

I created the set using my Gypsy. I am so sad to hear that PC will no longer be making the Gypsy. I think it's one of the most unique crafting devices out there. I love being able to create on the go. The card was designed while I was waiting to pick up a prescription!
 
 
I used white American Crafts cardstock for the base. I have already given the set to my Mom's friend, so I can't remember the exact size of the card. I think it is around 5 x 5.5  inches. I layered a piece of Red Cricut Candy Shop Cardstock and then another layer of embossed white American Crafts cardstock.  I cut the doves and heart from the Wedding Solutions cartridge at 4.5 wide by 2.10 high. Again. I used the red cardstock from the Cricut Candy Shop cardstock. I stamped Happily Ever After in Gold Ink and cut it into a rectangle. I cut 4 corners from Picturesque at 1.00 by .85 inches. I wanted to add some sparkle to the card since I was only using two colors, so I used Ranger Glossy Accents and Martha Stewart Coarse Glitter on the heart and corners. After I stamped the sentiment, I used the Glossy Accents and ran a very thin line of it across the edges, then dipped it into the MS coarse Glitter. It added just the right amount of sparkle to the card.
 
I followed the same pattern for the inside of the card with the embossing and colors. Then I cut a red rectangle and matted a computer sentiment on it. I wanted to leave a space for Rosalie to write a note for her Granddaughter on the inside so I printed the sentiment over both sides of the card. I also glittered the edges of the sentiment layer and added more glittered corners.
 
 
Once the card was finished, I attempted to create an envelope and it was a dismal failure. LOL! I decided that I would make a presentation box to go along with the card. I used the square box on page 63 from Sweet Tooth Boxes and sized the cuts at 10.75 x 10.75 inches. I used the scalloped lid and hid the circle window on the top.

 
I decorated the box with more corners from Picturesque, a monogram letter "L" and a tag from Tie The Knot. I embossed the red layers and the tag with the Anna Griffin Rosa folder. I added some red embossed panels to the sides for interest.


I finished the box with a red satin bow and some pearl accents. With some red tissue paper added, the card fit nicely in the box.


Here is one more look at the set.

I truly enjoyed creating this card set! I hope the bride and groom have a beautiful wedding and live happily ever after! Thank you for stopping by our blog today!

Happy Crafting!
Colleen
 
Designed by: Colleen McCauley
Created Using: Cricut Expression Anniversary E2,  Gypsy and Cuttlebug
Cartridges Used: Wedding Solutions, Tie The Knot, Sweet Tooth Boxes and Picturesque
Other Materials: Anna Griffin Embossing Folder, American Crafts White Cardstock, Cricut Candy Shop Red Cardstock, Happily Ever After Stamp by 7 Gypsies, Gold Pigment Ink by Color Box, Martha Stewart Coarse Glitter, Ranger Glossy Accents, Pearl Embellishments and Satin Ribbon.

Sunday, April 21, 2013

Car Decals Cards

Good Day. I hope everyone is enjoying a pleasant weekend. I'm L.B. from Cool Beans By L.B. and today I am sharing some cards I made using the Car Decals cartridge.
I have been trying to share more masculine themed cards with you here at Cricut FANatics and this cartridge is one that you can play with a lot and create some simple cards for the purpose.
After using some great washi tapes to created a backdrop on my card bases, I selected the male with a tie and the fun flower girl and cut the two layers out of scraps on my work table. They go together pretty simple, but the eyes can be pretty tricky (sometimes I just draw them in,but not on these two)
I added "Boss" to the front of one and "Hello" to the inside of the other. The font is also on this great cartridge. I kept the rest of the insides pretty simple so messages could be added.
This cart has a bunch of male images including golfers, skiers and campers.  Try it out!  Have a wonderful week!

Saturday, April 20, 2013

Sketch Challenge #6

Welcome to our Sketch Challenge.  
This is Amy from Amy's Digi Scraps and welcome to the another Sketch Challenge! On the 20th of each month, I will post a sketch for you to enjoy!  I generally post a card sketch with a card that I create, but you can make it a layout as well.  Please visit the Sketch Challenge link for more information about our monthly Sketch Challenges.

Here is the sketch for today:
 
And here is the card I created for it:


A simple card to tell someone that I am Grateful to have them in my life.  I have been challenging myself to use up and pare down my supplies.  So I have been using a lot of my scrap papers on my cards.  I have a box of "extra" and "text" cuts that I couldn't bear to toss but has been sitting around for someday as it filled up.  Today I had some craft time so I challenged myself by pulling that box down and my stack of scraps and made cards.  If I remember correctly, the "G" is from the Cricut Cutting Up cartridge.  Using strips and squares from my scraps, two metal buttons from my embellishment stash, a touch of bling, and a "grateful" stamp, I created a quick, easy to duplicate card.  I chose this because I have needed to replenish my stash of cards on hand.  This style is perfect not just for all occasion cards, but can easily be used for birthdays as well.  It is a non- gender style, so it was easy to switch the colors out for male and female.  Plus, using the letter for  the child's name easily personalizes the card for a birthday or other special occasion.

Hope you enjoy!  Make sure to share what you create!


We would love to see what you can do with this Sketch.  Please create a card or layout and upload the image to this post in the InLinkz!  Remember that you must use your Cricut in creating your project for the Sketch Challenge.

Polymer Clay in Cricut Cake

Hi Everyone! It's Melody Lane here from www.MelodyLaneDesigns.com I wanted to share with you my very first polymer clay project. If you follow me and have watched my shopping hauls you know I have been buying a lot of clay because Michaels had the sale of a life time last week and I could not pass it up even though I have never used it. well, I also have a Cricut Cake Machine that was still in the box after a year and a half I thought I was never going to use it to make a cake. I don't make cakes, and they get eaten so I thought I would use it for polymer clay instead and make something I can keep, or sell.


I made a peace key chain, now remember this was my first clay project so it is not perfect. It did cut out great on the Cricut Cake, I used Cricut Craft Room and Groovy Times cartridge. I mixed in glitter to the red clay and then to the pink clay for the flower, but that was not enough bling so I also sprinkled it on top of the flower, before placing on the other layers.
It was a lot of fun making these and I will make more with clay and my Cricut. I put an eye pin through the top before baking it in the oven and then I can make it in to key chains, charms, earrings, the possibilities are really endless. 

This one to the right was the first one I did, I'm not as happy with it as the second one. I rolled out the clay too thin on the first one and it made it harder to move and get off the mat.

I cut it out at 2" I think it is a good size for a key chain or necklace. I have the cut file here if you have the Groovy Times cartridge.

Polymer clay must be baked to harden, I baked in my toaster oven at 275 degrees as it says in the directions on the package of clay.

Just like most of my projects I added a video. There is also a tiny haul in the video showing some things I bought to make more things with clay.

                                                            Cricut Info & Supplies Used 
Designer: Melody Lane
Machines Used: Cricut Cake
Cartridges Used: Groovy Times
Other Supplies: Sculpty Polymer clay, eyepin, key ring, glitter.

Friday, April 19, 2013

WESTERN HOME DECOR PROJECT & GIVEAWAY!!!


Hey there, it's Freda from CannCreate Designs with another 3D project
from SVGCuts and MTC using my Expression.
This project has was made for the top shelf area of my scraproom desk...
makes me smile every time I look at it.


As soon as I saw the Happy Trails set of designs I knew I had to make it using a picture taken at Sears years ago of my grandson in a hat.  The wanted poster was originally intended to be a card, but I wanted it on a 12 x 12 canvas so I enlarged the file to fit the canvas. I purchased the Sasparilla Collection papers by October Afternoon to use because I LOVE the comic strip cowboy paper included in it.
 
Paint the sides and a little on the front of the canvas black and let dry. Trim the background paper to 11 3/4" and apply to the canvas with Mod Podge and let dry*.  Use Black StazOn to ink the edges of the paper once dry. 
 
*NOTE:  In a previous project years ago where I used Mod Podge and didn't allow each layer to completely dry before adding next layer I wound up with bubbles and buckling of the papers once the final project was completely dry.  I flip the project over and brayer the open area of the canvas and use the Cricut spatula to rub under the wooden frame area.  I haven't had any bubble issues since using this technique.
 
Enlarge the Paper, Text and Frame files from the Wanted Poster Card folder to fit on the 12 x 12 Mat angled slightly then cut it out.  (Be sure to cut your frame and text out before printing your photo, you will need to measure the area of the frame you cut to get the correct size for your final picture...speaking from experience....lol.  Ink the edges of the Paper file and mod podge to the canvas and allow to dry.

I'm so glad I bought the digital files so that I could tinker with it.  I had the photo reprinted on matte paper but found it was to "new" looking for this project.  So I opened it in Photoshop and ran the wanted poster action from Panos Effects Old Papers Action Set which I had purchased years ago, you could also use the built in Sepia tone action since the final product you're looking for is the photo.  I used the Wanted poster action because you can try out different items like bullet holes, stains, nails and cracks etc. for cool effects on your picture, if you don't like them you just hide or delete them.  When the photo looked "right" to me I cropped the file down to just the photo approximately 1/2" larger than the size needed for the area on the frame where it will be placed which you cut previously.  I printed the photo on cardstock and used a pair of decorative scissors to trim the picture down to approx. 6" squarish , distressed the edges then inked with StazOn.

Assemble the frame, text and picture layers then mod podge it to the "Paper" layer.

I thought the frame still needed a little something extra so I braided 9 strands of jute into a large flat braid and placed it around the sides of the frame, and a small braid for the hanger.

 
I stapled the start of the braid at the top of the frame and glued it around the sides with Zip Dry adhesive.  I trimmed the excess and stapled the other end where they met. I didn't like the appearance of the staples so I cut some jute to create a "fuzz", spread Zip Dry over the stapled area and pressed the fuzz into it...now you can't see the seam or staples.  I also did this to cover the staples on the hanger so they wouldn't scratch the wall when I hung it up...  I used large rubber bands around the outside to hold the braid in place while the glue dried.


The tag was made using Tim Holtz Distress Inks on a manila tag from the office supply store.  The lettering & banner came from Sizzlits dies Typeset and Tattered Banners.  The heart was a grunge board shape that I inked and fiddled with for 2 days to get it just right then couldn't wait for it to dry naturally.  I used my heat gun and wound up getting to close and suddenly had volcanic like eruption of paint and ink-My beautiful heart was broken.  I thought about it for a minute then covered the entire thing with red glitter, then drew lines of glue across the heart and applied gold glitter....let it dry without the heat gun.  The next night I applied Glossy Accents thickly and let it dry for a couple days.  Add a jute string and "fray" the ends and your tag is ready to be added using pop dots.

The boot and the pot were assembled using the video instructions on the SVGCuts.com website.  The boot itself was a little tricky on the front area, but they explain it quite well in the video...I couldn't even begin to explain.  Unfortunately I assembled the boot & pot at a crop and didn't take to many pictures of the assembly process.


You might notice that I changed the orientation of the horseshoe before cutting it out.  My grandma always said if you turn a horseshoe up side down all your good luck falls out...lol...I'm superstitious so I used the software to move the assembly tabs to the bottom of the shoe so my good luck doesn't get poured out...
 
 
Now for the Good Stuff-The Give Away:
 
If you would like to try your hand at assembling the boot but don't have the ability to cut one, I cut an extra boot to give away.  This will come unassembled, it has been inked and embossed you just add the glue...lol....
 
Embossing folder not included....it's in the picture so I can remember which one I used

 
Mary has a really detailed video tutorial that you can watch to help you with the steps of assembly and of course I will gladly answer any questions you may have just click the link to see it on Youtube: 
 
 
To win all you have to do is leave a comment on this posting. Don't forget to put your email addy in the comment section so I can contact you for mailing details....I will put the names in a hat, draw and post the winner Friday, April 26th.  Everyone is welcome to enter.
 
Thanks for stopping by and good luck!!!!!
 
Freda
 
Designed by:  Freda Cannon 
Machine Used:  Cricut Expression
Project Type:  Home Decor 
Products Used:  MTC Software; Happy Trails Svg files; Sasparilla Collection Paper by October Afternoon; Mod Podge; StazOn Ink; Photoshop Software; Panos FX actions for Photoshop; Tim Holtz Products: Typeset Alphabet, Tattered Banners and Grungeboard Heart, Martha Stewart Red & Gold Glitters, Glossy Accents, Twine and Jute.