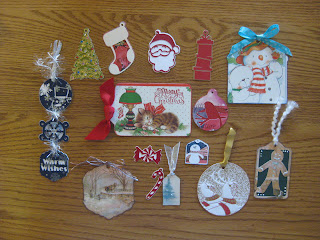
Happy Tuesday! This is Rita from Rita's Paper Obsession. I hope everyone had a wonderful Thanksgiving. You probably have recovered from the large turkey dinner and started your Christmas shopping. If you are like me, chosing the right wrapping and gift tag is just as important as the gift. Creating gift tags from old greeting cards is fun and easy to do with our Cricut machines.
Over the years I have saved my greeting cards, I just hate throwing them away. I love the graphics, colors and paper quality of greeting cards. So this year I pulled out my stash of cards and the Very Merry Tags cartridge and went to work.
Below are examples using the base tag with the images from the greeting cards. Sometimes there are images inside and/or on the back of the card that look stamped so be sure to consider using those as well. I let the image size determine my cut size.
Cut two base tags and use the positive and negative layer cuts.
Using chalk inks I inked the edges to remove the stark white edges.
Now it's time to embellish. I used gel glitter pens, alcohol ink, Versamark ink, Perfect Pearls, Liquid Pearls, Glossy Accents, chalk inks, rubber stamps, Stickles, gems, buttons and ribbons.
The lightbulb layer was cut from a very shiny white card. Alcohol inks and Perfect Pearls add a colorful and cheerful look to the tags.
The Christmas tree layer was cut from a card embellished in gold. I'm sorry the image isn't very good as this is one of my favorite tags. It looks so pretty with the colorful gems.
 |
| Add gems |
 |
| Add buttons |
 |
| Add Liquid Pearls |
 |
| Add gel glitter, Stickles and Gloss Accents |
Cards that have large images are great for making gift card holders. Cut the tags at 4 1/2 inches or larger to accommodate the pocket for the gift card.
 |
| Gift card holders |
Wishing you a happy and crafty holiday season.
Cricut
Info & Other Supplies:
Designed
By- Rita Poteat
Cricut
Machines Used- Expression
Cricut
Cartridges Used- Very Merry Tags


Oh Rita! I love this!! It's such a wonderful and creative idea. I just made a mini album using cards from last year, so I still have all my cards out. I think I'll give this try!
ReplyDeleteI love this....so very creative!
ReplyDeleteWhat a great way to "upcycle" those beautiful cards. These look as good as those store bought ones I pay so much for. Thanks for the idea...
ReplyDeleteGuess what we're all doing today? Digging out our old cards and Very Merry Tags carts! TFS such a creative and inspiring idea. :) Christine
ReplyDeleteThat is super cool idea. Saves paper and recycles. I have started cutting out all the sentiments and using them inside my hand made cards, so now I can use up the front as well. Thanks!
ReplyDeleteSuper tags. I don't think I could cut my cards though. You are brave!! I have every card I have ever received. I love what you did.
ReplyDeleteWhat a great idea! Totally cool tags!!
ReplyDeleteRita your tags are amazing. I love that you used old cards. What a wonderful idea.
ReplyDeleteWhat a fun way to recycle those Christmas cards. Great idea. Love the tags. Too cute.
ReplyDeleteGreat idea! I have been using the cards for years but never cut them down! Yours are so much cuter! Thanks for sharing!
ReplyDeleteWhat a great idea!!! Love them!!!
ReplyDeleteVery creative way to recycle and make something else very beautiful. Your tags are gorgeous!! TFS
ReplyDeleteThis is a great idea! Perfect tags and a great way to upcycle!! I have saved so many cards over the years-- great way to use them!!
ReplyDeleteI LOVE THESE. I have had people who know I craft give me cards--at least the fronts of them--and I have been looking for ways to use them creatively. Now, I will add this to my list. Thanks.
ReplyDeleteLove these tags! I don't have the Very Merry Tags cart. Can these be cut with another cart that has tags? If so, how would I center the cut over the image? Thanks so much.
ReplyDeleteFantastic ideas Rita! Each tag was prettier than the one before! Love them all!
ReplyDeleteIn reply to Erin L. Several carts have tags on them. You could even use the Gingerbread cart to make shape tags. To center the cut over the image you use the Center Point button on you Expression and move the blade to the center of the image. This takes some practice and I have to admit I'm not very good at it. For me it was easier just to move the blade to the position about a 1/4 inch from where I thought it would start cutting. It didn't always cut where I wanted but you can always embellish over those little flaws.
ReplyDeleteLOVE this! I never thought to cut directly on the card itself. I was cutting out tags on regular cardstock and then adding images from the cards. Thanks for sharing! I am going to do this from now on. I save all our cards!
ReplyDeleteVery nice! I often think I should do that with cards received...but when it comes right down to it, they never look as nice as YOURs do!
ReplyDeleteExcellent article. Very interesting to read. I really love to read such a nice article. Thanks! keep rocking. jewish printable cards
ReplyDelete