While we are no longer making active post of Cricut projects on this blog as of 8/1/2013, we invite you to use it for continued die cut inspiration as we will leave the blog up for viewing. Happy Cricuting !

Sunday, September 30, 2012

A B C's

Hello Everyone,

This is Yvonne from Ink-spirations and I'm excited to be part of this great blog. Today I'd like to share a home decor project and a some little book marks. The book marks follow the monthly theme of end of summer/back to school.

This wall hanging is for my newest Grandson for Christmas. I started with a white canvas 14x20. Painted the background a very light blue and then created a frame look with a darker blue.

The letters are from the Planting SchoolBook cartridge and are between 1.75" and 2.5".Each letter was faux stitched with a black pen. Zooballo was used for the animals and were sized accordingly to the letter. I used CCR to design and cut everything with my Imagine and all images were printed using Bubblegum Stripes. 
Black pearls were added to each animal and additional embellishments of  dew drops and ribbon were added. Xyron machine used for adhesive.

The cute little characters are Page Pals from the Cricut Craftroom and are available digitally.  They were quick to make. They were all cut at 4". Industrial Glow was used for the printing of the paper.
Thanks for stopping by!
Yvonne
 
Cricut Info and Supplies Used:
Designed by- Yvonne Balmer
Cartridges Used: Plantin SchoolBook
                            Zooballo
                            Bubblegum Stripes
                            Page Pals - Digital
                            Industrial Glow
Cricut Machine: Imagine
Project Type: Home Decor
Project Theme: Baby, Child
Additional Supplies - Dew Drops, Ribbon, Black Pen, Pearls, Inks for shading Page Pals.

Don't forget to leave a comment for our weekly drawing.

Saturday, September 29, 2012

Cricut Crafty Challenge #1 Winner

Good morning everyone

I want to thank everyone who participated in the very first Cricut Crafty Challenge. The winner of the September challenge is Scootingranny! She made this awesome project for the challenge.
Scootingranny please contact me at creationswithbecka at yahoo dot com to claim your $35 gift certificate to Stampin Up so generously donated by RockinRobin at  www.robingoens.stampinup.netThe next Cricut Crafty challenge will be posted on October 5th.
See you all then!
Becka
Hi everyone! 
This is Dana (DomesticatingDana over on the Cricut MB) and I’m so happy to be here with everyone.  September brought us an awesome 1st month here at the Cricut FANatics, but it also brought us back to school.  Back to school means back to homework, including nightly reading.  Need a little something to make reading a little more exciting for your kids?  I have  a fun little project that is quick and easy and makes a great little gift for readers of any age. 
 
I love to make these magnetic bookmarks- practical, easy, and super-FAST!   They cling around your page in your book so they dont fall out & you can locate your page easily.  They are great for kids especially because they don’t fall out of the book when they are tossed in and out of backpacks! Here is how I make mine:
Cut a strip of cardstock to 2.5” x 5”, and then score it at 2.5” (half) and fold.  This creates the base of the bookmark.  Use a bone folder on the crease to help it lie flat.   Cut 2 strips from an adhesive backed magnet sheet (found in the general crafting section of your local craft store) to approximately 2”L x 0.25”W each.   On the inside of the bookmark, adhere one strip along each of the short ends, lining them up so they magnetize.

 
Then decorate your bookmarks with your choice of cuts! 
 

Done! (Told you it was super-FAST!)  Fold it over the page in your book and it will stay in place.

The great thing about this project is the limitless possibilities!  You can make it any size and embellish it any way you want.   Like…
Monograms:
 

Shapes:

Holidays:
 

These make great birthday presents (to go with a book or a bookstore gift card), party favors, and even treats for your child’s classmates!
A few hints: 
  • When I am choosing my Cricut cuts, I use my Gypsy (or CCR) and place a square that is the same size as the finished bookmark on the mat and size up my cuts.  If I am using patterned paper, I want to make sure that my cut doesn’t cover all of it up.
  • To line up the magnets on the front and back pieces, I cut the magnetic strips and magnetize them together so the adhesive is on the outsides.  I remove the backing on one side only and adhere it to one of the short sides.  Once that is in place, I remove the backing from the other strip (now face up and magnetized to the other one, and fold the book mark closed.  This will line your strips up evenly.
  • I wanted to laminate one to see how it turned out, but my laminator is packed away due to some remodeling we are doing right now.  I have not tried it before, but would recommend the thinnest pouch in order to allow your bookmark to fold and stay together.  I would also recommend laminating and then adhere the magnets.
I hope that you get some inspiration from this project.  Thanks for stopping by!
 
Cricut Info & Supplies Used:
Designed by: Dana Bilson
Cricut Machine Used:  Cricut Mini
Cricut Cartridges Used: Create a Critter (apple, cut at 2”), Hello Kitty Font (monogram D, cut @ 1.5”), Life’s a Party (soccer shaped bookmark- used the card feature cut @ 2.5”), Mini Monsters (Jack-o-Lantern, cut at 1.75”) 
Other Supplies Used:  Cardstock, adhesive magnet strips (found in the general craft section of Joann’s), adhesive


Clever Paper Clip Holder

Hi Everyone, This is Stacey (StaceyM) with a back to school idea. I have been a middle school teacher for 20 years and love using my Cricut to make things for my classroom. Today, I embellished a paper mache box to make a paper clip holder. Teachers go through a lot of paper clips.


Lid Directions – I cut the apple with books (Hello Kitty Greetings) at 3.5 inches using red, green, blue and gold paper. I cut the shadow out in black. Next, I cut the oblong burst (Elegant Edges) at 4.5 inches out of the same red as the apple. I used 2-way glue to adhere the apple with books layers and then I used paper Mod Podge to adhere all pieces to the lid. I found ruler ribbon that I adhered to the outside of the lid.


Box Directions - I cut the oblong burst (Elegant Edges) four times at 4.5 inches out of the same blue as the science book. I cut eight paper clips (Locker Talk) out of silver holographic paper at 1 inch. I had some black glitter adhesive paper from DCWV that I used for the letters. I cut the word Paper Clips (Pooh Font Set) out twice at 1 inch. The blue oblong burst was trimmed to fit each side of the box. I used paper Mod Podge to adhere all pieces.


To finish the box, I put an extra coat of the paper Mod Podge over everything. I used a Sharpie black paint marker to write Math, Science, and Reading on the books and I also put stitching on the edges. I glued a piece of magnet paper to the bottom of the box to help the paper clips stay inside.
 

I hope you enjoyed today’s project and have enjoyed reading this blog everyday as much as I have.
 
Cricut Info & Supplies Used:
Designed by : Stacey M
Cricut Machine: Expression
Cricut Cartridges: Hello Kitty Greetings, Locker Talk, Elegant Edges, Pooh Font Set
Other Supplies Used: DCWV Glitter Adhesive Paper, Paper Mache Box, Various Colored Papers, Holographic Paper, Paper Mod Podge, 2-way Glue, Sharpie Black Paint Pen, Ruler Ribbon

Friday, September 28, 2012

Fall Festival time!

Hello, this is Chris of http://scrappin-nanapuddin.blogspot.com. I'm so honored and excited to be a part of the Cricut Fanatics! I have a layout today from the scrapbook I am working on for the outgoing president of Azle Lions Club. The page is from the Azle Library Fall Festival. What I want to show you is how awesome and fun it is to make the snow cones! They look real IRL!


Aren't they awesome!? I used Imagine Yummy cart, the banners, cut at 2.5 inches for the snow cone bases. I tried white but just didn't like it! Not enough color, even sprayed with Glimmer Mist! I cut circles for the "ice" part and embossed with the Cricut cuttlebug folder "tiny bubble". I tried to do one without the embossing and it did make a huge difference in how the snow cone appeared. It didn't look as much like ice! If you look close you can see the tiny bubbles in the background of the pink one. I then covered the top portion of the circle with Glossy Accents and then poured on "Diamond Dust" and let it sit until dry. Then sprayed with Perfect pearls in the "bubblegum" color mixed with water, and the Perfect Pearls in "Blue Raspberry" mixed with water. And let dry. It will be a little sharp due to the diamond dust! but its awesome looking on scrapbook pages!
For the rest of the page, I designed in Cricut Craftroom using:
Cricut Imagine
Cricut Craftroom
Imagine Cart - Yummy
Imagine Cart - Best Friends, for the little girls and the balloons
Independence Day - Firetruck cut at 2"
Imagine Cart - Imagine More for the banner, but I changed the patterns on the banners to patterns on the Imagine Hopscotch pattern cart
Thanks for looking today! Hope you find a way to use these instructions and make your own fun snow cones or something icy! I don't know about you but we're still boiling here in Fort Worth and my air conditioner is on the fritz! A/c and if you have any questions about the cones, be sure to ask! I'm "scrappin-nanapuddin" on the circle board or contact me at my blog!

Don't forget about the GRAND PRIZE... everyone who makes a comment on each designers post will be entered to win the Grand Prize drawing at the end of the month! Just a couple more days! I can't believe its almost October! You won't want to miss this BIG package of goodies.
Have a great weekend everyone !

Summer Memories.....

Hello, Diane of  http://happyscrapperdiane.blogspot.com with a layout to share with you.  Summer has ended, but those Summer memories still need to be put on the pages.  I am sharing two pages I created for my grandson Cameron's album of a trip to an amusement park called Coney Island not far from where we live.  I wanted to create pages that were fun just like the day we spent at the park!    
I decided to use several items that he visited to display in the layout.  
 I used my Scrap n' Easel to layout and align the letting that I cut from Carousel using the shadow feature of the font cut at 1.25 inches.  To make sure it was correct, I placed the ruler to help get it straight too!
 I decided not to use the letter part because they were small and decided to use my Uniball pen to make some accent lines on the letter to make it stand out a little bit more on the paper.
 I cut the Ferris Wheel from Carousel at 5 inches and used the shadow and cut 4 different colors of the top of the ferris wheel in teal, gray, white and red.  I used the gray as the main and then cut the cars from the other colors and glued them in a pattern and stickled the gray area in silver to make it shine.
The roller coaster was cut from the Summer Celebrations cartridge at 4.5 inches and I cut every layer in a different color and cut pieces to make it different.  After I finished I did stickle the gray in silver which does not show in this picture, but in my final pages.  I cut the bumper car  at 3 inches and the ticket booth at 5.75 inches and both were from Carousel as well.  I used the ticket booth as a journal tag. Thanks for taking the time to look at my project.

Details
Designed By-Diane Kielman
Cartridges Used-Carousel and Summer Celebrations
Machines Used-Cricut Expression 2 and Gypsy
Project-2 page layout
Other Supplies-Pattern paper from Stampin Up, Cardstock from Recollections, stickles by Ranger and Uniball white pen

Thursday, September 27, 2012

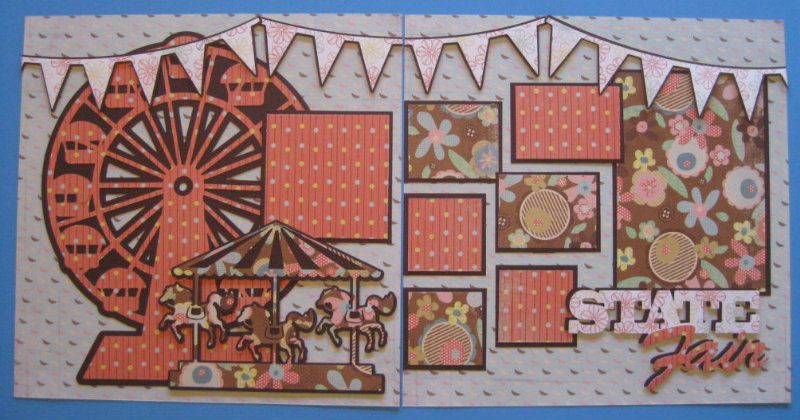
State Fair Layout

Hi Cricut Fans!  This is Rita of Rita's Paper Obsession.  Some of the fun memories of summer include going to an amusement park, carnival or fair.  Today I have a layout to share with you.


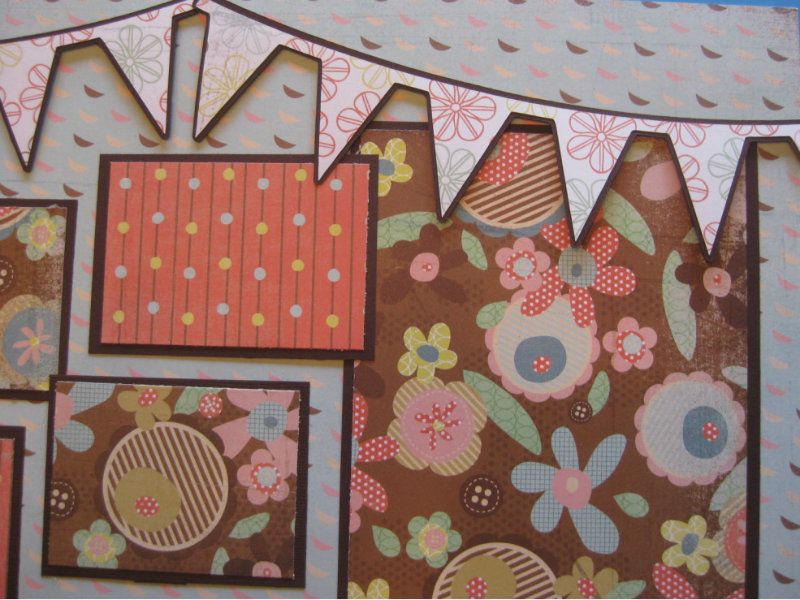
For this layout I used sheets of solid card stock and three different coordinating patterned papers.  Cuts are from the Carousel cartridge as follows:  Ferris Wheel (Ride5) 10.5 inches; Merry-go-round (Ride4) 5 inches; "State Fair" 3 inches cut in pattern paper and solid; and three Banners 3.5 inches.  Photo mats are cut to fit the photos I selected for the layout.

Merry-go-round, banners and title are secured with dimensional tape to add some depth.


The title does not have a shadow cut so I cut the base cut from the solid to create the shadow and off set the pattern cut to make it stand out.


Thanks for letting me share today.  Check out the Carousel cartridge, it has a lot of great cuts for your amusement park, carnival, fair and even circus photos.  Happy scrapping!

Cricut Info & Other Supplies:
Designed By- Rita Poteat
Cricut Machines Used- Expression
Cricut Cartridges Used- Carousel
Other Supplies Used- Bazzill "Mud Pie" and Hopscotch patterns "Jump Rope" "Hoppy Taw" and "First Dance", foam tape


Wednesday, September 26, 2012

Savory Memories

Hello, this is Liz of lizziesworldofcrafting.blogspot.com.  Today I have a layout to show you.

Twice a year I attend a weekend retreat with a group of friends at a beautiful Inn in Vermont.  The name of the retreat is called Savory Memories...the food is so delicious which is the Savory Part of the name.  (Grr--I apologize in advance for the pictures my camera is acting up).


The window is cut from Spring Cottage at 4" (I added the strips of paper behind the window so there would be "curtains." 

The word Savory is cut from the From My Kitchen cartridge at 3" and the word Memories is cut is from Phrases cut at 3".  I used the Shadow feature on both words.  The butterfly is cut at 2" from cake basics (I think this is my favorite butterfly!)


 I wanted to add a bit of extra around the matted picture so I cut the fence from Spring Cottage at 4" and then cut it in half with scissors and surrounded the matted picture of the girls.

I hope you have enjoyed my project.  Have a sparkling day!

 Cricut Info & Supplies Used:
Designed By: Liz Vellali
Cartridge(s) used:  Spring Cottage, Cake Basics, From My Kitchen and Phrases
Cricut Machine(s) used:  Expression
Project Type:  Layout
Project Theme:  Vacation

DON'T FORGET TO LEAVE A COMMENT TO BE ENTERED TO WIN OUR WEEKLY DRAWING IN SEPTEMBER.

Tuesday, September 25, 2012

An apple a day....

ʺHello, this is Terri of http://www.scrappinwiththebug.blogspot.com/. Today, I have an Apple Mini photo album to show you.ʺ I made these cute little apple albums for my daughter's pre-school teacher and assistant. I made these so they could put a small 3x3 photo inside. This album will hold 24 total photos, however, I only matted the one side.

Apple mini photo album
Finished Apple Mini Album
 
I used only 3cartridges for this project.
Create A Critter - 2 Apples and worms with shadows function I hid the faces of the apples w/ the gypsy
Mini Book - Cut 6 of the Square  L2 cut for inside pages

Cricut Craft Room Basics - Rounded Squares (photo mats)

Scored all pages

Once cut I then scored the pages on the tick marks using a score board. Glue 3 of them together end to end. I simply glued the tab to the bottom of the next page. If you need more area for photos then cut out another page.


Mountain/Valley fold the pages after glued together
 I folded each of the pages in Mountain/Valley style or fan fold.
Glue pages to apples

 Once folded then I glued the pages tot he inside of the apples. I glued some twine under the 1st page to make a pretty little bow. Hold down the album and carefully glue the back page on.
Add photo mats and tie
 
 Once the inside pages were glued down I added a red photo mat cut with Craft Room Basics for the mats. I find I like to use my machines to make the photo mats.
I then decorated the Apple shadow cut. I added the brown layer, then the green leafs, and the red apple layer. I added the cut little worm to the side with foam dots.

Cartridge Cut w/ Measurements:

Create a Critter Apples: 5 1/2" - cut 2 of them - one for each album w/shadow function & layers 
Create a Critter Worms: 2" - cut 2 of them one for each album w/ shadow function and layers
Mini Books - 3 1/2" Square L2 - cut 6 of them 3 for each album (unless you need more space for photos).

** A little tip - if you try to cut the L2 squares at 3 1/2" on the expression it will beep at you and say that it won't fit. That is because it is very close to the edge of the 12x12 mats. Here is a little trick - select the Mat Size 24 function  and still use the 12x12 mat. It will really cut almost to each edge so make sure the paper is 12x12. ***

Cricut Info & Supplies Used:
Designed by: Terri S.
Cricut Cartridges Used: Create a Critter, Mini Book and Cricut Craft room basics
Cricut Machines Used: Cricut Expression and Gypsy (to hide the face on the apple
Project type: Mini Album
Project theme: Teacher
Other Supplies Used: Paper from Michael's, scotch liquid glue, ATG tape, white gel pen


Baby layout

Hi, this is Kelly Bienvenu from kbiendesigns.  First I'd like to say I am very excited and honored to be a part of such a wonderful group of ladies!  From what I've seen, there are lots of super talented ladies out there!

I was recently asked to make a baby album for a soon to be born little girl.  I was asked to incorporate guitars into the book in a few places.  I have no idea what this was all about, but if guitars and music were that important I would do my best.

Here are two of the pages from the book.  For these two facing pages, I chose to print my paper from Teresa Collins Baby Boutique on my Imagine.  It's a very, very pale pink background which worked perfectly with the colors I had chosen, which were black and white, with a touch of pink.

I then cut the word "Lullaby" from Everyday Pop Up Cards at 3" on white cardstock, using black cardstock for the shadow feature, again at 3".  The guitar is from American Alphabet (one of the pre-loaded carts on the E2) and was also cut out at 3".  I used Tim Holtz tissue tape to border the page and made a flower for the bottom left hand corner.


The facing page also began with Teresa Collins Baby Boutique paper printed on the Imagine.

I wanted a banner, but since I did not have a baby name, I decided to use the storks from the Pretty Pennants cartridge.  These were cut at 1". I added the baby carriage from Everyday Pop Up Cards, cut at 2".  Again I used black and white cardstock, but thought the carriage needed something, so I used black and white ribbon to dress it up a bit.


The alphabet is 7 Gypsies tape which went perfectly with my theme of black and white!

All in all, these pages were very easy to make, and even though I used a lot of different carts, the process was quick!  Thanks for looking!

Monday, September 24, 2012

Cute School Home Decor Project

Good morning everyone!  This is Julie (Hurricane Zuri on the Cricut message board) of http://mommys-playroom.blogspot.ca/. I am really happy to be a part of the Cricut FANatics.  Today I have a home décor project to share with you.
 
As I was thinking about what type of project to do, I was also dealing with my entire family being sick.  It seems that the beginning of each school year brings home new germs.  So I decided that a school themed tissue box cover would be an appropriate project.
 
 
 To make the box cover I used the Gypsy and the George and Basic Shapes Cricut cartridge.  The yellow portion of the cover measures 15“ x 4 ¼ ”.  It is scored at 5 ¼” and 9 ¾”.  The red portion is the same size with four 1” x 5 ¼ ” rectangles welded to it and scored for the tabs.  I welded an oval (cut at 1 ¼” wide and 3 ½ “ tall on the Gypsy) to both pieces for the opening on the top.


The chalkboards measure 4 ¼ “ x 5 “ with white faux stitching added using a white pigment ink gel pen.  All of the images are from the Recess Cricut cartridge and were adhered with pop dots.  The pile of books was cut at 2 ¾”.  I embossed the apple using the PC Divine Swirl embossing folder to make the apple pop a little.  I love the dimension it adds. The veins on the leaves were drawn in with a Stampin’ Up Old Olive marker.  The stem was colored using a Stampin’ Up Early Espresso marker.  I embossed the pages of the book using the Stampin’ Up  Woodgrain embossing folder. 


My favorite part of the tissue box cover is the old-fashioned school house.  It was cut at 3 ¾ “.


I always picture an old school house as brick.  I used the PC Brickyard embossing folder to create the look.  The school bus was cut at 2 “ and the ABC was cut at 2 ½ “.
I hope you enjoyed my project today.  Have a wonderful week!

Cricut Info & Supplies Used:
Designed By: Julie (Hurricane Zuri on the Cricut message board)
Cricut Machines Used: Gypsy, Expression, Cuttlebug
Cricut Cartridges Used: George and Basic Shapes, Recess
Other Supplies Used: PC Brickyard embossing folder, PC Divine Swirl embossing folder, Stampin’ Up Woodgrain embossing folder, assorted colors of cardstock, Uni-ball Signo white gel pen, Stampin’ Up markers, pop dots, adhesive
 
DON'T FORGET TO LEAVE A COMMENT THIS WEEK ON EACH DESIGNERS POST SO YOU HAVE A CHANCE TO WIN A CARTRIDGE.

Sunday, September 23, 2012

 
Hello There,  this is Jami Larson (Cricut Farmer) from http://thepaperfarm.blogspot.com/ with a project that I did awhile back but wasn't allowed to share it, as it was selected for The Ultimate Creative Series DVD set.  This fun project is a backpack made out of a box of graham crackers with a pocket that holds the chocolate bars in an acetate pocket on the front and a cellophane bag filled with marshmallows.

I covered the top, bottom and back with craft paper leaving the sides open so you could see it was graham crackers.  I attached ribbons to the back to look like the straps on a backpack as well as a loop at the top for the hanging piece.  I welded the letters and inked the top edge to look like toasted marshmallows.  The characters are cut from the Create a Critter cartridge and added to the front pocket.

The marshmallows on the sticks were made by using a corner rounder on a couple of squares with the top edge being inked and attached to a stick from the yard.  I don't have the exact dimensions of everything but it is all stored in my Gypsy.  I know that I can post the project but am not really sure about posting all of the exact dimensions since it was featured on the DVD set.   It's a pretty simple project so am hoping you will be able to adjust it to whatever size you decide to go with.

Cricut Info & Other Supplies:
Designed By- Jami Larson
Cricut Machines Used-Original Cricut, Cricut Gypsy
Cricut Cartridges Used- Create a Critter, Doodletype
Other Supplies Used-Tim Holtz Distress Ink-Vintage Photo, Red Ink, Ribbon, Raffia, Paper by Bo Bunny-Camps-A-Lot
 

Saturday, September 22, 2012

Week # 3 Cartridge Winner

 WOW, it is hard to believe it has already been
3 weeks on the Cricut FANatics Blog !!!  
So many amazing and varied projects have been shared so far. Isn't it exciting to come here every day and see a new project ?
Okay, now on to the good stuff....

So by Random Number Generator selection,
our Week #3 Cartridge Winner is

Very cute! Everything is so awesome! The yellow mesh really gives it a finished look!! 
Jodie R gets her pick from the following cartridges which were generously donated by Maura aka Happy Granny : Berries & Cream, Sweet Tooth Boxes, MS Seasonal Cake Art OR Giant Flowers donated by Debbie aka ScrapHappyDeb. Please email your pick of the cartridge and your mailing address to creationswithbecka@yahoo.com to claim your prize. You have 7 days to claim your prize or we will draw another winner.
And the contest for Week # 4 kicks off starting today, Saturday September 22nd. So be sure and keep leaving your wonderful comments for our designers.  It means so much to hear your kind words about their projects they spend so much time preparing to share with all of us.

And don't forget about the GRAND PRIZE... everyone who makes a comment on each designers post will be entered to win the Grand Prize drawing at the end of the month ! Lets just say you won't want to miss this BIG package of goodies.
Enjoy your weekend everyone !

ROAR!!!!!


Hi Everyone!  This is Alex from www.cardsinthetree.blogspot.com with a card/gift card holder for a friend’s baby shower.  Her nursery is a jungle themed room for her little guy.  I love lions so this was perfect to make something I have had rolling in my head.  To start I made a miniature mock up of what I wanted.

I used some scrap papers and free hand cut some of the basic shapes and pieces for the base.


I started with one of the best animal cartridges, Create a Critter.  I really liked the lion's face but I wasn't crazy on the direction of the body for this project.


So with the help of my Gypsy I used the bottom half of the koala (also from CaC) for the legs of my lion and then just the head from the actual lion cut.  With the Gypsy I can do partial image cuts and then just make sure that what I want is in the actual cutting area of the mat.  I used scissors to cut the "margin" area that was not cut to free the images. 


The head of the lion has four layers.  The blank back that I hid the contours of the face cut in the bamboo color, another of the same cut in black, the face cut in bamboo, and the mane in gold rush.  Above are all the layers together with out any glue, ink, or embellishments.


With this being a gift card holder I wanted the tail to hold the gift card and be pulled to reveal it.  I used my grocery card to fold over a strip of paper and then with what was left of the strip I free cut a tail minus the tuft of hair part.


Above are the body pieces without any embellishing.  The top left is the tail, then the face, the front legs, the back legs with the card placement, and the back of the head.  The piece in the middle is to attach to the back legs to form the pocket for the tail and gift card.  I actually cut a third set of the koala legs and cut off the excess so it fit the card area only.


And here are the same pieces with some distress inking.  The tail tufts pictured left center are another free hand cut but just think a flamed shape.  The tail tufts and mane were also distress inked and glimmer spayed.  


This is the body glued together, the pocket attached, and the tail inserted.


With all the weight and upcoming embellishments the lion needed some help standing upright.  I made a box lid from Tags, Bags, Boxes, and More 2.  I always use some hair clips to hold things while they glue.  They are perfect for paper and ribbon because they do not have the teeth and are pretty wide.  I used some fun scissors and clipped the edges of the box and inked the outside to darken and distress it a little.  I used some green grass clippings and ink sprayed it to darken it as well (actually the green stuff is what came in the box from the Cricut Circle Year 1 welcome box).


Here He Is!!!  I cut another face with Cotton Candy paper but hide all the contours except for his little nose.  And even though the card is for a little boy I did manage to put some bling on it.  There are two black gems on his eyes.  I also used glossy accents over the black whiskers and mouth.


His head is attached with two springs so that it would wobble.  It's so stinking cute!


The back view with the card partially in.


Finally it is a card, so I lined the inside with a champagne paper to clear up all the ink marks and make it cleaner for the group to sign.  The Congrats is cut from Wild Card on plain black paper.


Cricut Info & Supplies Used:
Designed By:  Alex B.
Cricut Machine Used:  Expression 2 and Gypsy
Cricut Cartridges Used:  Create a Critter, Wild Card, and Tags, Bags, Boxes & More 2
Other Supplies Used: Close to My Heart Papers in Bamboo, Black, Cotton Candy, Pear, Champagne, and Gold Rush; Tulip Hot Set Black gems and setter; Tim Holtz distress inks in Wild Honey, Antique Linen, Scattered Straw, Mowed Lawn; Inkssentials Glossy Accents; CTMH Adhesive Springs; Tattered Angels Sunflower Glimmer Mist; and some random green basket grass. :)