While we are no longer making active post of Cricut projects on this blog as of 8/1/2013, we invite you to use it for continued die cut inspiration as we will leave the blog up for viewing. Happy Cricuting !

Thursday, February 28, 2013

A Day with the Penquins

Welcome to another project at Cricut FANatics. Diane here from the blog http://happyscrapperdiane.blogspot.com with a quick and simple project. A couple weeks ago, we went to the Aquarium and my 3 year old granddaughter loves penquins so her parents arranged for her to do the meet the penquins. She got to go into a special room and learn all about them and get to touch and see them other than behind glass. She was so excited and had the best time ever! I thought in addition to adding this to her scrapbook, I would make her a little frame to put in her room. I used the cartridges Base Camp and Animal Kingdom.  It was fun to create this easy project for her.

Created by: Diane
Cartridges Used:  Animal Kingdom penquin cut at 4.75 inches
                           Base Camp-lettering cut at 1 inch
Cricut Machine:  Cricut Expression 2
Materials:  Pattern Paper from Making Memories
                 Cardstock-Michaels
                 Unfinished frame-Michaels.

Wednesday, February 27, 2013

Man's Best Friend Layout

Hi Cricut FANatics!  This is Rita with Rita's Paper Obsession.  February is the month to celebrate love and I wanted to remember the love of our pets with a layout.


Dogs are great examples of how to live life to it's fullest.  We can learn many life lessons from our four legged friends:
  • When loved ones come home, always run to greet them.
  • Never pass up the opportunity to go for a joyride.
  • Allow the experience of fresh air and the wind in your face to be pure Ecstasy.
  • Take naps.
  • Stretch before rising.
  • Run, romp, and play daily.
  • Thrive on attention and let people touch you.
  • Avoid biting when a simple growl will do.
  • On warm days, stop to lie on your back on the grass.
  • On hot days, drink lots of water and lie under a shady tree.
  • When you’re happy, dance around and wag your entire body.
  • Delight in the simple joy of a long walk.
  • Be loyal.
  • Never pretend to be something you’re not.
  • If what you want lies buried, dig until you find it.
  • When someone is having a bad day, be silent, sit close by, and nuzzle them gently.
Using Paper Pups, I cut the following:  from black cardstock 3" Paw using circle feature and 4" Sundog; from white cardstock 2 5/8" Collar and Buckle; 1 3/4" "Best Friend"; 4" Sundog using the blackout feature.

I applied black and brown ink using a stiple brush to the photo mats, dog image and title.  Stickles were used to create a glittering collar and a clear gem was added to the dog cut.


I ran the dog collar through my Xyron sticker maker and applied red glitter.  On the title I applied red glitter to the heart.  For the buckle I used a Versamark ink pad to adhere silver embossing powder.


I used a paw stamp and Versamark ink to create a background of little paw prints.  Unfortunately I ran out of time to locate a picture to put on my layout so I stamped the mat with a few bones until I can get my picture printed.

Thank you for stopping by and may you run, romp and play daily.

Designed by:  Rita Poteat
Cartridges:  Paper Pups
Cricut Machines:  Expression
Other materials:  Black and brown ink, stiple brush, red glitter, Versamark ink, silver embossing powder, embossing heat gun, paw and bone stamps from a set I purchased a Michaels.

Tuesday, February 26, 2013

Cutting Fabric with the Cricut

Hi,
Its Liz from http://lizziesworldofcrafting.blogspot.com/.  I was asked to teach a group of ladies how to cut fabric with the cricut and thought that would be a good project for my post this month.

Its a lot of fun and the ladies loved it.

Items needed:


Cricut machine
A relatively sticky mat (it doesn’t have to be brand new)
100% cotton fabric
cartridge of your use
heat and bond
brayer
iron and ironing board

 
Steps:

1.      Put your fabric right side down on the ironing board
2.     Cut heat and bond to fit fabric and iron it onto the fabric (make sure you are ironing on the paper side of the heat and bond
3.     Remove the paper from the heat and bond and you will have a shiny side of your fabric


4.     Shiny side of fabric down on the mat
5.     Use a brayer to make sure that the fabric sticks really well.
6.     Load your paper
7.     Choose your image
8.     Use the following settings:  Blade on 4; low speed; maximum pressure
9.     Hit cut
10.   Remove the cut from the mat and it is ready to iron or glue onto your project!

Here is the finished project using the storybook cartridge set at 4"!


Have a sparkling day!
Liz

Monday, February 25, 2013

BUZZZZZ Flower/Heart Wreath full of LOVE


Hi again this is Terri from http://www.scrappinwiththebug.blogspot.com/. I know,  I know Valentines is already over but I made this a couple of days ago for Valentines and it was just too fun not to share with you.

I used Arts philosophy cartridges and cut out different colors of flowers. I wanted purple, pink and dark purple. I cut the flowers at 2.5", on Font Heart 3 Shift function.
Depending on how full you want it to look and/or what the starting size is of your base you will need about 150-200 flowers. This specific project took 190.
I started with a Styrofoam core - in the shape of a heart. I painted it a soft pink so that way in case any areas were not filled in 100% it wasn't white.
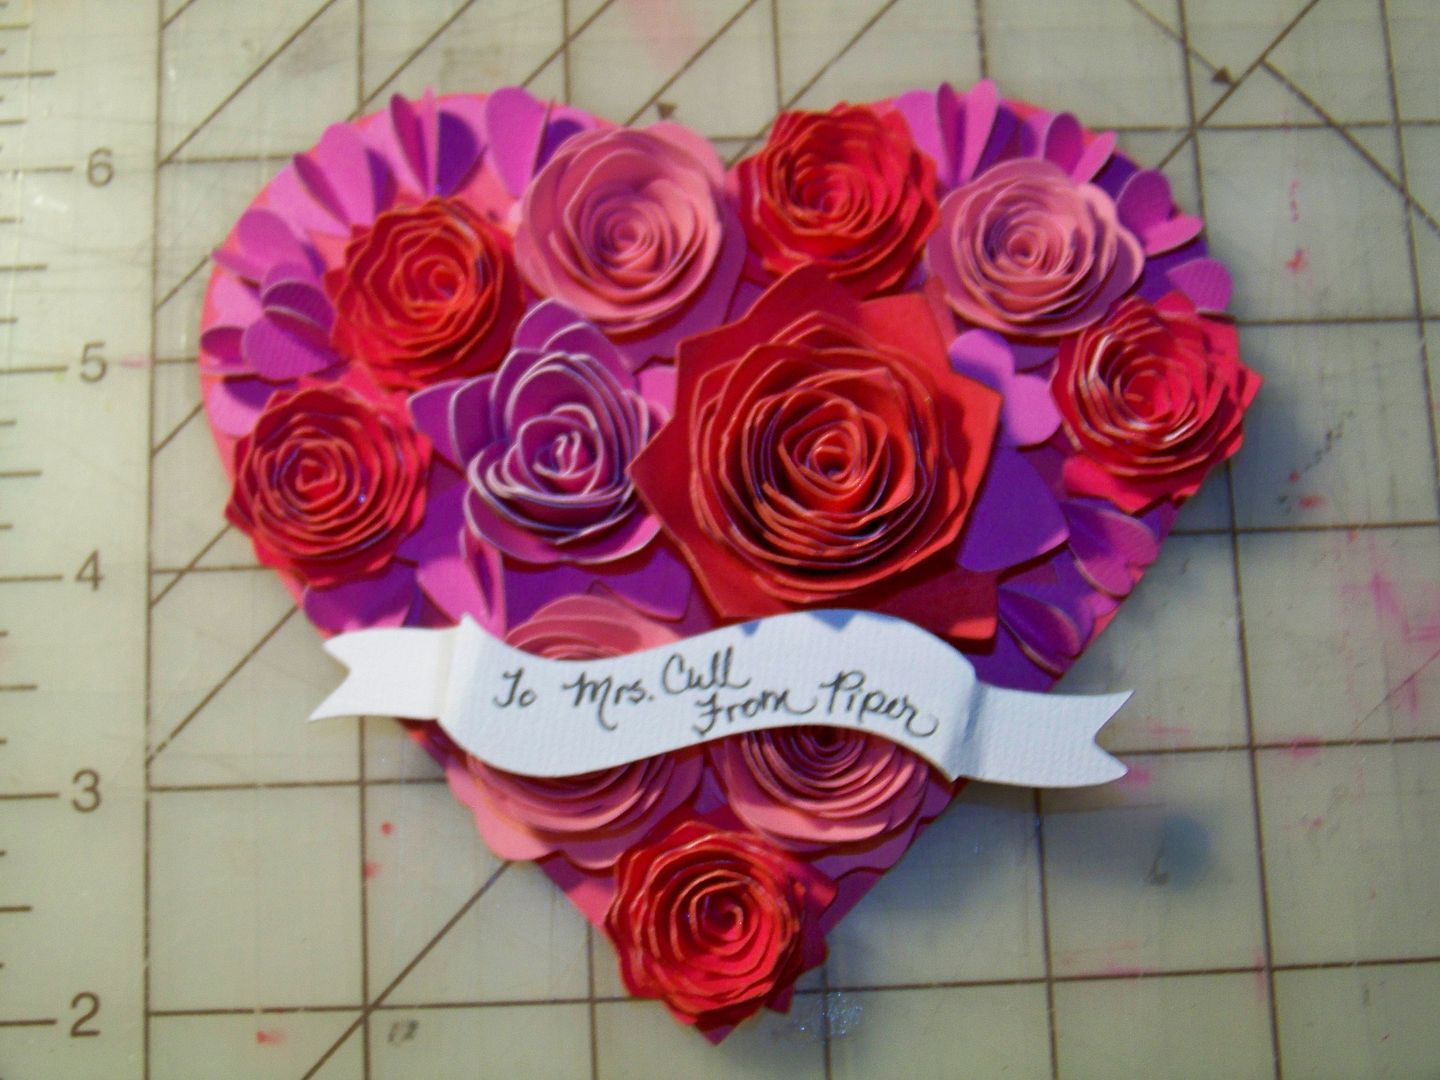
 I then added the flowers. I added about 10 of the light purple, then did the same of the pink, dark and light again. Then I would add to the other side that way the "lines" were kept pretty straight. I used Scotch Quick dry adhesive to add the flowers. I worked allot in sections on this. I will admit this is a simple project but takes a few hours to make.

So since I like to share my tricks here are a few.
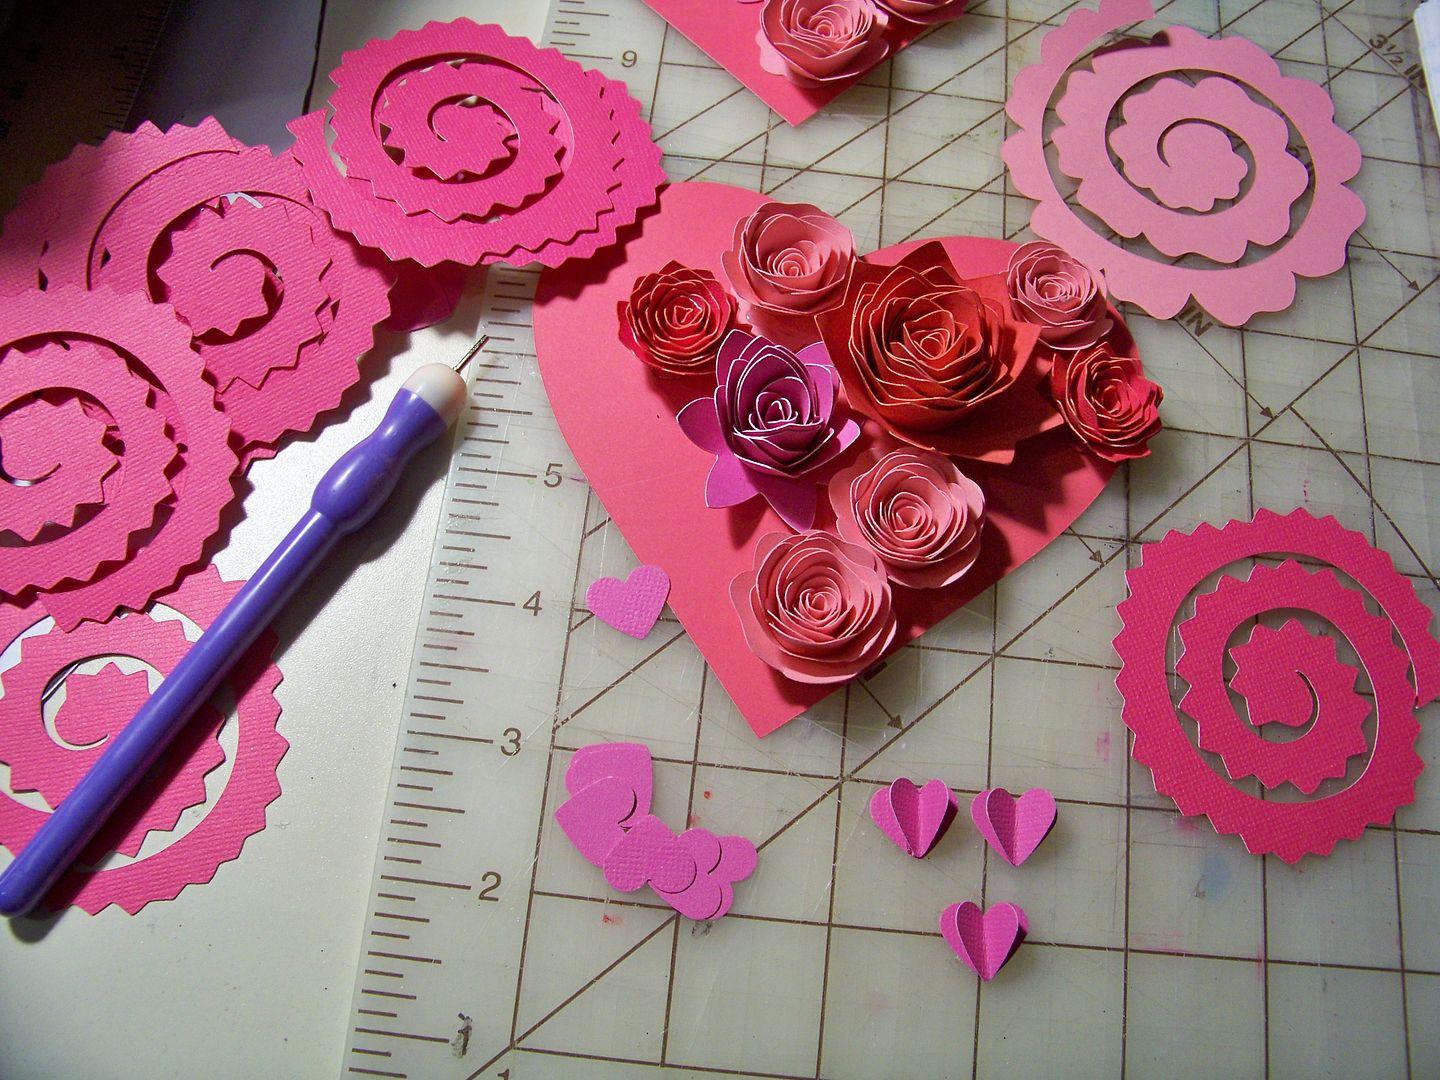
I have learned a few tricks for rolling the flowers  - so here goes maybe this will help you a little. Tip #1 - Use a  quilling tool to get them started
#2 - After you have rolled about 2 turns put a small dot of glue on the flower - I use Scotch Quick dry glue - then continue rolling the rest. This will keep the "bud" portion of the flower and not unroll allot.
#3 - When you get to the end put a little glue on the tail area - and then put the rolled flowers on the glue and let them unroll. Then hold and press.
#4 - DO NOT try to glue your flowers to the base until the GLUE HAS DRIED completely - especially if using a thin weight paper.
#5 When putting them on the base/wreath form - get them as close as you can together (makes it look full).

I used for the paper a simple paper pack from Michael's - it was just simple pinks, and purples. All of these papers were in the pack. The paper is 8 1/2 x11 and you can get 12 flowers off the one piece of paper.

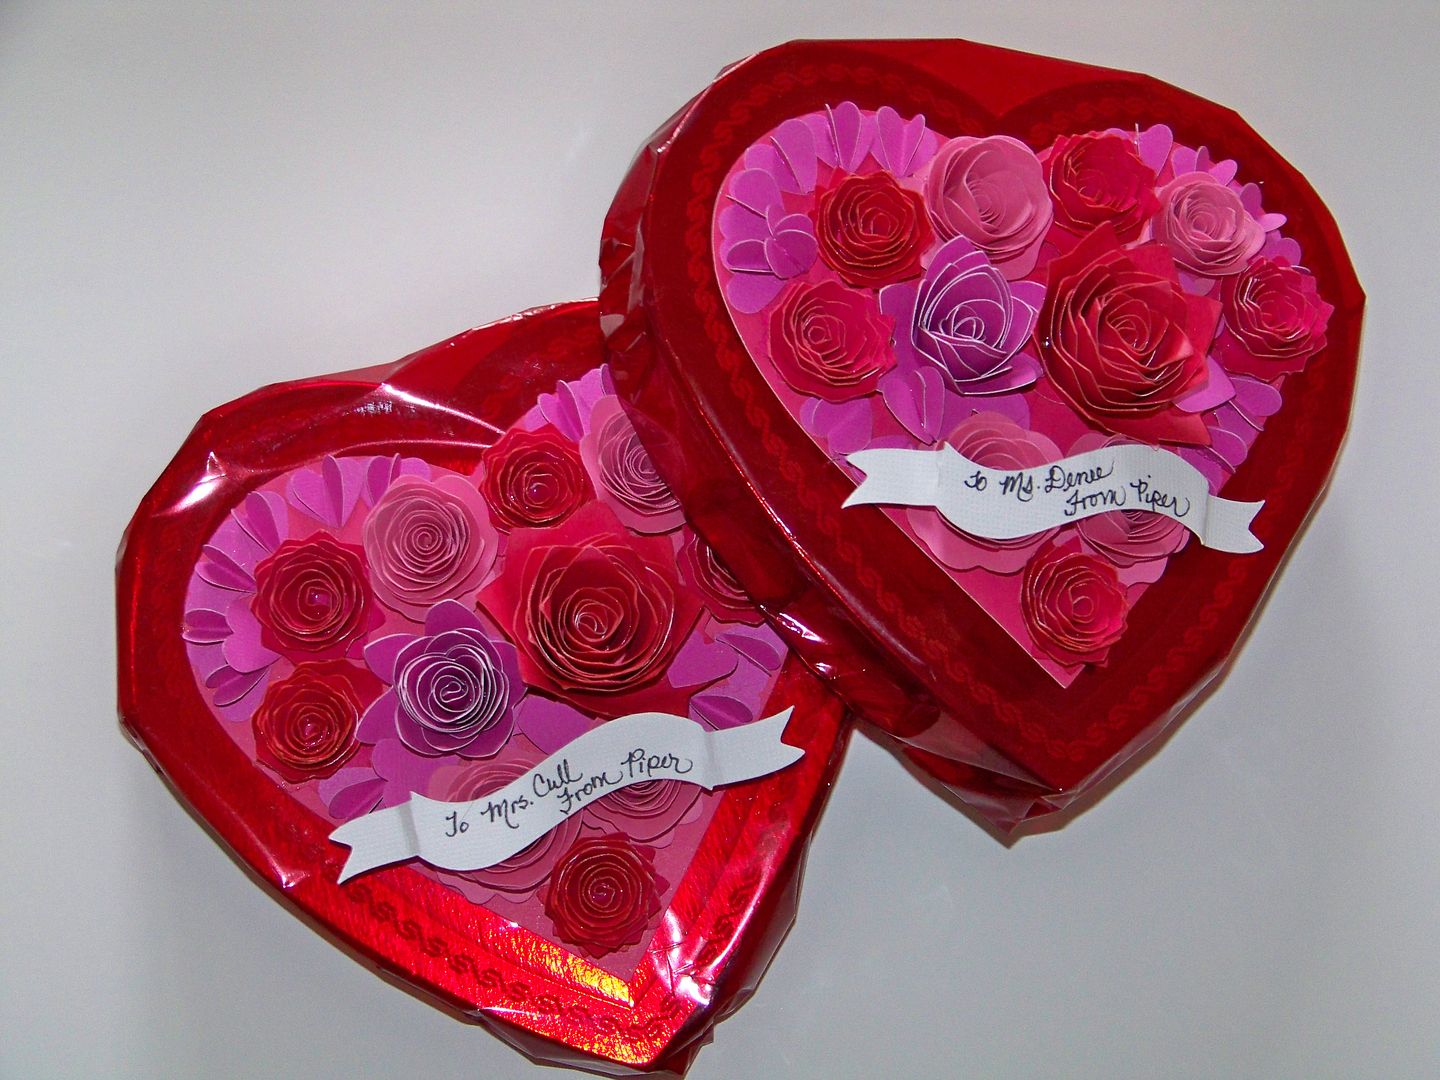
While I loved the look of it with just the flowers I wanted to go a step further. I wanted a little "banner" so I used My Creative Time's heart die and cut them out in the bright pink - then I cut out  3/4" letters w/ shadow from Kate's ABC to form the word LOVE.

The adorable little bee's were cut at 2" from Create a Critter 2 cartridge again in the coordinating colors from the paper.
I then over lapped the hearts to each other and the bee a little - and just glued to the roses.
A little stickles to give the bee a cute little shimmer/glitter.
 
Here is the back - I only did 4 rows because I want this to lay flat against the door. I may/may not add ribbon - it will depend on what door I hang it on since it's not water proof I don't think I'll put on the front door.
 
Hope you enjoy and
 
Happy Scrappin'
 
 
Cricut Info & Supplies Used:
Designer :  Terri Szymanski
Cricut Machine: Cricut Expression
Cricut Images: Arts Philosophy <FONT> Shift Heart 3, Create a Critter 2 Bee cut at 2",  Kates ABC 3/4" letters.
Other Supplies Used: My Creative Time for me heart die, Stickles, Recollection paper pack, heart Styrofoam piece

Saturday, February 23, 2013

CTMH Artiste Cards

Good Morning!  Jami Larson-Cricut Farmer from the messageboard here to share one of my latest creations with the Cricut.  These fun cards were made using the CTMH Artiste Cartridge and "Girls Rock" stamp set.  The flowers were cut the size listed on the stamp package and stamped using Hollyhock, Cotton Candy and Pear ink from CTMH.  The paper is from the Chantilly collection from CTMH as well. 

Easter card and bonus card using Creative Cards with CCR

Hello everyone, it's Trinity from trinityscraftingcreation.blogspot.com and today I have a card to share with everyone. I'm trying to get an early start on easter cards this year instead of waiting till the last minute. On this card I used A Child's Year but did alittle bit of snipping and cutting here and there. I used for the rabbits and grass the image found on page 32 but snipped off the girl holding the carrot. And for the girl holding the basket I cut the shift cut and also cut both shadow cuts. The were all cut out at 4" and pop dotted the girl. I took a piece of light pink paper and cut it at 1x2" and used a corner ticket punch on the edges. I also took my Martha Stewarts loop punch and did the corners of the base layer on the card and accented it and also put on the girls braid with SU pearls. I used my My Pink Stamper happy easter stamp for the sentiment. The cardstock that I used for the card was from Echo Park and the pattern paper was just some that I found in my stash.

I also got a chance to play with CCR the other day and tried out the free images that PC gave us for a week from Creative Cards. I don't remeber what size I cut it out at but it did come out a little on the small size but would be great for something like a note card or for a gift bag. The paper that I used came from my stash. Thanks for stoping by and looking and have a great day!


Designed By: Trinity Wallace

Machines Used: Cricut Anniversary Expression and CCR

Cartridges Used: A Child's Year, Creative Cards

Materials: Vinyl, Martha Stewart Punch, paper, pearls

Friday, February 22, 2013

St. Patrick's Day Decor Using Vinyl

Hi fellow FANatics! It's Colleen from Col's Creative Corner sharing a little of the luck of the Irish with you!

Now that St. Valentine's Day has come and gone, it's time for the wearing o' the green in our home. I finally got around to one of my bucket list projects, a St. Patrick's Day Subway Art Frame.


This was my first time attempting to use Word Collage and vinyl. Up until today, I had only used it a couple of times with my Imagine. This is a very versatile cartridge and upon closer inspection of it, I was thrilled to see the Irish inspired subway art.

I set my Expression 2 to the kiss cut (speed 3, depth 3 and blade 4) and loaded the mat. I cut a small shamrock just to make sure that it would cut. It cut nicely, so I felt safe to cut my word collage. It cut most of the words smoothly, but the smaller phrases were ripping. I changed my setting to a speed of 2 instead of  3 and set the blade at 3. I found that worked much better. It was a new blade, so I think that was why I needed to lower the setting for it. I also found that no matter what I did, I couldn't get the "Top Of The Morning" phrase to cut without tearing some letters. To fix that, I used my Gypsy to add a row of shamrocks where that phrase would have been. They are from Paper Doll Dress Up. At this point, I used the hide contour function on the Gypsy so I could change the colors of the words and phrases that I needed to re-cut. Below is an example of some hidden contours and a different color vinyl.


I weeded out all the small pieces before transferring the letters to the glass. The picture below shows the transfer paper on the letters. It really makes working with the vinyl easy.


In an effort to keep the phrases straight on my frame as I transferred them, I used a piece of scrap paper and created a grid to put under the glass while I was working. I cut the word collage at 7.5 inches wide, so I drew a line at .5 an inch in from the edge of my scrap paper. I didn't draw any lines across the paper, but I will the next time I create one of these frames. I also think I will reverse the letters the next time so that they will be inside the frame and not on the outside as they are on this one. I'm such a vinyl newbie! I used a piece of green paper from my stash as a backing for my word art.


Here's a close up of the frame. I really am happy with how it turned out.


With my vinyl scraps, I made a candle that would compliment the frame. I used a Martha Stewart Punch to make a doily border and I cut some shamrocks in varying sizes from A Child's Year. I can light this candle if I choose to because it melts into itself and the outside stays the same. If you are unsure how a candle might burn, I would suggest removing the vinyl before lighting.


If you have been wondering about trying out vinyl, I say give it a try! I really enjoyed creating this project and I know I will be digging into my stash of vinyl again very soon!

St. Patrick's Day is a double the fun holiday in our home. We love celebrating our Irish heritage and it's my birthday too! It's a great day for a birthday, everyone celebrates with me and I get a parade to boot!

Thanks for stopping by the FANatics blog today! It is always an honor to share my projects with you! Don't forget, there's still time to enter our challenge! Happy St. Patrick's Day to everyone!

Happy Crafting!

Designed By: Colleen McCauley
Machines Used: Cricut Anniversary Expression and Gypsy
Cartridges Used: Word Collage, A Child's Year, Paper Doll Dress Up
Materials: Vinyl, Martha Stewart Punch, paper, frame and candle from my stash. The paper is is from Penny Black and is called Green Sponged.


Thursday, February 21, 2013

FORE!

Happy Thursday everyone. I'm L.B. from Cool Beans By L.B. and I am happy to be back for my day at Cricut FANatics. Recently, we heard from our followers that you would like to see more masculine themed projects. I have a lot of wonderful men in my life who enjoy getting my cards, but I find it hard to make these.  I am taking the challenge.  For the next few months I am going to do my best to share a masculine themed card or project with you on the 21st! I hope I can give you a little inspiration. Here we go with round one:
Know anyone who loves golf? I do and I came up with this cute Valentine for him. I started with the All Sports cartridge that has some great golf images (for male or females). I selected the guy swinging because I think he is the most  fun. I cut him and all is layers at 3.75 inches. I laid everything out on my Gypsy before putting the papers on the mat and cutting. Next came the gluing, which I did on the mat (a few small pieces)
I was really pleased with how easy the layer went together on him (although I drew in the face because I must have thrown away the small cuts). Next, came the phrasing.... I loved this "fore!" cut from a different golfing page in All Sports and it got me thinking: "Fore you!"
I cut the "fore" and its layer at about an inch an half height and then cut this fun "you" cut from Graphically Speaking for the inside.
I used a mesh texture embossing folder for some more fun on my backing layers and put it all together.  I hope you enjoyed part one of this journey and will come visit us again soon.

Supply Information:
Cartridges: All Sports (golfer page 47) and Graphically Speaking
Additional Supplies: The Paper Studio Mesh texture embossing folder, Recollections papers

Tuesday, February 19, 2013

Cricut Craftroom Freebies


Hello again, it’s Freda from CannCreateDesigns here with two quickie projects using the Mini Books Project Cartridge and the Freebie Creative Cards preview that are free in the CraftRoom through the 20th.
It’s my son’s birthday next month and even though no one else in the family drinks coffee he has developed a taste for it. When I saw the Starbucks Lovers Gift Box on the Cricut With Heart Blog at Christmas time I printed out the page and put it in my “to make” pile for his birthday.


Using the Cricut Mini Books Project Cartridge I cut the outside layer only of the exploding box on pg. 11, scored the fold lines and inked all the folds on the inside and outside. To make this project even quicker I used coordinating double sided paper from my stash so I didn’t have to cut any panels to decorate it. I also used a couple of leftover stickers from my stash for decorating the top.


I suggest that you put the thicker objects on panels across from each other and the thinner items on the other 2 panels, that way when you close up the box the folded “wings” have somewhere to hide without distorting your box. I left these “wings” in to provide support since the gum and cookies are heavy. I stacked pop dots on the bottom of the cup until they were tall enough to stick to the center of the box bottom. The empty panel is waiting for a Starbucks Gift Card. They were out of the Happy Birthday ones the day I was in there getting the cup, samplers and gum.


The Banner came from the Artiste chipboard and stamp set that came with the cartridge (pop dot it up to make room for the ribbon to slide under). The cut itself is on page 35 cut at 1 ¼ “. I used a coordinating VersaMagic chalk round the edges of the banner. Butchers string was used as a ribbon since it matched the ribbons on the paper.

Next I decided to make a card from the Creative Card Freebies. When I first saw the samples I thought they were a little too plain for my taste so I wanted to “bling” one up to see if I would like it better. The card on the right was just cut and assembled. The card on the left was embossed, glittered, inked and bling’d up.


The extra bling didn’t take too long so I guess this cartridge would come in handy to use in a pinch when I needed a card quickly.
NOTE: I sized the card in CraftRoom to be a 4 ¼ x 5.5 and only cut the layers. I used up some of my stash of 8 ½ x 11 cardstock cut in half for the bases of the cards instead of cutting them on the cricut and I have tons of envelopes. Skipping those items saved a lot of time making these cards.
Thanks for stopping by, Freda

Cricut Info and Other Supplies:
Designed by: Freda
Cartridges Used: Mini Books, Artiste, Creative Cards
Cricut Machines Used: CCR, Cricut E2
Other Supplies Used: card stock, distress ink, swiss dot embossing folder, Queen & Co Goosebumps & Rhinestone Trios, CTMH Artiste stamp set & chipboard, extra fine glitter.

Monday, February 18, 2013

Snapshot

Hello all!
This is Michele from Scrap-n-Dance. Today I have a layout for you as well as a cut file!

You know how certain iconic items become all the rage? I've seen things like those old rotary fans, coffee stain stamps and more. Lately I've seen the viewmaster disks around. what memories those bring back!

Just recently someone on the Cricut message board asked me where I get my ideas for layouts. I get inspiration from everywhere, but I have no problem scraplifting! Especially if I want to experiment in a style of crafting that I'm not used to doing... as is the case with this layout... I am never quite comfortable doing layouts like this... But I like how it turned out. Sometimes I just see one little thing somewhere that inspires, sometimes the whole layout inspires me. In the latter case, I often translate someone's layout into a "sketch" and go from there, using my own supplies to re-interpret the "sketch". Today's layout is definitely scraplifted! It was her viewmaster disk that caught my eye at first, but then I fell in love with the whole layout. To see my inspiration, click here.

However I did not have any viewmaster disk embellishments. So I had to create one! That meant a little research. It turned out that Capadia had made a tutorial for a cut file for a different machine. I was able to translate that to my gypsy and created my own viewmaster disk cut file for my cricut on my gypsy. You can download the Gypsy viewmaster disk file from Box.com by clicking here.

The gypsy file includes the disk in two sizes, the smaller one is based on measurements I found for the disks... close but not quite exact I am sure. The larger one was the size I wanted for my layout. The images are grouped separately so you can move them or resize them as you please. On the second layer is a blackout version of the disk, in case you want a black background for the photo holes, as I did in this layout.

By the way, this layout was made entirely with stash that I've had from 4 months to 4 years. :)  I dug out several things I'd made ages ago and stored away (grungepaper flowers, UTEE'd heart).

Thanks for coming to see my project today!

Cricut Info and supplies used:
Designed by: Michele Donner-Ramsey
Machines used:  Expression, Gypsy
Cartridges used:  Elegant Edges, viewmaster file: B is for Boy, George, Plantin
Other tools: Sizzix, Tim Holtz rosettes dies, EK notebook punch
Other supplies:  The Girls' Paperie letters, Printed cardstock from Graphic 45, Studio Calico, Simple Stories. Camera rubon from Kaiser, seam binding, Art Parts hand, grungepaper, buttons, Charlene's Button Box button (yellow square button). twine.

Saturday, February 16, 2013

Shades of J

Hello again, everyone!  Doreen from PolkaDotPaperPrincess here with another project.  I made this layout of my daughter.  It was an accidental photo that I just love.  The light coming in came directly across her face.  I'm not sure if you can see in this photo, but you can see both sides of her.  The portion on the right side of the photo is just darker.  


I used Quarter Note for the script writing, Printing Press for the J, Accent Essentials for the stars and Sophie for the doily under the photo.   I made the flower on the J with tulle and then added the brad.  I used some very old Glitz rub-ons and stickers.  MME journalling cards and labels, a fabric ticket from Webster's Pages, some buttons and washi tape.  

Try doing a scrapbook page of an accidental photo.  Try to also work outside of your comfort zone!  Use up some of those wonderful goodies you have!  Have a lovely, long weekend!


Friday, February 15, 2013

Valentine Projects

Hi everyone. It's Sherry from http://www.macybella.blogspot.com. I know I'm a day late for Valentine's, but I wanted to share with you some of the things I made this year. First up is a Chalkboard look card I did for a Card Swap. It is a regular size card from half an 8 1/2" x 11" sheet of paper. I used twine to string the banner, and buttons with twine bows for the ends. The hearts are cut at 1 1/2" from various carts. I used Prima white chalk ink to add the chalky look and for the life of me I can't remember what cart the Happy Valentine's Day is cut from, but as soon as I find it I will come back and update.


The second thing I made was a sign for my Valentine Swap partner. I cut a red circle at 9", then cut hearts from Sophie (shadow cut) at 3" each. I laid them out around the circle to get the look I wanted before gluing them down. Then I cut Love from Sophisticated at 3" I think and layered it. I added a hand cut flower and some bling for decoration. I love how this turned out.


I hope you all had a wonderful Valentine's day filled with love and happiness.

Thursday, February 14, 2013

Blooming Candy Boxes for Your Valentine!

Happy Valentine's Day!  This is Nadia from my blog, With Glittering Eyes.  I picked one of my Valentine projects to share here today--a quick and easy one since today is THE BIG DAY!  I picked up a couple of little heart-shaped boxes of candy and created a dimensional tag for the tops using paper flowers, hearts, and a banner.  These are teacher gifts, but they would be fun to give to neighbors or any chocolate-lovin' friends!


The heart-shaped base was cut from Artiste, page 51, at 4-3/4".  

The flowers were cut from Artiste, page 54, at 2-3/4" (Accent1-shift), 3-1/4" (Accent2), 4" (Accent 2-shift), and 5-3/4" (Accent1-shift).


The hearts were cut with a punch.  Some were combined to make dimensional by folding one in half and gluing to a flat one.

The banner was cut from Holiday Frames and Tags, page 48, at 1".  I bent it at the perforations to make it dimensional.  It was hot glued to the tops of the flowers.

All the flowers were hot glued to the base.  The base was attached with Terrifically Tacky double-sided tape.


Best wishes for a Happy Valentine's Day with the people you love the most!  To see my other Valentine crafts and gifts, check out my blog today!


Cricut Info & Supplies Used:
Designed By: Nadia Herbst-McConnell
Cricut Machines Used: Expression
Project Type: Gifts
Project Theme: Valentines
Cricut Cartridges Used:  Artiste, Holiday Frames and Tags
Suppies Used: Paper, hot glue

Wednesday, February 13, 2013

Cricut Saint Patrick's Day Card

Sis from Paper, Craft & Scissors with a Saint Patrick's Day Card (or any other Irish or coffee occasion) to share as I shared my Valentine's card previously on my blog. 


I will share a few Cricut Craft Room tips that I used to make this card.  If you are interested in learning more, there is a terrific resource available at the Cricut Craft Room Blog (by Narelle and Scrapalette).

I used the "Love You a Latte" card and selected frappucino 2 as the base of my Irish coffee.  As designed, there is some greenery peaking out from the whipped cream, but it isn't a shamrock.  Because the second base layer is the same as the first minus the greenery,  I copied the shift layer and simply welded two small shamrocks from Paper Doll Dress Up.  


As Irish coffee does not include sprinkles, I used the "Edit Contour" feature to hide the sprinkles cuts.  I needed some eyes to smile, so I used the "pinwheel face" from Create a Critter, edited the contours, and welded the eyes and smile on the "coffee layer."  To ensure the eyes and smile were visible, I also cut the "coffee layer" from black card stock (without the smile and eyes).  Assembling the Irish coffee mug was a breeze and I used foam squares to attach the coffee to the label.

I selected a blue background for the label in order to highlight the coffee.  The label is from Twinkle Toes (Dance Team).  I also cut a label from lightweight cardstock and adhered to the blue label to add some dimension.  To further highlight the featured cut, I added some copper-colored brads in the corner of the frame.  The banner behind the label is from B is for Boys (once again I used Cricut Craft Room to remove the "slits" in the cut).

I like to use a variety of prints and colors to add interest and depth.  I printed the sentiment and trimmed it by hand.  The sentiment is also attached to a small piece of lightweight chipboard.

And there you have it, a smiling cup of Irish coffee without a bow or glitter accent in sight.


Tuesday, February 12, 2013

Valentine Card - I Hope You See


 Hi everyone, Maria here from Stamp, Cut, Create! Today I'm sharing another Valentine I made along with a mini tutorial on using UTEE (Ultra Thick Embossing Enamel). My card was inspired by an Inkadinkado stamp that resembled an eye chart. I don't have the stamp, but instead created the image using Word and then printing it out. The red frame is from the Art Philosophy cartridge and I used the Gypsy to tweek the size, adjusting the height and width so it would just fit around the printed image. I then added some doodling with a white Gelly Roll pen.
The glasses are from the Forever Young cartridge. I wanted them to look like shiny plastic frames, and that's where the UTEE comes in. Like any embossing powder, the first step is use a medium that will make it stick to the surface you are heat embossing. For this, I use Versamark. When I'm covering an entire image, I simply place it directly on the pad and tamp it down to completely coat it with the Versamark.
This is what the piece should look like with a good, wet covering of the Versamark.
The next step is to coat the piece with the UTEE. I store my UTEE along with a plastic spoon in a plastic container with a lid. (Not my original idea, but a good one!) I hold the piece with tweezers over the container and sprinkle the UTEE on it until it's completely covered.
 Then I tap the piece until all the excess UTEE falls off. There will be a small space where the tweezers were, but you can simply dip that corner in the tub and again tap off the excess.
The next step is to use the heat gun to melt the UTEE. I have a ZAP! by American Crafts and so far have been very happy with it. Start applying the heat and in a few seconds you will see the UTEE begin to melt, keep moving the heat source along the entire piece until it is all melted. I use long tweezers for this step, because it does get hot and I've burned my fingers on more than one occasion! Don't keep the heat on too long or the UTEE will turn white.
After the first coat your image will sometimes look bumpy like this. Not to worry though, simply repeat the process of  Versamark, UTEE, then heat and it should come out like this:
Doesn't that look like a plastic eye glass frame? I think so! You can actually continue to add coats of UTEE until the piece is your desired thickness. Another nice thing, if you end up with a blemish on it, you can simply re-apply the heat and melt it out.
Here are the completed glasses with all the layers put together. I  added some bling with Swarovski heat set crystals and adhered it to the card with foam tape.
The heart paper is from SEI's With All My Heart Collection. It's mounted on a slightly larger piece of Hollyhock paper from CTMH. I machine stitched the edges with a silver metallic thread by Sulky. Finally, I added some adhesive rhinestones to the bottom of the card.
Thanks again for stopping by today. I hope you enjoyed the card and the mini tutorial. I also hope you all have a very happy Valentine's Day!
Maria

Monday, February 11, 2013

A Quick Valentine's Note and Gift

Hey everyone! It's Angie from AngiesPaperPassion with a couple of quick projects for those last minute Valentine's Day gifts. The first one is a simple note card:


I cut the cardstock at 3x6 to make this into a 3x3 card and added a 3x3 piece of patterned paper to the front. The scalloped border is from my 'old faithful' cart - Plantin Schoolbook! Even with all of the newer carts around this one still is a wonderful cart with so many great images. I cut out about 10 borders in cardstock at 0.5". I also used Accent Essentials to cut out the heart in glitter paper at 2.25". After inking the edges of the scallops, I adhered them to the card by staggering the borders, added a piece of ribbon with glue dots, and the heart with small pop dots. Once finished I decided that it needed one more thing so I punched out a tag shape and stamped a Valentine's sentiment on it and adhered it to the heart with a tiny red brad. Then I was satisfied that it was finally finished!

Next is a Tag Treat Holder:

Again, I used Plantin Schoolbook. This image is on page 71 (shift/Italic). It's one of those images that I often don't pay attention to and skip over but it makes a cute little treat holder by scoring it in the middle and folding in half. It was cut at 8" with the Fit to Length feature turned on with my Expression and scored at 3.75" and again at 4.5". I added two little hearts cut with the shift/Tall Ball feature (found on the same page) at 2.5", adhered them on to the tag, and tied it together with some twine. This would be great to give to someone with a piece of chocolate inside (think Ghirardelli chocolate squares! Yum!)

I think I will put both of these little gifts into this gift bag that was made with Plantin Schoolbook (see, I told you it was still a great cart!):

Whatever you give (and receive) this Thursday, I hope that all of you have a sweet and happy Valentine's Day! Thanks for visiting and until next time, Happy Crafting!
Angela

Info and Supplies Used
Designed By: Angela Cromwell
Project Type: Gifts
Project Theme: Valentine's
Cricut Cartridges: Plantin Schoolbook, Accent Essentials
Cricut Machines: Expression